Oh my goodness, friends, you are in for a treat! Today, I’m absolutely bursting to share my go-to recipe for the most perfect, cloud-like Angel Food Cake you’ll ever bake. Seriously, this isn’t just *any* cake; it’s a fluffy, ethereal dream that practically floats off the plate! I remember the first time I nailed this – it was for my sister’s birthday, and everyone was just in awe of how light and delicate it was, especially knowing it’s famously fat-free. It’s such a classic, and once you try my method, you’ll see why it’s a showstopper every single time. Get ready to fall in love with baking this beauty!
Why You’ll Love This Angel Food Cake
Trust me, this isn’t just another recipe; it’s a game-changer! You’ll absolutely adore this Angel Food Cake because:
- It’s incredibly light and airy – like eating a sweet cloud!
- The delicate vanilla and almond flavors are just divine.
- It’s naturally fat-free, so you can indulge without guilt.
- Perfect for any occasion, from a casual brunch to a fancy dinner party.
- It’s surprisingly simple to make once you know the tricks!
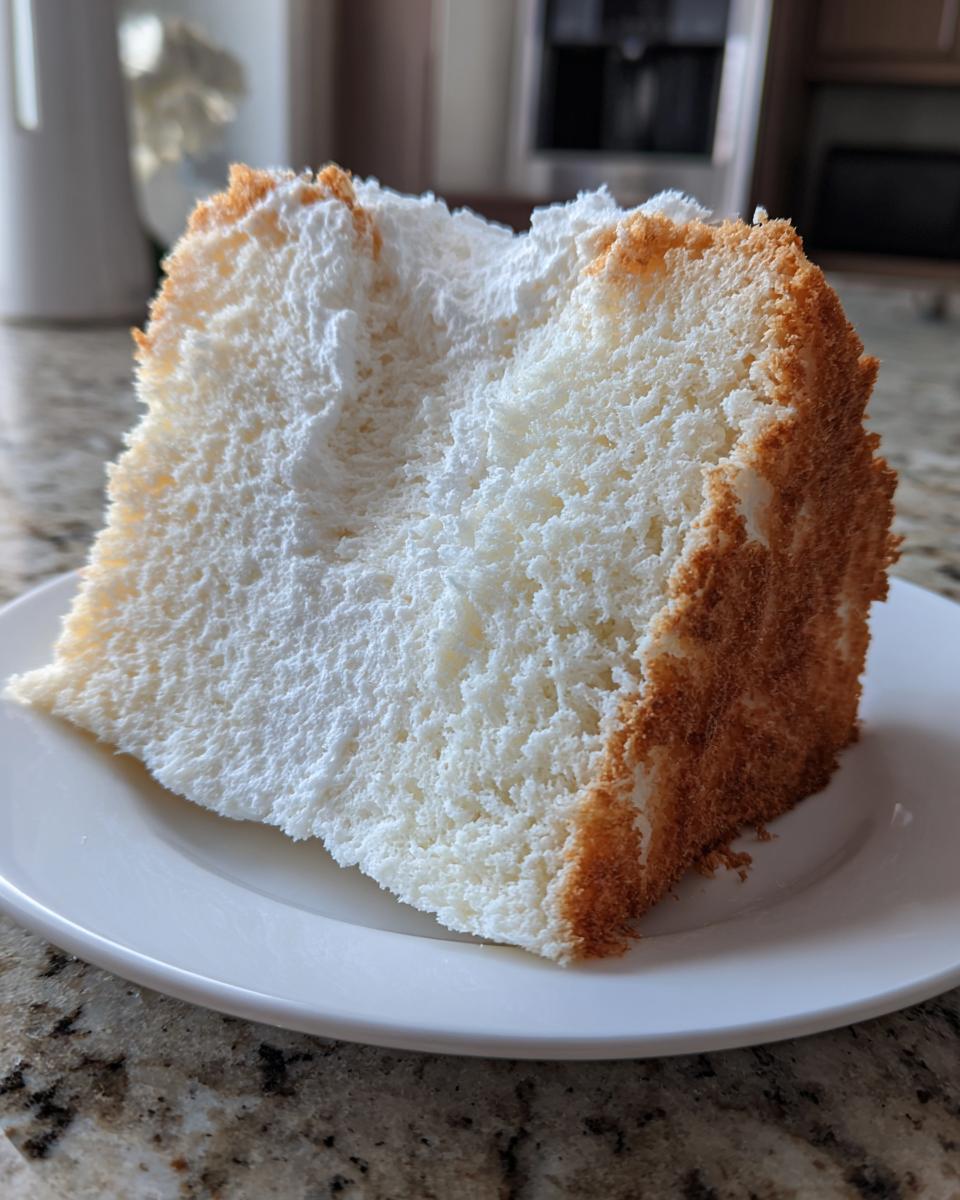
The Heavenly Texture of Angel Food Cake
Oh, the texture! That’s the real star here. This Angel Food Cake boasts an unbelievably light, delicate, and airy crumb. It practically melts in your mouth, leaving behind just the subtle sweetness and fragrant vanilla. It’s a truly unique experience, unlike any other cake, and it’s what makes this recipe so utterly irresistible.
Essential Ingredients for Your Angel Food Cake
Alright, let’s talk ingredients! For this glorious Angel Food Cake, we’re not using anything fancy, but *how* you prepare them makes all the difference. You’ll need:
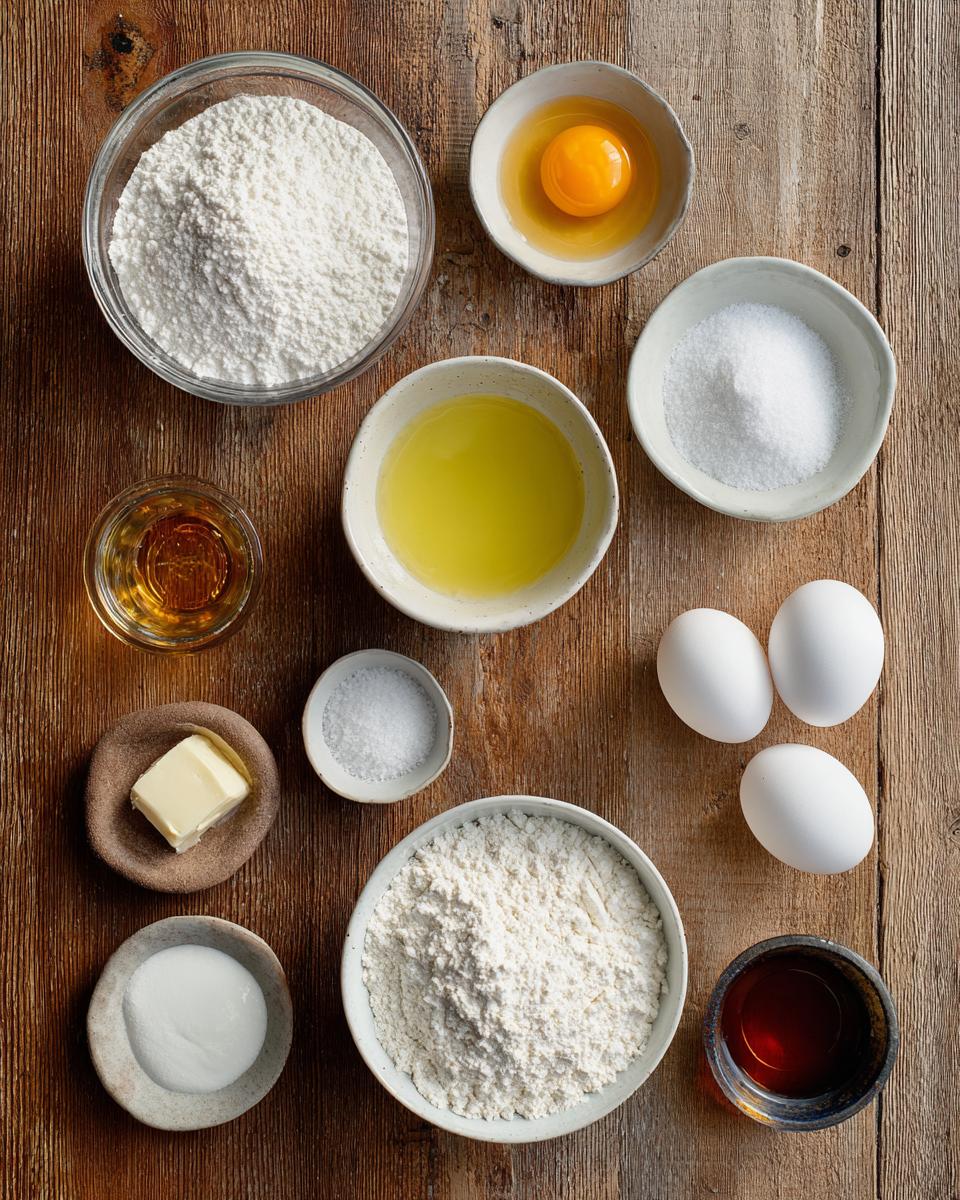
- 1 1/2 cups granulated sugar, divided: Yes, divided! We’re using some of it with the flour and then slowly adding the rest to our egg whites.
- 1 cup cake flour, sifted: And I mean *sifted*! Don’t skip this. It’s crucial for that airy texture. If you only have all-purpose, you can make your own cake flour substitute, but for the best results, get proper cake flour.
- 12 large egg whites, at room temperature: This is non-negotiable, folks! Room temp egg whites whip up so much better.
- 1 1/2 teaspoons cream of tartar: Our secret weapon for stable peaks!
- 1 teaspoon vanilla extract: Go for a good quality one; it really shines here.
- 1/2 teaspoon almond extract (optional): I love the subtle hint it adds, but if you’re not an almond fan, no worries, just leave it out.
- 1/4 teaspoon salt: Balances all that sweetness beautifully.
See? Simple stuff, but when combined just right, magic happens!
Key Components for a Flawless Angel Food Cake
So, a couple of these ingredients are truly MVP status for our Angel Food Cake. First, that cream of tartar? It’s not just for show! It helps stabilize the egg whites, giving them strength and volume so they can hold all that air we’re whipping in. This means a taller, more stable cake that won’t fall flat. And those room temperature egg whites? Seriously, don’t rush it. Cold egg whites are stubborn and won’t whip up as light and voluminous. Letting them sit out for about 30 minutes before you start makes all the difference in achieving that heavenly, cloud-like texture!
Step-by-Step Instructions for Making Angel Food Cake
Okay, deep breath! Making an Angel Food Cake might seem a little intimidating, but I promise if you follow these steps, you’ll be a pro in no time. We’re going to build this beauty layer by layer, so pay close attention, and don’t rush any of the stages. Precision is key here, but it’s totally doable!
- Get that oven ready! First things first, preheat your oven to a steady 350 degrees F (175 degrees C). This part is crucial – a consistent temperature is an angel food cake’s best friend. And please, please, *do not* grease your 10-inch tube pan. We’ll talk more about why in a sec, but trust me on this one!
- Prep your dry ingredients: Grab a medium bowl and whisk together 3/4 cup of your granulated sugar with that lovely sifted cake flour. Just a quick whisk to combine, then set it aside. This mix is going to gently fold into our egg whites later.
- Whip those whites! Now for the magic! In a really large, clean bowl (and I mean *really* clean, no grease allowed!), pour in your room temperature egg whites. Using an electric mixer, start beating them on medium speed until they get nice and foamy. See those little bubbles? That’s what we want!
- Add the stabilizers: At this foamy stage, toss in the cream of tartar and the salt. Keep beating until you see soft peaks forming. This means when you lift the beaters, the peaks will hold their shape for a moment but then gently flop over.
- Sweeten them up: Now, gradually, and I mean *gradually*, add the *remaining* 3/4 cup of granulated sugar, about a tablespoon at a time. Keep that mixer going! You’re looking for stiff, glossy peaks. When you lift the beaters, those peaks should stand tall and proud, like little snowy mountains. Beat in the vanilla extract and almond extract (if you’re using it) right at the end.
- Fold in the flour: This is where we get gentle. Take your flour mixture and gently fold it into the egg white mixture, about 1/4 cup at a time. Use a rubber spatula and a light hand. You want to combine it *just* until there are no more streaks of flour. Don’t overmix, or you’ll deflate all that precious air!
- Into the pan: Carefully pour your beautiful batter into the ungreased tube pan. Use your spatula to gently smooth the top.
- Bake it up! Pop it into your preheated oven for 35 to 40 minutes. You’ll know it’s done when the top springs back lightly when you touch it, and it’s a lovely golden brown. Resist the urge to open the oven door during baking – seriously, don’t do it!
- The critical cool-down: As soon as it comes out of the oven, immediately invert the pan. If your pan has little feet, use those! If not, find the neck of a sturdy bottle (like a glass soda bottle) and balance the pan on it. This lets the cake cool upside down, preventing it from collapsing. Let it cool *completely* – about 1 1/2 to 2 hours. Patience, my friend!
- Release the beauty: Once it’s totally cool, run a thin knife carefully around the edges of the pan and the center tube to release your show-stopping Angel Food Cake. Viola!
Preparing Your Pan for Angel Food Cake Success
This is one of those “trust the process” moments for Angel Food Cake! You absolutely, positively must *not* grease your tube pan. I know, it feels wrong, right? But the batter needs to cling to the sides of the pan as it rises. If it’s greased, the batter can’t climb, and your beautiful cake will struggle to get that signature towering height and airy texture. So, clean, dry, and ungreased is the way to go!
Whipping Egg Whites for the Lightest Angel Food Cake
Okay, this is where the magic happens for your voluminous Angel Food Cake! You want those egg whites to be at room temperature because they whip up so much better and hold more air. Start beating them until they’re foamy, then add the cream of tartar and salt – these are your secret weapons for stability! Keep beating, slowly adding the sugar a tablespoon at a time, until you get those gorgeous, stiff, glossy peaks. When you lift your beaters, the peaks should stand straight up! This ensures your cake will be unbelievably light and airy.
Baking and Cooling Your Angel Food Cake
Baking your Angel Food Cake is all about even heat and patience. Pop it into that preheated 350°F oven for about 35-40 minutes. Don’t peek! Opening the oven door too early can cause it to collapse. You’ll know it’s done when it’s golden brown and springs back when you gently touch the top. Now, for the most crucial step: immediately invert the pan! Seriously, flip it upside down on its feet or a bottle neck. This prevents the delicate structure from deflating as it cools, giving you that perfectly tall and airy cake. Let it cool completely, maybe an hour and a half to two hours, before you even think about releasing it!
Tips for the Best Angel Food Cake
Alright, my fellow bakers, here are my absolute best tips to make sure your Angel Food Cake turns out perfectly every single time! First off, don’t skimp on sifting that cake flour. It introduces air and ensures a super-fine texture, which is key for a light cake. Also, resist the urge to peek during baking! Opening the oven door lets in cold air, which can cause your beautiful cake to fall. Trust your oven and the timing. And remember, that upside-down cooling isn’t just a quirky step; it’s essential for structural integrity. Follow these, and you’ll be a true angel food cake master!
Common Pitfalls to Avoid with Angel Food Cake
Listen, we’ve all been there! The biggest no-nos for Angel Food Cake are greasing the pan (seriously, don’t!), overmixing the batter once the flour is added (it deflates those precious egg whites!), and opening the oven door too soon. Also, make sure your egg whites are at room temperature and your mixing bowl is squeaky clean – any grease can prevent those whites from whipping up properly!
Angel Food Cake Serving Suggestions
Once you’ve got your gorgeous, cloud-like Angel Food Cake, the fun doesn’t stop there! My absolute favorite way to serve it is simply with a generous dusting of powdered sugar – it just looks so elegant. But if you’re feeling a little extra, fresh berries are a dream! Think sliced strawberries, raspberries, or a mix of summer fruits. A light berry coulis or a simple lemon curd also work beautifully. For a richer touch, a dollop of whipped cream is always a winner. It’s so versatile, you really can’t go wrong!
Storing and Reheating Your Angel Food Cake
So, you’ve got some glorious leftover Angel Food Cake? Lucky you! To keep it super fresh and airy, store it tightly wrapped in plastic wrap or in an airtight container at room temperature. It’ll stay wonderful for about 2-3 days. Honestly, I rarely bother reheating it because its delicate texture is best enjoyed at room temperature. But if you really want to warm it slightly, a quick 10-15 seconds in the microwave can do the trick, just be careful not to overdo it!
Frequently Asked Questions About Angel Food Cake
Okay, I know you might have a few burning questions about this heavenly Angel Food Cake, especially if it’s your first time or if you’ve had a less-than-perfect experience before. Don’t worry, I’ve got your back! Here are some of the most common questions I get asked about making this delicate dessert.
Can I Make Angel Food Cake Ahead of Time?
Absolutely! That’s one of the best things about Angel Food Cake. You can bake it a day or two in advance. Once it’s completely cooled (and I mean *completely*!), wrap it tightly in plastic wrap or store it in an airtight container at room temperature. It actually tastes even better the next day as the flavors meld!
Why Did My Angel Food Cake Fall?
Oh, the dreaded fallen Angel Food Cake! There are a few culprits here. The most common reasons are opening the oven door too early (letting in cold air), not cooling it upside down (which helps set the structure), or overmixing the batter after adding the flour (which deflates those precious egg whites). Also, make sure your pan wasn’t greased – the batter needs to cling to the sides to climb high!
Estimated Angel Food Cake Nutritional Information
Just a heads-up for those of you keeping an eye on things! A single serving of this delightful Angel Food Cake (that’s about one twelfth of the whole cake) is an estimate, but here’s what you’re generally looking at: around 150 calories, with 0g fat (yay!), about 35g carbohydrates (mostly from sugar), and a nice 5g of protein. It’s a sweet treat that’s surprisingly light and cholesterol-free!
Your Feedback on This Angel Food Cake
Alright, my friends, now it’s YOUR turn! I’d absolutely love to hear how your Angel Food Cake turns out. Did you love it? Did you try a fun topping? Please, please, leave a comment below and let me know! And if you share your beautiful creation on social media, tag me! I can’t wait to see your angelic masterpieces!
PrintHomemade Angel Food Cake Recipe
A light and airy cake perfect for any occasion. This classic dessert is fat-free and has a delicate texture.
- Prep Time: 20 minutes
- Cook Time: 40 minutes
- Total Time: 2 hours 40 minutes
- Yield: 12 servings 1x
- Category: Dessert
- Method: Baking
- Cuisine: American
- Diet: Low Fat
Ingredients
- 1 1/2 cups granulated sugar, divided
- 1 cup cake flour, sifted
- 12 large egg whites, at room temperature
- 1 1/2 teaspoons cream of tartar
- 1 teaspoon vanilla extract
- 1/2 teaspoon almond extract (optional)
- 1/4 teaspoon salt
Instructions
- Preheat your oven to 350 degrees F (175 degrees C). Do not grease a 10-inch tube pan.
- In a medium bowl, whisk together 3/4 cup of the granulated sugar and the sifted cake flour. Set aside.
- In a large bowl, using an electric mixer, beat the egg whites on medium speed until foamy. Add the cream of tartar and salt; continue beating until soft peaks form.
- Gradually add the remaining 3/4 cup of granulated sugar, 1 tablespoon at a time, beating until stiff, glossy peaks form. Beat in the vanilla extract and almond extract (if using).
- Gently fold the flour mixture into the egg white mixture, about 1/4 cup at a time, until just combined. Do not overmix.
- Pour the batter into the ungreased tube pan and smooth the top.
- Bake for 35 to 40 minutes, or until the top springs back when lightly touched and the cake is golden brown.
- Invert the pan immediately onto the neck of a bottle or onto the pan’s feet (if it has them) and let cool completely, about 1 1/2 to 2 hours.
- Once cooled, run a thin knife around the edges of the pan to release the cake.
Notes
- Ensure egg whites are at room temperature for maximum volume.
- Do not grease the pan; the batter needs to cling to the sides to rise properly.
- Sifting the cake flour helps create a lighter cake.
- Avoid opening the oven door during baking to prevent the cake from falling.
Nutrition
- Serving Size: 1 slice
- Calories: 150
- Sugar: 25g
- Sodium: 100mg
- Fat: 0g
- Saturated Fat: 0g
- Unsaturated Fat: 0g
- Trans Fat: 0g
- Carbohydrates: 35g
- Fiber: 0g
- Protein: 5g
- Cholesterol: 0mg


