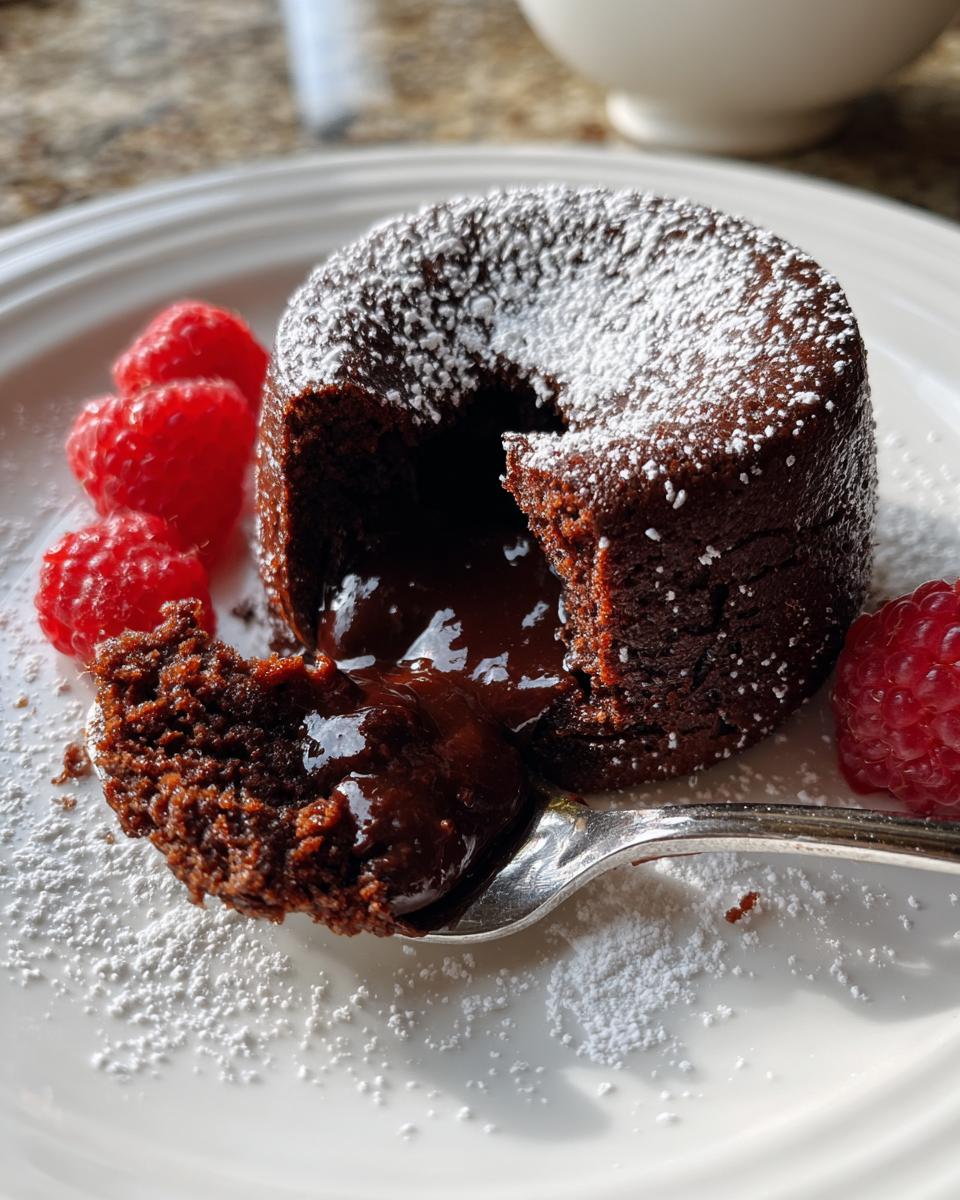
Oh my goodness, get ready to have your mind blown! If there’s one dessert that consistently makes people gasp with delight, it’s a chocolate lava cake. I still remember the first time I made these – I was so nervous, convinced I’d end up with either a dry chocolate puck or a soupy mess. But when I inverted that first ramekin and a river of warm, molten chocolate oozed out? Pure magic! My kitchen instantly became the most popular spot on the block.
These aren’t just any chocolate lava cakes, though. This recipe is my go-to for a reason! It’s ridiculously quick to whip up, uses super basic ingredients you probably already have, and the best part? That incredible, gooey, molten chocolate center is practically guaranteed every single time. Seriously, you can even make the batter ahead of time, which is a lifesaver for dinner parties. Trust me, once you master this, you’ll be making excuses just to bake them!
Why You’ll Love These Chocolate Lava Cakes
Get ready to fall head over heels for these chocolate lava cakes! Seriously, they’re not just a dessert; they’re an experience. Here’s why you’ll be making them again and again:
- Crazy Quick Prep: We’re talking minutes, not hours, to get these beauties in the oven. Perfect for those last-minute cravings!
- Super Easy Steps: Don’t let the fancy name fool you; this recipe is straightforward and totally doable, even for beginner bakers.
- Impressive Presentation: Everyone will think you slaved away for hours when they see that gorgeous molten center, but shhh, it’ll be our secret!
- Perfect for Any Occasion: Whether it’s a cozy night in, a romantic dinner, or a small celebration, these cakes fit right in.
- Irresistible Molten Chocolate Core: The absolute best part! That warm, gooey, chocolatey river flowing out is pure bliss.
Essential Equipment for Perfect Chocolate Lava Cakes
You don’t need a fancy chef’s kitchen to whip up these incredible chocolate lava cakes, but having the right tools definitely makes life easier and helps ensure that perfect molten center every time. Here’s what I grab when I’m ready to get my lava cake on:
- Ramekins: These are your absolute must-haves! I use four 6-ounce ceramic ramekins. They’re perfect for individual portions and getting that classic lava cake shape.
- Mixing Bowls: You’ll want at least two – one for melting your chocolate and butter, and another for whisking everything together.
- Whisk: A good old-fashioned whisk is essential for getting everything smooth and lump-free.
- Baking Sheet: Pop your ramekins on a baking sheet before they go into the oven. It makes transferring them in and out super easy and catches any potential drips.
Ingredients for Delicious Chocolate Lava Cakes
Alright, let’s talk ingredients! While these chocolate lava cakes are super simple, using good quality stuff really does make a difference, especially with the chocolate. Think of it like this: if you want a fantastic chocolate cake, you need fantastic chocolate, right? Here’s what you’ll need to gather:

- 1/2 cup (113g) unsalted butter, melted: Butter is key for richness and that lovely texture. Unsalted gives you control over the saltiness.
- 4 ounces (113g) good quality semi-sweet or bittersweet chocolate, chopped: This is HUGE! Don’t skimp here. A good chocolate melts smoothly and tastes incredible, which directly impacts your molten center. I usually go for a bar of baking chocolate rather than chocolate chips for a better melt.
- 1 cup (198g) powdered sugar: This dissolves beautifully, giving us a smooth batter without a grainy texture.
- 2 large whole eggs: They bind everything together and add richness.
- 2 large egg yolks: Extra yolks mean extra richness and help create that decadent, custardy molten center. Trust me on this one!
- 1 teaspoon alcohol-free vanilla extract: A little vanilla really enhances the chocolate flavor.
- 1/2 cup (63g) all-purpose flour: Just enough to give the cake structure, but not so much that it becomes bready.
- Pinch of salt: Don’t skip this! Salt balances the sweetness and makes the chocolate taste even more chocolatey.
- Optional garnishes: Fresh raspberries or strawberries for a pop of color and tartness, and a dusting of powdered sugar for that fancy touch!
How to Make Chocolate Lava Cakes: Step-by-Step Guide
Okay, let’s get down to the nitty-gritty of making these heavenly chocolate lava cakes! This is where the magic happens, and I promise, it’s easier than you think. Just follow these steps, and you’ll be enjoying warm, gooey chocolate goodness in no time. Precision here is your friend, especially with baking times, so keep an eye on your oven!
Preparing Your Ramekins for Chocolate Lava Cakes
First things first, let’s get those ramekins ready. You’ll want to generously grease the inside of four 6-ounce ramekins – I use a little butter or cooking spray. Then, give them a light dusting of flour, tapping out any excess. This little trick is going to make sure your beautiful cakes slide right out. Pop them onto a baking sheet; this makes them super easy to move in and out of the oven.
Melting the Chocolate and Butter for Chocolate Lava Cakes
Now for the good stuff! Grab your good quality chopped chocolate and the melted butter. You can melt them together in a microwave-safe bowl. Heat in 30-second bursts, stirring really well after each burst, until it’s super smooth and glossy. No lumps allowed! Alternatively, a double boiler works perfectly too – just make sure no water gets into your chocolate mixture.
Combining Wet and Dry Ingredients for Chocolate Lava Cakes
Once your chocolate and butter mixture is smooth, whisk in that powdered sugar until it’s completely incorporated. Next, beat in the two whole eggs, followed by the two extra egg yolks, and the alcohol-free vanilla extract. Whisk it all until it’s just combined and looks lovely and uniform. Finally, gently stir in the flour and that tiny pinch of salt. This is important: mix *just* until the flour disappears. Overmixing here means a tougher cake, and we want tender, molten perfection!
Baking Your Chocolate Lava Cakes to Perfection
Divide your beautiful batter evenly among those prepared ramekins. Now, slide that baking sheet into your preheated oven at 425°F (218°C). Bake for 12-14 minutes. This timing is CRUCIAL! You’re looking for edges that are set and firm, but the very center should still look a bit jiggly when you gently nudge the ramekin. If it’s not jiggly, it’s probably overbaked, and you might lose that lava flow. Carefully take them out, let them sit for just about a minute, then invert each cake onto a dessert plate. Lift the ramekin slowly, and prepare for gasps of delight!
Tips for Success with Your Chocolate Lava Cakes
Okay, you’ve got the steps down, but let me share a few of my personal tricks to make sure your chocolate lava cakes are absolutely show-stopping every single time. First, and I can’t stress this enough, use good quality chocolate! It seriously makes all the difference in flavor and that glorious molten texture. Don’t overbake them; that’s the number one rule! Keep an eye on those edges – set but jiggly in the middle is what you’re aiming for. Oh, and these beauties are best served warm, straight from the oven. If you’re planning ahead, you can totally make the batter up to a day in advance, just cover it and pop it in the fridge. Let it come to room temp before baking, or add a couple of extra minutes to the bake time. Easy peasy!
Serving Suggestions for Chocolate Lava Cakes
You’ve baked these incredible chocolate lava cakes, now let’s make them look and taste even more amazing! My absolute favorite way to serve them is with a generous dusting of powdered sugar – it just makes them look so elegant, right? For a pop of color and a lovely tart contrast, fresh raspberries or sliced strawberries are simply divine. And if you’re feeling extra indulgent (which, let’s be honest, you should be!), a scoop of really good vanilla bean ice cream or a dollop of fresh whipped cream melting slowly into that warm chocolate lava? Pure heaven, I tell ya!
Common Questions About Chocolate Lava Cakes
Can I prepare Chocolate Lava Cakes ahead of time?
Absolutely, yes! This is one of my favorite things about these chocolate lava cakes. You can whip up the batter a day, sometimes even two, in advance. Just cover your bowl or ramekins tightly with plastic wrap and pop them in the fridge. When you’re ready to bake, let the batter come closer to room temperature on the counter for about 30 minutes. Or, if you’re in a hurry and bake them straight from the fridge, just add an extra 2-4 minutes to the baking time. It’s a total lifesaver for dinner parties!
What kind of chocolate is best for Chocolate Lava Cakes?
Okay, this is super important for a truly delicious chocolate lava cake! I always recommend using a good quality semi-sweet or bittersweet baking chocolate. Think chocolate bars you’d find in the baking aisle, not chocolate chips. Chocolate chips often have stabilizers that prevent them from melting as smoothly, which is what we want for that glorious molten center. The better the chocolate, the richer and more decadent your lava cake will taste. So, treat yourself to a nice bar!
How do I know when my Chocolate Lava Cakes are perfectly baked?
Ah, the million-dollar question! Knowing when your chocolate lava cakes are done is key to that perfect molten center. You’re looking for the edges of the cake to be set and firm, but the very center should still look a little jiggly when you gently shake the ramekin. It shouldn’t be liquidy, but definitely not firm either. If it’s not jiggly, it’s likely overbaked, and you might miss out on that beautiful lava flow. Trust your eyes and that gentle jiggle!
Estimated Nutritional Information for Chocolate Lava Cakes
Okay, so we’ve talked about how utterly delicious these chocolate lava cakes are, but I know some of you are curious about what’s actually in them! It’s good to be informed, right? Based on the ingredients in this recipe, here’s an estimated peek at the nutritional values per serving. Now, keep in mind, these are just estimates! Things like the exact brand of chocolate you use, how much butter you *really* put in (oops!), and even the size of your eggs can make small differences. But this should give you a good idea:
- Serving Size: 1 cake
- Calories: Approximately 550
- Sugar: Around 55g
- Sodium: About 70mg
- Fat: Roughly 35g
- Saturated Fat: Close to 20g
- Unsaturated Fat: Around 10g
- Trans Fat: 0g (phew!)
- Carbohydrates: About 60g
- Fiber: Roughly 3g
- Protein: Around 8g
- Cholesterol: Approximately 250mg
See? It’s a rich, decadent treat, perfect for when you want to indulge a little. And honestly, for that molten chocolate goodness, it’s totally worth it in my book!
Share Your Chocolate Lava Cakes Experience!
Alright, you’ve got the recipe, you’ve got the tips, now it’s your turn to unleash your inner pastry chef! I absolutely LOVE hearing from you all. So, once you’ve whipped up these incredible chocolate lava cakes, please come back here and leave a comment. Tell me how it went, what you loved, and any fun tweaks you made! Don’t forget to rate the recipe, and if you snap a pic, share it on social media and tag me! Can’t wait to see your molten masterpieces!
PrintChocolate Lava Cakes
These chocolate lava cakes have a molten chocolate center. They are quick to make and use basic ingredients. You can prepare them ahead of time for convenience.
- Prep Time: 15 minutes
- Cook Time: 14 minutes
- Total Time: 29 minutes
- Yield: 4 servings 1x
- Category: Dessert
- Method: Baking
- Cuisine: French
- Diet: Vegetarian
Ingredients
- 1/2 cup (113g) unsalted butter, melted
- 4 ounces (113g) good quality semi-sweet or bittersweet chocolate, chopped
- 1 cup (198g) powdered sugar
- 2 large whole eggs
- 2 large egg yolks
- 1 teaspoon vanilla extract
- 1/2 cup (63g) all-purpose flour
- Pinch of salt
- Optional: fresh raspberries or strawberries for garnish
- Optional: powdered sugar for dusting
Instructions
- Preheat oven to 425°F (218°C). Grease and lightly flour four 6-ounce ramekins. Place them on a baking sheet.
- Melt butter and chopped chocolate together in a microwave-safe bowl in 30-second intervals, stirring until smooth. Alternatively, use a double boiler.
- Whisk powdered sugar into the chocolate mixture until smooth.
- Whisk in whole eggs, egg yolks, and vanilla extract until combined.
- Stir in flour and salt until just combined. Do not overmix.
- Divide the batter evenly among the prepared ramekins.
- Bake for 12-14 minutes, or until the edges are set and the center is still jiggly.
- Carefully invert each cake onto a dessert plate. Let them sit for a minute before lifting the ramekin.
- Serve immediately, garnished with fresh berries and a dusting of powdered sugar, if desired.
Notes
- For best results, use good quality chocolate.
- Do not overbake, as this will prevent the molten center from forming.
- You can prepare the batter up to 24 hours in advance. Cover and refrigerate. Bring to room temperature before baking, or add a few extra minutes to the baking time.
- These cakes are best served warm.
Nutrition
- Serving Size: 1 cake
- Calories: 550
- Sugar: 55g
- Sodium: 70mg
- Fat: 35g
- Saturated Fat: 20g
- Unsaturated Fat: 10g
- Trans Fat: 0g
- Carbohydrates: 60g
- Fiber: 3g
- Protein: 8g
- Cholesterol: 250mg


