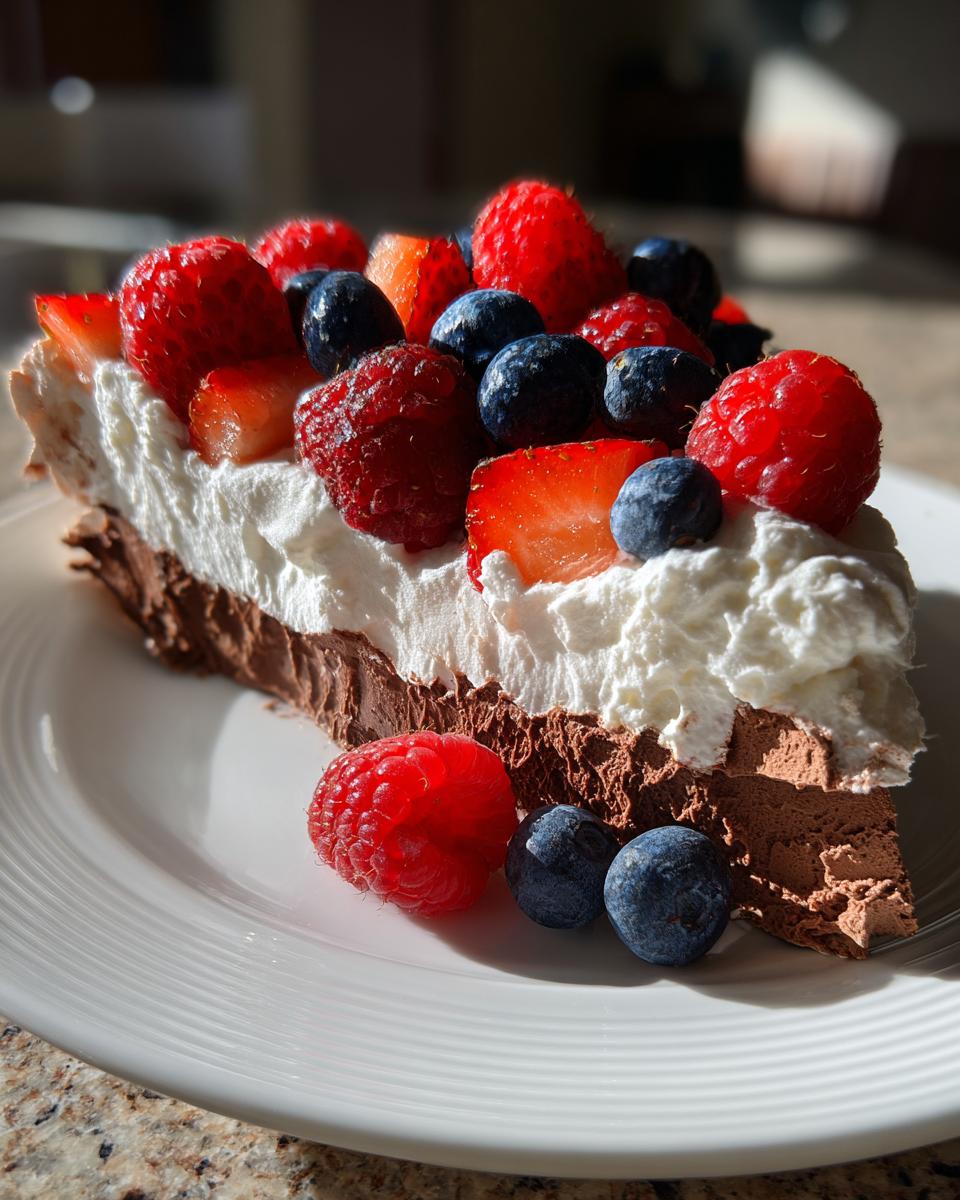
Oh my goodness, get ready for a dessert that’s going to make your taste buds sing and your guests gasp with delight! We’re talking Chocolate Pavlova today, and trust me, it’s pure magic. Imagine this: a crisp, delicate shell that shatters with the lightest touch, giving way to a marshmallowy, chewy center, all infused with rich chocolate. Then, pile on some fluffy whipped cream and a cascade of vibrant, fresh berries. It’s elegant, it’s dramatic, and it’s surprisingly simple to make!
I still remember the first time I tried pavlova. It was at a fancy little cafe, and I was convinced it was some super complicated chef secret. But when I got home, curiosity got the better of me, and I started experimenting. Turns out, it’s not nearly as intimidating as it looks! Plus, for all my gluten-free friends out there, this beauty is naturally free of gluten, so everyone can enjoy a slice.
As a home baker who loves to make impressive treats without all the fuss, I’ve really perfected this recipe. I’m going to walk you through every step, sharing all my little tips and tricks to make sure your Chocolate Pavlova turns out absolutely perfect, every single time. Let’s get baking!
Why You’ll Love This Chocolate Pavlova
Okay, so why *this* Chocolate Pavlova? Because it’s not just a dessert; it’s an experience! You’re going to fall head over heels for how effortlessly elegant it is. It looks like you spent hours slaving away, but shhh, that’ll be our little secret. The contrast of textures – that crisp exterior and gooey, chewy inside – is just divine. And the chocolate? Oh, the chocolate takes it to a whole new level!
The Allure of Chocolate Pavlova
- Quick & Easy: Seriously, the hands-on time is minimal. Most of the magic happens in the oven!
- Flavor Explosion: Rich chocolate, sweet meringue, creamy topping, and tart berries? It’s a symphony for your taste buds.
- Naturally Gluten-Free: Yep, you heard that right! Everyone at your table can enjoy this delightful treat.
- Impressive Presentation: It’s a showstopper. Get ready for all the oohs and aahs when you bring this to the table!
Essential Equipment for Your Chocolate Pavlova
Alright, before we dive into the deliciousness, let’s talk tools! You don’t need a fancy chef’s kitchen for this, but having the right gear really does make the process smoother and more fun. Think of these as your trusty sidekicks in creating pavlova perfection.
Tools for Perfect Chocolate Pavlova
- Electric Mixer (Stand or Handheld): This is your MVP for whipping those egg whites into fluffy, glorious peaks. Trust me, trying to do this by hand is a workout you don’t want!
- Large Mixing Bowls: You’ll need a couple, especially one that’s super clean and dry for those egg whites.
- Baking Sheet: A sturdy one to hold your beautiful meringue.
- Parchment Paper: Non-negotiable! It prevents sticking and makes transferring your pavlova a breeze.
- Rubber Spatula: Gentle folding is key, and a good spatula is perfect for that.
- Measuring Cups and Spoons: For precision, because baking is a science, after all!
Ingredients for Decadent Chocolate Pavlova
Okay, let’s talk ingredients! This recipe uses a surprisingly short list of everyday items, but each one plays a super important role in creating that magical Chocolate Pavlova texture and flavor. Getting them just right, and having them ready before you start, is half the battle won. Trust me, you don’t want to be scrambling for sugar when your egg whites are at perfect peaks!
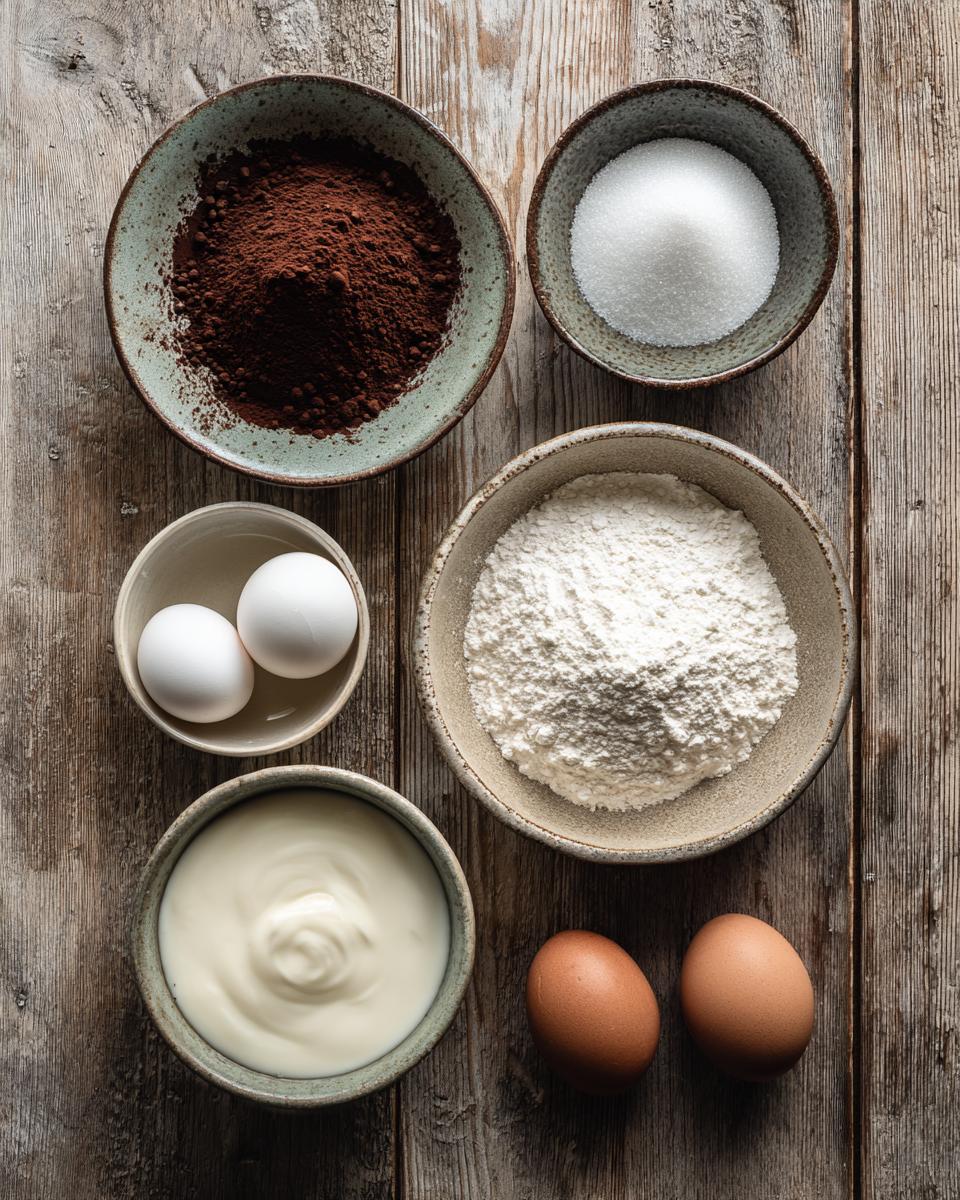
Gathering Your Chocolate Pavlova Ingredients
- 4 large egg whites, at room temperature: This is HUGE! Room temperature egg whites whip up so much better and give you that stable, voluminous meringue. Don’t skip this step!
- 1 cup (200g) granulated sugar: Our main sweetener and what gives the meringue its structure and shine.
- 1 tablespoon unsweetened cocoa powder, sifted: Sifting is key here, friends! We want a smooth, lump-free chocolate swirl, not powdery bits.
- 1 teaspoon cornstarch: This little secret ingredient helps create that famous chewy center.
- 1/2 teaspoon white vinegar: Don’t worry, you won’t taste it! The vinegar helps stabilize the egg whites and makes them extra strong.
- 1/2 teaspoon alcohol-free vanilla extract: For that lovely, warm vanilla note without any alcohol.
- 1/2 cup (120ml) heavy cream, chilled: Cold cream whips up best, so keep it in the fridge until you’re ready!
- 2 tablespoons powdered sugar: For sweetening that luscious whipped cream topping.
- 1/2 cup fresh berries (strawberries, raspberries, blueberries) for topping: This is where you can get creative! A mix of berries adds beautiful color and a lovely tartness to cut through the sweetness.
Crafting Your Chocolate Pavlova: Step-by-Step Guide
Alright, this is where the magic happens! Don’t be intimidated; making a Chocolate Pavlova is actually super fun and rewarding. We’re going to take it one step at a time, and I’ll share all my little secrets to get you that perfect, crisp-on-the-outside, chewy-on-the-inside masterpiece. Precision is your friend here, but don’t stress too much – baking should be enjoyable!
Preparing the Meringue for Chocolate Pavlova
First things first, let’s get that oven ready! You want to preheat your oven to a gentle 275°F (135°C). While it’s heating up, grab a baking sheet and line it with parchment paper. Now, here’s a neat trick: draw a 9-inch circle on the parchment paper. You can use a plate as a guide! This gives you a perfect template for your pavlova.
Now for the star of the show: the egg whites! Make sure your mixing bowl and beater attachments are squeaky clean and completely dry – any grease can ruin your meringue. Start beating those room-temperature egg whites with your electric mixer on medium speed. Watch them carefully; you’re looking for soft peaks, where they hold their shape but still flop over a little. Once you hit that, it’s time for the sugar!
Gradually, and I mean *gradually*, add the granulated sugar, about a tablespoon at a time, while the mixer is still running. This slow addition helps the sugar dissolve properly and creates a super stable meringue. Keep beating until you have beautiful, stiff, glossy peaks. When you lift the beater, the meringue should stand straight up, and if you rub a little between your fingers, you shouldn’t feel any grittiness from undissolved sugar. This usually takes a good 7-10 minutes, so be patient!
Finally, it’s time to add the chocolatey goodness and stabilizers! Gently fold in the sifted cocoa powder, cornstarch, white vinegar, and alcohol-free vanilla extract. You want to be delicate here – we’ve worked hard to get all that air into the egg whites, so don’t deflate it! Just a few gentle turns with your rubber spatula until everything is just combined and you see those beautiful chocolate streaks.
Baking and Cooling Your Chocolate Pavlova
Now, carefully spoon your gorgeous chocolate meringue onto the drawn circle on your parchment paper. Use the back of your spoon or spatula to create a lovely nest shape, building up the sides slightly and making a little well in the center. This well is where all that delicious cream and berries will go later!
Pop that baking sheet into your preheated oven and bake for 1 hour and 15 minutes. And here’s the absolute most important rule of pavlova: DO NOT open the oven door during baking! Seriously, resist the urge! Once the baking time is up, turn off the oven, but leave the pavlova inside. Prop the oven door ajar just a tiny bit (a wooden spoon works perfectly for this!) and let it cool completely in there for at least another hour. This slow cooling process is crucial for preventing cracks and getting that perfect crisp exterior and chewy interior. Again, no peeking!
Assembling Your Chocolate Pavlova
Once your pavlova is completely cool – and I mean *completely* cool, otherwise, your cream will melt – it’s time for the fun part: assembly! Grab your chilled heavy cream and powdered sugar. In a clean, dry bowl, beat them with your electric mixer until soft peaks form. You want it fluffy and light, not too stiff. Taste it – if you like it a little sweeter, add a tiny bit more powdered sugar!
Carefully, and I mean *carefully*, transfer your cooled pavlova to your prettiest serving plate. A large, flat spatula or two can help here. Spoon that gorgeous whipped cream into the center of your pavlova, filling up that well you created. Finally, arrange your fresh berries all over the cream. The vibrant colors against the chocolate and white are just stunning! Serve it right away and enjoy the applause!
Tips for a Flawless Chocolate Pavlova
Okay, you’ve got the steps down, but sometimes a few insider tips can make all the difference between a good chocolate pavlova and an absolutely *flawless* one! These are the little nuggets of wisdom I’ve picked up over countless batches, and they’ll help you get that perfect, show-stopping dessert every single time. Trust me, these small details really add up!
Secrets to Perfect Chocolate Pavlova
- Cleanliness is Next to Meringue-ness! No, seriously, this is probably the most important secret. Your mixing bowl and beaters MUST be spotlessly clean and completely grease-free. Even a tiny speck of oil can prevent your egg whites from whipping up properly. Give them a good wash and dry, or wipe with a little white vinegar before you start.
- Resist the Urge to Peek! I know, I know, it’s so tempting to open that oven door and check on your beautiful creation. But please, for the love of all things chewy and crisp, don’t! Rapid temperature changes are the enemy of pavlova and can cause it to crack or collapse. Let it do its thing, both during baking and especially during that slow, cool-down period.
- Serve It Fresh (Mostly!): While pavlova can hold up for a bit, it’s truly at its absolute best when served the day it’s made. That’s when the crisp shell and chewy interior are in their prime! If you need to prep ahead, make the meringue base, let it cool completely, and store it in an airtight container. Then, whip the cream and assemble just before serving.
Common Questions About Chocolate Pavlova
I get a lot of questions about Chocolate Pavlova, and I totally understand why! It can seem a little finicky, but once you know the answers to these common questions, you’ll be a pavlova pro. Let’s clear up some of those lingering doubts so you can bake with total confidence!
Can I Make Chocolate Pavlova Ahead of Time?
Yes, absolutely! This is one of the best things about making a chocolate pavlova for entertaining. You can bake the meringue base a day or even two days in advance. Just make sure it’s completely cooled, then store it in an airtight container at room temperature. Don’t add the cream or berries until just before serving, though. Otherwise, your beautiful crisp shell will get soggy, and we don’t want that!
Why Did My Chocolate Pavlova Crack?
Ah, the dreaded cracks! Don’t worry, a few cracks are totally normal and even part of the rustic charm of a homemade chocolate pavlova. The most common reasons for major cracking are opening the oven door too soon, or taking it out of the oven too quickly. Remember, extreme temperature changes are the enemy! Letting it cool slowly in the turned-off oven with the door ajar is your best defense against those big cracks. Also, sometimes a very humid day can contribute, but mostly it’s about that slow, gentle cool-down.
What Can I Substitute for Berries on Chocolate Pavlova?
Oh, the world is your oyster when it comes to toppings for your chocolate pavlova! While fresh berries are classic and delicious, feel free to get creative. Sliced peaches, kiwi, or even passion fruit pulp are fantastic. For a more decadent twist, try a sprinkling of chocolate shavings, a drizzle of caramel sauce, or some toasted nuts. My personal favorite alternative for a chocolate pavlova is sliced bananas with a little extra chocolate drizzle – pure indulgence!
Is Chocolate Pavlova Gluten-Free?
Yes, yes, a thousand times yes! This is one of the main reasons I love making chocolate pavlova. It’s naturally gluten-free, which means almost everyone can enjoy a slice without worry. It’s truly a fantastic dessert option for those with gluten sensitivities or allergies, and you don’t have to make any special substitutions. Just follow the recipe, and you’ve got a delicious gluten-free treat!
Storing and Reheating Chocolate Pavlova
Okay, so you’ve made this incredible chocolate pavlova, and miraculously, there are leftovers! (It happens, sometimes!) You’ll want to store it carefully to keep it as delicious as possible. Pavlova isn’t really a “reheat” kind of dessert; it’s all about that fresh texture, but we can definitely keep it enjoyable for a little longer.
Keeping Your Chocolate Pavlova Fresh
If you have any leftover chocolate pavlova that’s already assembled with cream and berries, the best way to store it is in an airtight container in the fridge. Now, a little warning: it will lose some of its crispness, especially where the cream and berries touch the meringue. It’ll still be super tasty, but that delicate crunch will soften. For unassembled pavlova bases, an airtight container at room temperature is best – away from humidity! It’ll stay crisp for a couple of days that way. Just assemble right before you want to dig in again!
Estimated Nutritional Information for Chocolate Pavlova
Okay, so while we’re indulging in this delicious chocolate pavlova, some of you might be wondering about the nutritional side of things. I totally get it! While this is definitely a treat, it’s good to have an idea of what’s in each serving. Remember, these values are estimates and can vary a bit depending on your exact ingredients and portion sizes, but it gives you a good ballpark figure!
Understanding Your Chocolate Pavlova’s Nutrition
Here’s a quick peek at the estimated nutritional information per serving for this chocolate pavlova. It’s a treat, so enjoy it in moderation!
- Calories: 250
- Sugar: 30g
- Sodium: 40mg
- Fat: 12g
- Saturated Fat: 7g
- Unsaturated Fat: 3g
- Trans Fat: 0g
- Carbohydrates: 35g
- Fiber: 1g
- Protein: 4g
- Cholesterol: 40mg
Share Your Chocolate Pavlova Creation
Alright, my fellow bakers, you’ve done it! You’ve made a stunning, decadent Chocolate Pavlova, and now it’s time to show it off! I absolutely *love* seeing what you create in your kitchens, so please don’t be shy!
Your Chocolate Pavlova Journey
I’m so excited for you to try this recipe! Once you’ve whipped up your masterpiece, come back here and leave a comment below. Tell me how it went, what berries you used, or any fun twists you added! Don’t forget to rate the recipe – it really helps others. And please, please, please share your amazing creations on social media! Tag me with #MyChocolatePavlovaJourney so I can ooh and aah over your beautiful work!
PrintChocolate Pavlova

Chocolate Pavlova is a delightful dessert with a crisp exterior, chewy interior, and a rich chocolate flavor. It is often topped with cream and fresh berries.
- Prep Time: 25 minutes
- Cook Time: 1 hour 15 minutes
- Total Time: 2 hours 40 minutes
- Yield: 8 servings 1x
- Category: Dessert
- Method: Baking
- Cuisine: European
- Diet: Gluten Free
Ingredients
- 4 large egg whites, at room temperature
- 1 cup (200g) granulated sugar
- 1 tablespoon unsweetened cocoa powder, sifted
- 1 teaspoon cornstarch
- 1/2 teaspoon white vinegar
- 1/2 teaspoon vanilla extract (alcohol-free)
- 1/2 cup (120ml) heavy cream, chilled
- 2 tablespoons powdered sugar
- 1/2 cup fresh berries (strawberries, raspberries, blueberries) for topping
Instructions
- Preheat oven to 275°F (135°C). Line a baking sheet with parchment paper and draw a 9-inch circle on it.
- In a clean, dry bowl, beat egg whites with an electric mixer until soft peaks form.
- Gradually add granulated sugar, one tablespoon at a time, beating until stiff, glossy peaks form and sugar is dissolved.
- Gently fold in sifted cocoa powder, cornstarch, vinegar, and vanilla extract.
- Spoon the meringue onto the drawn circle on the parchment paper, creating a well in the center for the topping.
- Bake for 1 hour and 15 minutes, then turn off the oven and leave the pavlova inside with the door ajar for another 1 hour to cool completely. Do not open the oven door during baking or cooling.
- Once completely cool, in a separate bowl, beat heavy cream and powdered sugar until soft peaks form.
- Carefully transfer the cooled pavlova to a serving plate. Spoon the whipped cream into the center of the pavlova.
- Arrange fresh berries on top of the whipped cream before serving.
Notes
- Ensure your bowl and beaters are completely clean and grease-free for best meringue results.
- Do not open the oven door during baking or cooling to prevent the pavlova from cracking or collapsing.
- Pavlova is best served the day it is made. Store any leftovers in an airtight container at room temperature for up to 2 days, though it may lose some crispness.
Nutrition
- Serving Size: 1 slice
- Calories: 250
- Sugar: 30g
- Sodium: 40mg
- Fat: 12g
- Saturated Fat: 7g
- Unsaturated Fat: 3g
- Trans Fat: 0g
- Carbohydrates: 35g
- Fiber: 1g
- Protein: 4g
- Cholesterol: 40mg


