Oh my goodness, you guys! There’s just something absolutely magical about biting into a perfectly crispy, sweet, and savory Coconut Shrimp. It’s like a little tropical vacation for your taste buds, right in your own kitchen! I swear, the first time I ever had really good coconut shrimp, I was at this tiny beachside shack on vacation, and I thought, “I HAVE to figure out how to make this at home.” And let me tell you, after many, many (delicious) trials, I’ve cracked the code!
This isn’t just any recipe; it’s *the* recipe you’ll want to keep in your back pocket for parties, a fun weekend dinner, or just when you need a little pick-me-up. It’s got that amazing crunch from the coconut and panko, the succulent sweetness of perfectly cooked shrimp, and then BAM!—a dipping sauce that’s a total game-changer. Trust me, I’ve made this coconut shrimp countless times, and it always gets rave reviews. Get ready to impress yourself and everyone you share it with!
Why You’ll Love This Coconut Shrimp Recipe
Okay, so why *this* coconut shrimp recipe? Because it’s seriously the best, that’s why! You’re not just making food; you’re creating an experience. This recipe is designed to be super easy, incredibly delicious, and way better than anything you’d get from a freezer bag. Here’s why it’s going to be your new go-to:
- Unbeatable Crunch: That combination of shredded coconut and panko? Pure magic for texture!
- Flavor Explosion: Sweet, savory, and a little tangy from the dipping sauce – it’s a party in your mouth.
- Surprisingly Simple: Don’t let frying scare you! I’ve broken it down so anyone can master it.
- Impress Your Guests: This dish always gets oohs and aahs, making you look like a kitchen superstar with minimal effort.
- Freshness You Can Taste: No mystery ingredients here, just fresh shrimp and quality components.
The Irresistible Appeal of Homemade Coconut Shrimp
Honestly, once you taste homemade coconut shrimp, there’s just no going back to the store-bought stuff. The difference is night and day! You get that incredible fresh shrimp flavor, perfectly cooked and juicy, wrapped in a golden, crispy coating that just sings. It’s got a texture and taste that store-bought versions can only dream of – truly irresistible!
Essential Equipment for Perfect Coconut Shrimp
You don’t need a fancy chef’s kitchen for this, but having the right tools makes all the difference for perfect coconut shrimp! Trust me, a little prep with the right gear means less stress and more deliciousness. Having these essentials on hand will make the whole process smoother and more enjoyable, especially when you’re dealing with hot oil!
- Shallow Dishes (3): Essential for your breading station – one for flour, one for eggs, one for coconut/panko.
- Large Skillet or Dutch Oven: You’ll need something deep enough to hold a couple inches of oil for frying.
- Thermometer (Candy/Deep Fry): This is your secret weapon for perfectly cooked, non-greasy shrimp!
- Slotted Spoon or Spider: For safely removing those golden beauties from the hot oil.
- Wire Rack with Paper Towels: Crucial for draining excess oil and keeping your shrimp crispy.
- Whisk: For whipping up that incredible dipping sauce!
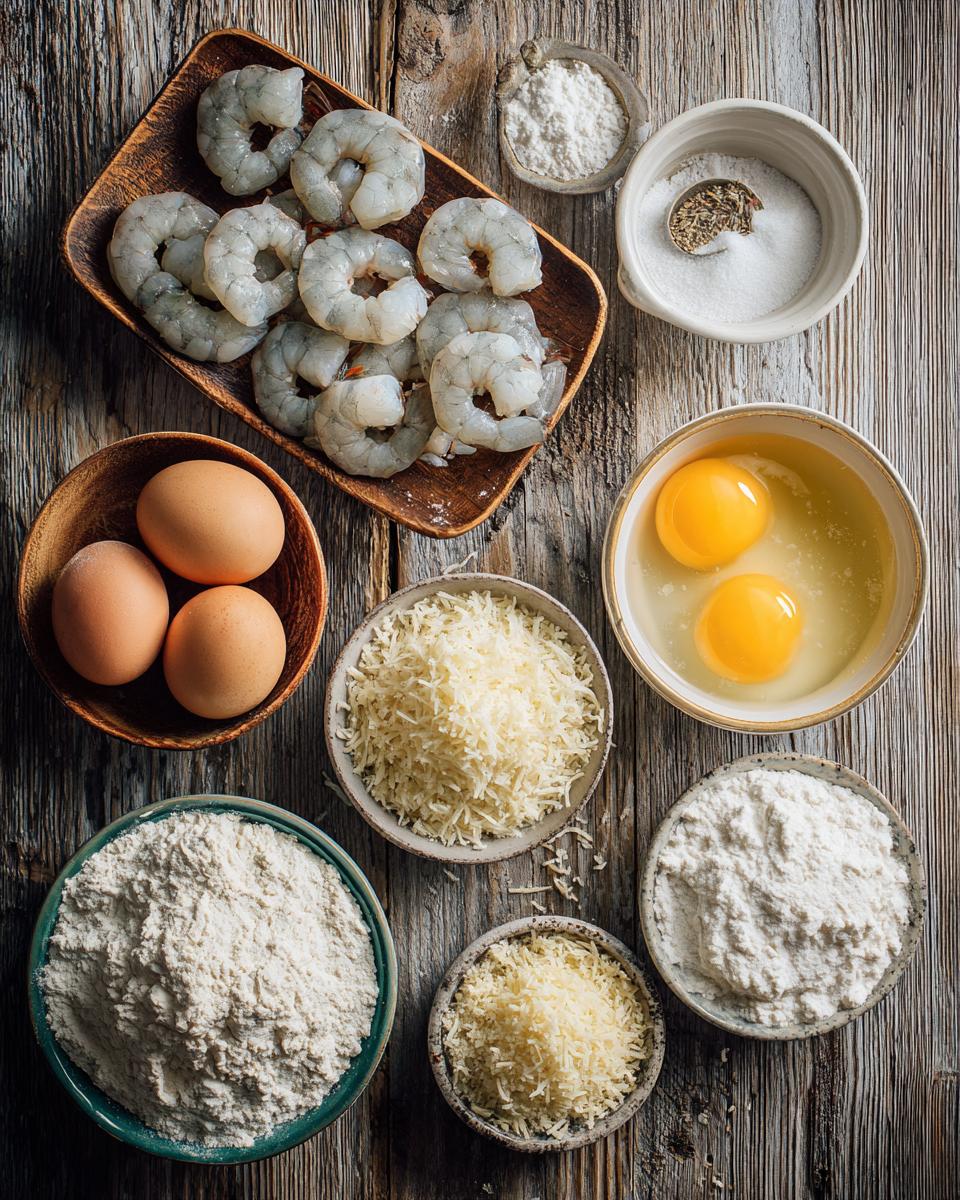
Gather Your Ingredients for Delicious Coconut Shrimp
Alright, let’s talk ingredients! This is where the magic really starts to happen. I’m a big believer that good food begins with good ingredients, and this coconut shrimp recipe is no exception. Everything here plays a crucial role in getting that perfect flavor and texture, so grab your shopping list and let’s make sure you’ve got all your ducks (or should I say, shrimp?) in a row. Don’t skip any of these – each one is a star!
For the Crispy Coconut Shrimp
- 1 pound large shrimp, peeled and deveined, tails on: Go for the best quality you can find! Having the tails on just makes them look fancier and gives you a little handle.
- 1 cup all-purpose flour: Our first layer for that amazing coating.
- 1 teaspoon salt: Essential for seasoning the shrimp right from the start.
- 1/2 teaspoon black pepper: A little kick to wake up those flavors.
- 2 large eggs, beaten: This is our “glue” to hold all that delicious coconut on!
- 1 1/2 cups shredded sweetened coconut: The star of the show! Sweetened is key here for that classic flavor.
- 1/2 cup panko breadcrumbs: My secret weapon for extra, extra crunch. Panko is lighter and crispier than regular breadcrumbs.
- Vegetable oil, for frying: You’ll need enough to get about 2 inches in your skillet.
Crafting the Tangy Dipping Sauce for Coconut Shrimp
And now for the dipping sauce! This isn’t just an afterthought; it’s the perfect zesty, sweet, and tangy counterpoint to the crispy coconut shrimp. It’s so good, you might want to double the batch for other things!
- 1/2 cup orange marmalade: The sweet and citrusy base for our sauce.
- 2 tablespoons rice vinegar: Adds that lovely tanginess that cuts through the richness.
- 1 tablespoon soy sauce: For a touch of savory depth.
- 1 teaspoon grated fresh ginger: Don’t use dried! Fresh ginger makes all the difference here – bright and zingy.
- 1/2 teaspoon red pepper flakes (optional): If you like a little heat, these are your best friend. Adjust to your preference!
How to Prepare Your Own Coconut Shrimp
Alright, you’ve got your ingredients and your tools, now for the fun part: making these glorious coconut shrimp! Don’t worry, I’m going to walk you through each step just like I would if we were cooking side-by-side in my kitchen. It’s really not as tricky as it might seem, and the payoff is SO worth it. Get ready to transform those humble shrimp into crispy, golden perfection!
Preparing the Shrimp and Breading Station
First things first, those shrimp need to be ready for their close-up! Grab your beautiful, peeled, and deveined shrimp (tails on, remember? So cute!). The absolute key here is to pat them super, super dry with paper towels. Seriously, don’t skimp on this step! It helps the coating stick like a dream. Next, set up your little assembly line: one shallow dish for the seasoned flour (flour, salt, and pepper all mixed up), one for your beaten eggs, and the third for that gorgeous shredded coconut and panko breadcrumb mix. This station makes the breading process a breeze!
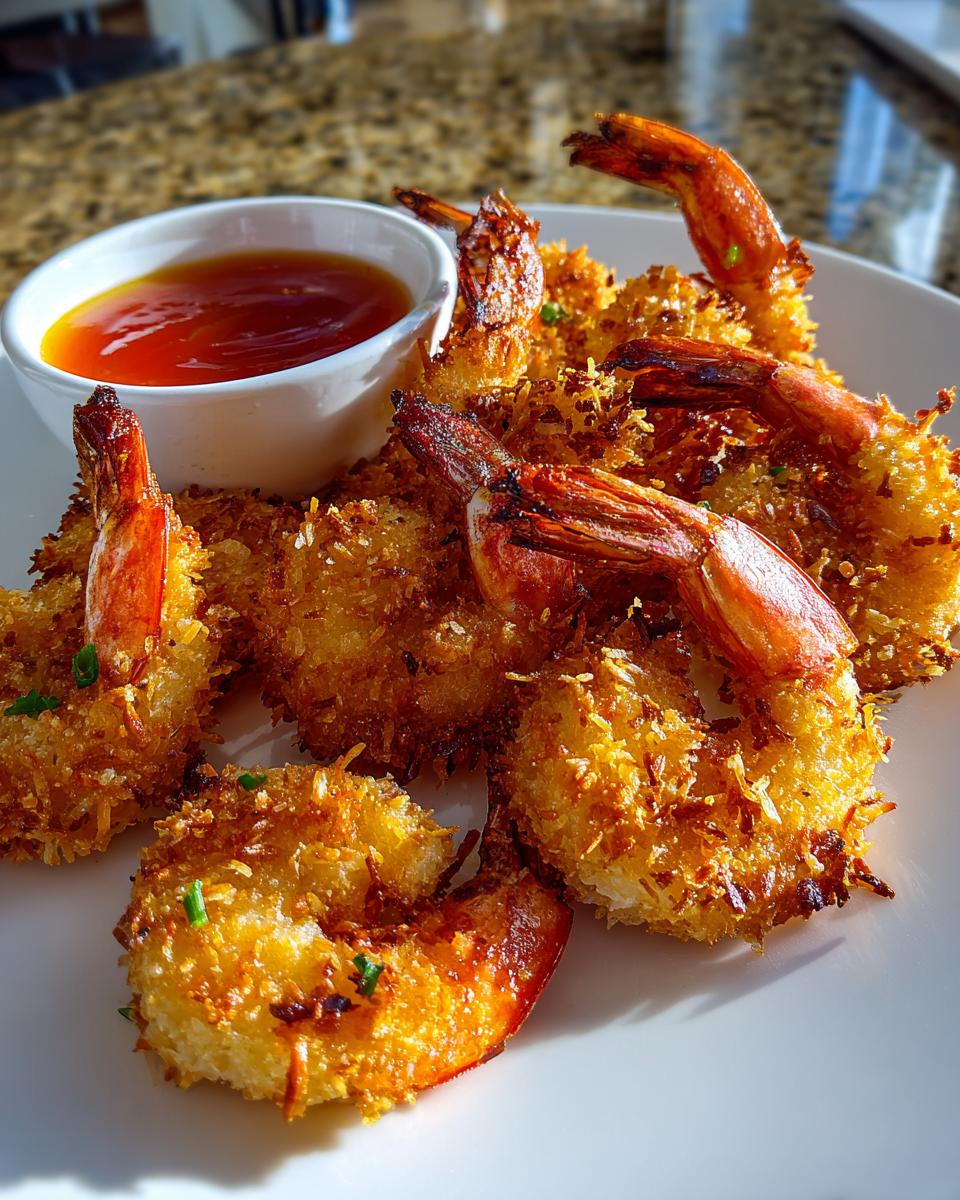
Frying Your Golden Coconut Shrimp
Now for the sizzle! Pour your vegetable oil into your large skillet or Dutch oven – you want about 2 inches deep. Turn the heat to medium-high and get that oil up to 350°F (175°C). This is where that thermometer really shines, because maintaining the right temperature is crucial for crispy, not greasy, shrimp! Once it’s hot, carefully dredge each shrimp: first in the flour (shake off excess!), then the egg (let it drip off!), and finally, really press it into that coconut-panko mixture. Fry them in batches, about 2-3 minutes per side, until they’re beautifully golden brown and cooked through. Don’t overcrowd the pan, or the oil temperature will drop, and your shrimp won’t get crispy! Use your slotted spoon to transfer them to a wire rack lined with paper towels to drain. Safety first, folks – hot oil splatters!
Whisking Up the Perfect Coconut Shrimp Dipping Sauce
While your shrimp are frying (or even before you start, if you’re a super planner!), let’s whip up that incredible dipping sauce. It’s honestly as easy as pie. Just grab a small bowl and whisk together the orange marmalade, rice vinegar, soy sauce, and that wonderful fresh grated ginger. If you’re feeling a little spicy, now’s the time to stir in those red pepper flakes. Give it a taste – if you want more zing, add a tiny bit more vinegar. If you want more heat, more flakes! This sauce really brings everything together, making each bite of coconut shrimp an absolute delight.
Tips for Achieving the Best Coconut Shrimp
Okay, so you’ve got the steps down, but let me share a few more golden nuggets of wisdom to make sure your coconut shrimp are absolutely legendary, every single time! These little things can truly elevate your dish from “good” to “OMG, you HAVE to try this!”
- Dry Shrimp is Happy Shrimp: I cannot stress this enough – pat those shrimp DRY! Any excess moisture means your breading won’t stick properly, and you’ll end up with soggy spots instead of that glorious crunch.
- Oil Temperature is Your BFF: Seriously, invest in a good thermometer. Keeping your oil at a consistent 350°F (175°C) is the secret to perfectly golden, crispy shrimp that aren’t greasy. Too cool, and they’ll soak up oil; too hot, and they’ll burn before cooking through.
- Don’t Crowd the Pan: This is a big one! Frying in batches is key. If you throw too many shrimp in at once, the oil temperature drops, and you’ll get less-than-crispy results. Give those little guys some space to swim!
- Press That Breading On: When you’re coating the shrimp in the coconut-panko mix, don’t be shy! Gently but firmly press the mixture onto the shrimp to ensure a good, thick, even coating.
- Serve Immediately: Coconut shrimp are at their absolute best fresh out of the fryer. They lose a little bit of their magic as they sit, so gather everyone around and dig in right away!
Frequently Asked Questions About Coconut Shrimp
Got questions about your new favorite coconut shrimp recipe? You’re not alone! Here are some common queries I get, and my best tips to make sure your coconut shrimp journey is a delicious success, every single time. Don’t be shy if you have more – just ask!
Can I Bake or Air Fry Coconut Shrimp Instead of Frying?
Absolutely! If you’re looking for a lighter option, you can definitely bake or air fry these coconut shrimp. For baking, place them on a wire rack over a baking sheet and bake at 400°F (200°C) for about 12-15 minutes, flipping halfway. For air frying, cook at 375°F (190°C) for 8-10 minutes, shaking the basket once or twice. Just know the texture will be a bit different – still delicious, but not quite the same deep-fried crispness!
How to Store and Reheat Leftover Coconut Shrimp?
If you actually have any leftover (which, let’s be real, is rare!), store your cooked coconut shrimp in an airtight container in the fridge for up to 2-3 days. To reheat, I highly recommend using an air fryer or oven at 350°F (175°C) for about 5-8 minutes until heated through and re-crisped. The microwave will make them soggy, and we definitely don’t want that!
What Can I Serve with Coconut Shrimp?
Oh, the possibilities! These crispy coconut shrimp are fantastic as an appetizer on their own, but they also make a wonderful light meal. I love serving them with a fresh, vibrant green salad with a citrus vinaigrette, some fluffy jasmine rice, or even a simple coleslaw. If you want to keep the tropical vibe going, some grilled pineapple or mango salsa would be absolutely perfect!
Estimated Nutritional Information for Coconut Shrimp
Just a heads-up, folks! While I’m no dietitian, I can give you an estimated peek at the nutrition for a serving of about 3-4 of these delicious coconut shrimp, especially with that amazing dipping sauce. We’re looking at roughly 350 calories, with about 20g of fat, 30g of carbs, and a good 18g of protein. Keep in mind, these numbers can totally vary depending on the exact brands you use and how much oil gets absorbed. It’s just a general guide, not a strict rule!
Share Your Coconut Shrimp Experience
Okay, now it’s YOUR turn! I absolutely LOVE hearing from you. If you give this coconut shrimp recipe a try, please, please, please come back and tell me all about it in the comments below! Did you love it? What did you serve it with? Don’t forget to rate the recipe and share your amazing creations on social media – tag me! I can’t wait to see your crispy, golden masterpieces!
PrintCoconut Shrimp with Dipping Sauce

Crispy coconut shrimp with a sweet and tangy dipping sauce.
- Prep Time: 20 minutes
- Cook Time: 10 minutes
- Total Time: 30 minutes
- Yield: 4 servings 1x
- Category: Appetizer
- Method: Frying
- Cuisine: Fusion
- Diet: None
Ingredients
- 1 pound large shrimp, peeled and deveined, tails on
- 1 cup all-purpose flour
- 1 teaspoon salt
- 1/2 teaspoon black pepper
- 2 large eggs, beaten
- 1 1/2 cups shredded sweetened coconut
- 1/2 cup panko breadcrumbs
- Vegetable oil, for frying
- For the Dipping Sauce:
- 1/2 cup orange marmalade
- 2 tablespoons rice vinegar
- 1 tablespoon soy sauce
- 1 teaspoon grated fresh ginger
- 1/2 teaspoon red pepper flakes (optional)
Instructions
- Pat the shrimp dry with paper towels.
- In a shallow dish, combine flour, salt, and pepper.
- In another shallow dish, beat the eggs.
- In a third shallow dish, combine shredded coconut and panko breadcrumbs.
- Dredge each shrimp first in the flour mixture, shaking off excess.
- Then dip in the beaten egg, allowing excess to drip off.
- Finally, coat thoroughly in the coconut-panko mixture, pressing gently to adhere.
- Heat about 2 inches of vegetable oil in a large skillet or Dutch oven to 350°F (175°C).
- Fry the shrimp in batches for 2-3 minutes per side, or until golden brown and cooked through.
- Remove the shrimp with a slotted spoon and place on a wire rack lined with paper towels to drain excess oil.
- To make the dipping sauce, whisk together orange marmalade, rice vinegar, soy sauce, grated ginger, and red pepper flakes (if using) in a small bowl.
- Serve the coconut shrimp hot with the dipping sauce.
Notes
- Ensure shrimp are thoroughly dry for best coating adherence.
- Do not overcrowd the pan when frying to maintain oil temperature and ensure even cooking.
- Adjust red pepper flakes in the sauce to your preferred spice level.
Nutrition
- Serving Size: 3-4 shrimp with sauce
- Calories: 350
- Sugar: 15g
- Sodium: 450mg
- Fat: 20g
- Saturated Fat: 8g
- Unsaturated Fat: 10g
- Trans Fat: 0g
- Carbohydrates: 30g
- Fiber: 2g
- Protein: 18g
- Cholesterol: 100mg


