Oh my goodness, you guys, get ready for a game-changer! I am SO excited to share this recipe for Pea-Mint Falafel with Bulgur. Seriously, if you think you know falafel, prepare for a delightful surprise. We’re taking that classic crispy exterior and tender interior, but giving it a vibrant, fresh twist that just sings. I first stumbled upon this idea when I had a mountain of fresh mint from my garden and a bag of split peas staring at me from the pantry. I thought, “Why not combine them?” And let me tell you, it was pure magic! The peas give it such a lovely, earthy sweetness, and the mint? It just brightens everything up. Add in that fantastic bulgur for texture, and you’ve got something truly special. This isn’t just a recipe; it’s a little burst of sunshine on a plate!
Why You’ll Love This Pea-Mint Falafel with Bulgur
Okay, so why *this* falafel? Because it’s not just good, it’s *unforgettable*! I promise, once you try these, you’ll be making them for every get-together. They’re so vibrant, so satisfying, and honestly, they just make you feel good. It’s the kind of dish that disappears from the platter in minutes, and everyone asks for the recipe. Trust me, you’re about to fall head over heels for these little golden nuggets of deliciousness!
The Irresistible Texture of Pea-Mint Falafel with Bulgur
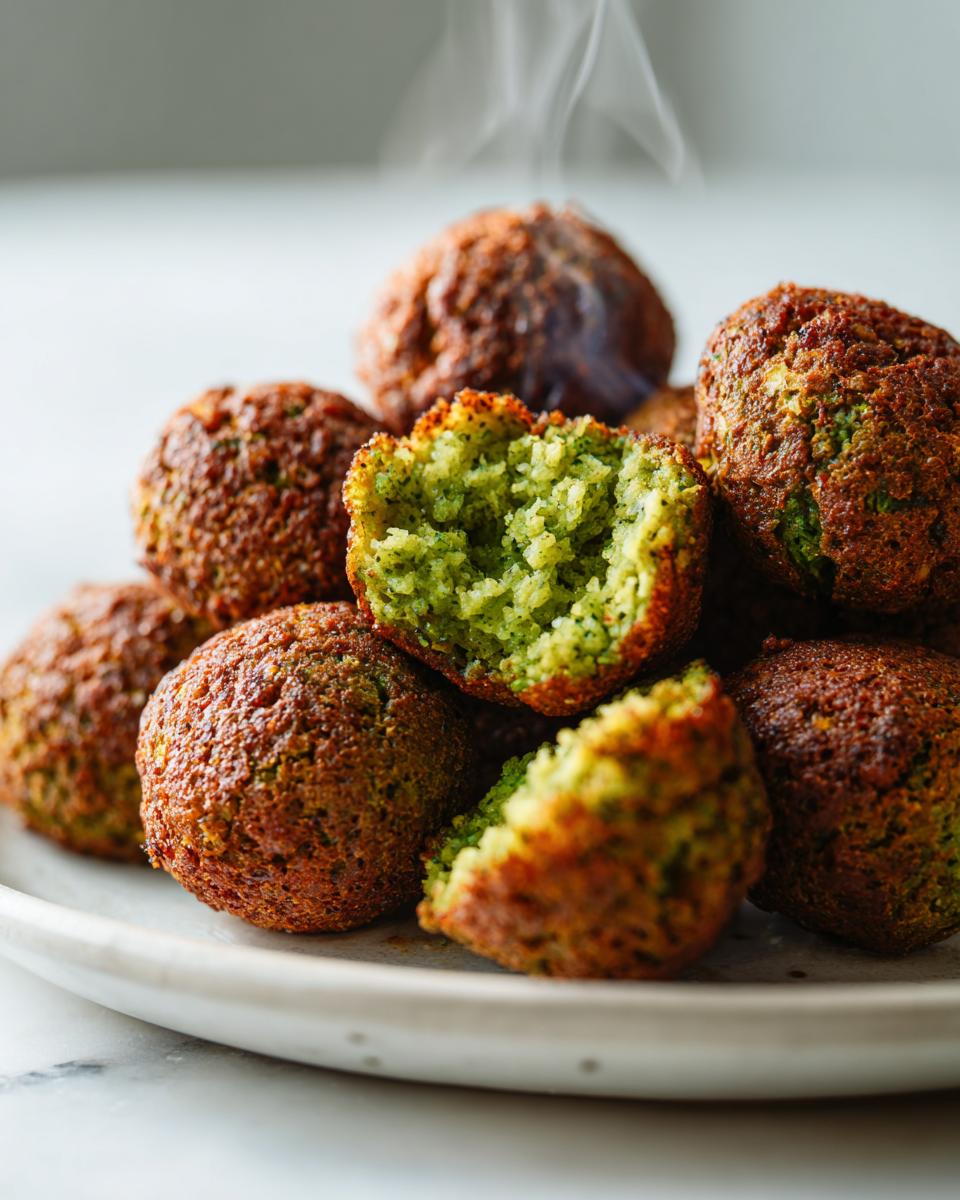
Oh, the texture! This is where the magic really happens. You bite into one, and first, there’s that incredible, shatteringly crisp exterior – pure perfection. Then, you hit the inside, and it’s wonderfully tender, but with just enough chew. That’s our secret weapon, the bulgur! It gives the falafel this fantastic structure and a delightful, almost fluffy interior that you just don’t get with other versions. It’s truly the best of both worlds!
A Fresh and Flavorful Twist
Forget everything you thought you knew about falafel being heavy! These Pea-Mint Falafel are incredibly fresh and bursting with flavor. The sweetness of the peas, combined with the bright, zesty kick of fresh mint, creates a taste that’s totally unique and utterly addictive. It feels lighter, more vibrant, and just so much more exciting. Plus, it’s a fantastic way to sneak in some veggies, making it a delicious and healthier option you can feel great about.
Versatile Serving Options
One of my favorite things about these falafel is how many ways you can enjoy them! They’re absolutely divine as a standalone appetizer with a creamy dip. But pop them into a warm pita with some crisp veggies and tahini, and you’ve got an amazing lunch. Or, if you’re feeling fancy, arrange them on a mezze platter with olives, hummus, and tabbouleh. They fit right in, whether you’re going for a casual snack or a full-on Middle Eastern feast. So many possibilities!
Essential Ingredients for Pea-Mint Falafel with Bulgur
Alright, let’s talk ingredients! This is where we build the foundation for our amazing Pea-Mint Falafel. Don’t worry, nothing too exotic here, but each component plays a super important role in getting that perfect flavor and texture. You’ll need 1 cup of dried green split peas (remember, these need a good overnight soak!), 1/2 cup of fine bulgur (hot water soak for 15 mins, then drain), a generous 1/2 cup of fresh mint leaves (packed tight!), and 1/4 cup of fresh parsley (also packed). For aromatics, we’ll use 1 small onion, roughly chopped, and 2 cloves of minced garlic. Then for those warm, earthy notes, grab 1 teaspoon of ground cumin and 1/2 teaspoon of ground coriander. If you like a little kick, 1/4 teaspoon of cayenne pepper is optional. And for that lovely lift, 1/2 teaspoon of baking soda. Of course, salt and black pepper to taste, and some vegetable oil for frying. See? Simple, but mighty!
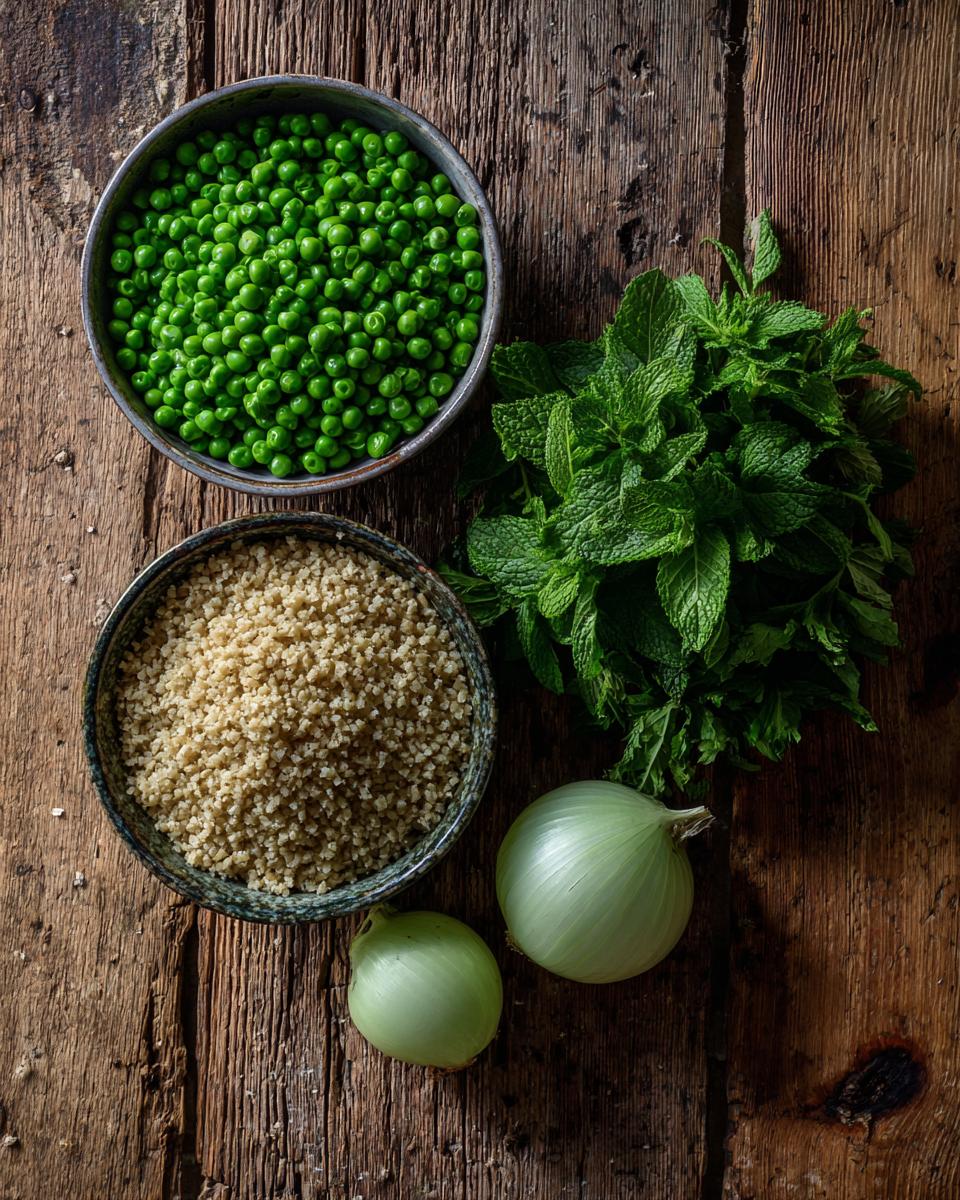
Key Components for Authentic Pea-Mint Falafel
The stars of our show are definitely those dried green split peas. They form the beautiful, creamy base of our falafel, giving it that wonderful body and a subtle, sweet earthiness. And the mint? Oh, the mint! It’s not just a garnish here; it’s absolutely essential. It provides that incredible burst of freshness that truly sets these Pea-Mint Falafel apart from any other falafel you’ve ever had. It lifts all the other flavors and makes every bite feel so vibrant and alive.
Enhancers for Flavor and Texture
Now, for the supporting cast that makes everything sing! That fine bulgur is our texture hero. It helps bind everything together and gives us that perfect tender-chewy interior we talked about. The onion and garlic? They’re the unsung heroes, providing that deep, savory aromatic base that every good falafel needs. And that little bit of baking soda? That’s our secret for keeping things light and airy, preventing our falafel from becoming too dense. It’s all about balance!
Optional Spices and Seasonings
When it comes to spices, we’re keeping it classic but giving you room to play! Cumin and coriander are non-negotiable for that authentic, warm Middle Eastern flavor – they’re like the cozy blanket of our falafel. But the cayenne pepper? That’s totally up to you! If you love a little gentle heat, go for it. If not, no biggie! Always taste and adjust your salt and pepper too. Remember, you’re the chef here, so make it perfect for *your* palate!
Step-by-Step Guide to Preparing Pea-Mint Falafel with Bulgur
Okay, deep breaths! Making these Pea-Mint Falafel might seem like a lot of steps, but I promise you, it’s super straightforward and so rewarding. Just follow along, and we’ll get you to crispy, delicious falafel perfection in no time. Think of me as your personal kitchen coach, cheering you on every step of the way!
Prepping Your Ingredients
First things first, those dried green split peas aren’t going to soften themselves! You absolutely *must* soak them overnight. Seriously, don’t skip this. It’s crucial for the texture. Just pop them in a bowl, cover them with plenty of cold water (they’ll expand a lot!), and let them hang out on your counter. The next day, drain them *super* well. Like, really well. We don’t want any extra moisture making our falafel mushy. For the bulgur, just a quick 15-minute soak in hot water, then drain it thoroughly too. Squeeze out any excess water – a clean kitchen towel can help here! This thorough draining is key for that perfect Pea-Mint Falafel texture.
Blending the Pea-Mint Falafel Mixture
Now for the fun part! Grab your food processor. Into it goes your well-drained split peas, bulgur, all that lovely fresh mint and parsley, the chopped onion, minced garlic, cumin, coriander, and if you’re feeling spicy, the cayenne pepper. Don’t forget the baking soda (it’s our secret for lightness!) and a good pinch of salt and pepper. Pulse, pulse, pulse! The goal here is to get everything combined and slightly chunky, not a smooth paste. You want to see little bits of peas and herbs. If you over-process, your falafel will be dense, and we’re going for tender! Once it looks good, scoop it into a bowl, cover it, and pop it in the fridge for at least 30 minutes. This chilling time is a game-changer; it helps the mixture firm up so your Pea-Mint Falafel hold their shape beautifully when you fry them.
Forming and Frying Your Pea-Mint Falafel
Time to get cooking! Pour about 2 inches of vegetable oil into a deep pan or pot. We need enough oil for the falafel to float. Heat that oil to 350°F (175°C). If you don’t have a thermometer, a little trick is to drop a tiny bit of the mixture into the oil; if it sizzles gently and immediately, you’re good to go. Now, grab a falafel scoop (they’re super handy!) or just use your hands to form small patties or balls. Carefully, gently, place them into the hot oil. Don’t overcrowd the pan, okay? We want them to fry evenly, not steam. Fry them for about 3-5 minutes, turning them occasionally, until they’re gloriously golden brown and cooked through. Use a slotted spoon to fish them out and put them on a paper towel-lined plate to drain any extra oil. Look at those beauties!
Alternative Baking Method
If you’re looking for a slightly lighter option, you can absolutely bake these Pea-Mint Falafel! Preheat your oven to 375°F (190°C). Lightly grease a baking sheet or line it with parchment paper. Arrange your formed falafel on the sheet, making sure they have a little space between them. Bake for 20-25 minutes, flipping them halfway through, until they’re golden and firm. They won’t have quite the same crispy crunch as fried ones, but they’re still incredibly delicious and a fantastic healthier alternative!
Tips for Perfect Pea-Mint Falafel
You’ve done all the hard work, now let’s make sure your Pea-Mint Falafel turn out absolutely perfect every single time! A few little tweaks and tricks can make all the difference between good falafel and falafel that makes you want to do a happy dance. I’ve learned these the hard way, so you don’t have to!
Achieving the Right Texture
The biggest secret to that perfect tender-yet-firm texture? It all starts with the peas! Make sure those dried green split peas get their full overnight soak; it’s non-negotiable for softening them up properly. And when you’re blending, *do not* over-process! You’re aiming for a slightly coarse mixture, not a smooth paste. If it’s too mushy, your falafel will be dense and sad. If you let it get too chunky, it might not hold together. Trust your gut (and your eyes!) here.
Ensuring Crispy Results
For that glorious, golden crispiness, oil temperature is your best friend. Too low, and your falafel will soak up oil and be greasy. Too high, and they’ll burn on the outside before cooking through. Aim for that sweet spot of 350°F (175°C). Also, resist the urge to overcrowd the pan! Frying in batches keeps the oil temperature steady and allows each falafel to get beautifully crisp all around. Patience is a virtue, especially when it comes to perfect Pea-Mint Falafel!
Flavor Adjustments
This recipe is a fantastic starting point, but feel free to make it your own! Love garlic? Add another clove! Want more of a kick? Amp up that cayenne pepper or add a pinch of chili flakes. If you’re a cilantro fan, you could swap out some parsley for it. Just remember, taste the mixture *before* chilling (you can fry a tiny test patty if you’re unsure!) and adjust the salt and pepper. It’s all about finding what makes *your* Pea-Mint Falafel sing!
Serving Suggestions for Pea-Mint Falafel with Bulgur
You’ve made these incredible Pea-Mint Falafel, now how do you enjoy them? Oh, the possibilities are endless! These little gems are so versatile, they fit into almost any meal or snack situation. Get ready to impress everyone with your culinary creativity!
Classic Pairings
For a truly authentic experience, you absolutely *must* serve your Pea-Mint Falafel with a creamy tahini sauce – it’s like they were made for each other! A cool, tangy yogurt dip (maybe with a little mint mixed in?!) is also a dream. And, of course, a fresh, crisp salad with a bright lemon vinaigrette cuts through the richness beautifully. Pure perfection!
Creative Ways to Enjoy
Don’t stop at just classic! Crumble these falafel over a grain bowl for a protein-packed lunch, or chop them up and toss them into a vibrant Mediterranean salad. They’re also fantastic as part of a breakfast spread with eggs and some fresh veggies. Or, hear me out: make mini falafel sliders with tiny buns and your favorite toppings. So fun!
Storing and Reheating Your Pea-Mint Falafel
So, you’ve made a big batch of these delicious Pea-Mint Falafel (smart move, by the way!) and now you have some leftovers. Don’t you worry, keeping them fresh and bringing them back to life for another meal is super easy. We want to keep that amazing flavor and texture going strong!
Proper Storage Techniques
Once your falafel have cooled completely (this is important, don’t put warm falafel in the fridge!), just pop them into an airtight container. They’ll happily hang out in your refrigerator for up to 3-4 days. I sometimes layer them with a piece of parchment paper just to make sure they don’t stick together, but it’s not strictly necessary. Easy peasy!
Best Reheating Methods
To get that lovely crispiness back, I highly recommend reheating your Pea-Mint Falafel in an oven or an air fryer. For the oven, a quick 10-15 minutes at 350°F (175°C) usually does the trick. In an air fryer, about 5-7 minutes at 375°F (190°C) is perfect. You want them heated through and slightly crispy again. Microwaving them will make them soft, which isn’t ideal for falafel, so try to avoid it if you can!
Frequently Asked Questions About Pea-Mint Falafel
Got questions? I’ve got answers! Making these Pea-Mint Falafel is pretty straightforward, but a few common questions pop up. I’m here to demystify any lingering doubts so you can fry up some perfect falafel with confidence!
Can I make the Pea-Mint Falafel mixture ahead of time?
Absolutely, yes! In fact, I highly recommend it. Making the Pea-Mint Falafel mixture ahead of time is a fantastic idea. You can prepare the entire mixture, cover it tightly, and keep it in the refrigerator for up to 24 hours. The flavors actually meld even better, and it makes weeknight cooking so much easier. Just give it a quick stir before forming and frying!
What can I substitute for green split peas?
If you’re out of green split peas, don’t despair! While they give our Pea-Mint Falafel their unique color and mild flavor, you could try using yellow split peas, though the color will be different. Some people even use chickpeas (garbanzo beans) as a base for falafel, but remember to soak them overnight too! The texture and taste will change a bit, but you’ll still get a delicious homemade falafel.
How do I know the oil is hot enough for frying Pea-Mint Falafel?
This is a super important question for crispy falafel! The best way is with a thermometer, aiming for 350°F (175°C). But if you don’t have one, here’s my trick: drop a tiny pinch of the falafel mixture into the hot oil. If it immediately starts to sizzle and bubble gently, rising to the surface, your oil is ready for your Pea-Mint Falafel! If it just sinks and does nothing, it’s not hot enough. If it immediately burns, it’s too hot!
Can I freeze cooked Pea-Mint Falafel?
You bet! Freezing cooked Pea-Mint Falafel is a great way to have quick meals ready to go. Just make sure they’re completely cooled after frying. Arrange them in a single layer on a baking sheet and freeze until solid. Then, transfer them to a freezer-safe bag or container. They’ll keep well for about 2-3 months. To reheat, you can pop them directly into a preheated oven or air fryer until heated through and crispy again. So convenient!
Estimated Nutritional Information
Just a quick heads-up on the numbers! For about three of these delicious Pea-Mint Falafel, you’re looking at roughly 180 calories, with about 12g of fat (mostly unsaturated, yay!), 15g of carbs, and a good 6g of protein. These are just estimates, of course, because every batch is a little different, but it gives you a good idea of what you’re getting into!
Share Your Pea-Mint Falafel Creations
I absolutely LOVE seeing what you all create in your kitchens! If you make these Pea-Mint Falafel, please, please, please share your photos and experiences with me. Did you try a new dip? Serve them in a unique way? I can’t wait to see your delicious masterpieces and hear all about your falafel adventures. Happy cooking! For more recipe inspiration, check out RecipeTin Eats.
PrintPea-Mint Falafel with Bulgur

These pea-mint falafel are a fresh take on a classic. Made with a blend of peas, fresh mint, and bulgur, they are crispy on the outside and tender on the inside. Serve them as an appetizer, in a pita, or as part of a mezze platter.
- Prep Time: 30 minutes
- Cook Time: 20 minutes
- Total Time: 10 hours 50 minutes (includes soaking time)
- Yield: About 20-25 falafel 1x
- Category: Appetizer
- Method: Frying
- Cuisine: Middle Eastern
- Diet: Vegetarian
Ingredients
- 1 cup dried green split peas, soaked overnight
- 1/2 cup fine bulgur, soaked in hot water for 15 minutes and drained
- 1/2 cup fresh mint leaves, packed
- 1/4 cup fresh parsley, packed
- 1 small onion, roughly chopped
- 2 cloves garlic, minced
- 1 teaspoon ground cumin
- 1/2 teaspoon ground coriander
- 1/4 teaspoon cayenne pepper (optional)
- 1/2 teaspoon baking soda
- Salt and black pepper to taste
- Vegetable oil for frying
Instructions
- Drain the soaked split peas thoroughly.
- In a food processor, combine the drained split peas, bulgur, mint, parsley, onion, garlic, cumin, coriander, cayenne pepper (if using), baking soda, salt, and pepper.
- Process until the mixture is well combined but still has some texture. Do not over-process into a paste.
- Transfer the mixture to a bowl, cover, and refrigerate for at least 30 minutes to firm up.
- Heat about 2 inches of vegetable oil in a deep pan or pot to 350°F (175°C).
- Using a falafel scoop or your hands, form the mixture into small patties or balls.
- Carefully place the falafel into the hot oil, frying in batches to avoid overcrowding the pan.
- Fry for 3-5 minutes, turning occasionally, until golden brown and cooked through.
- Remove the falafel with a slotted spoon and place them on a paper towel-lined plate to drain excess oil.
- Serve hot with your favorite dips or in pita bread.
Notes
- Soaking the split peas overnight is crucial for proper texture.
- Do not over-process the mixture; a slightly coarse texture is desirable.
- Refrigerating the mixture helps the falafel hold their shape during frying.
- You can bake the falafel at 375°F (190°C) for 20-25 minutes, flipping halfway, for a healthier option.
- Serve with tahini sauce, yogurt dip, or a fresh salad.
Nutrition
- Serving Size: 3 falafel
- Calories: 180
- Sugar: 2g
- Sodium: 210mg
- Fat: 12g
- Saturated Fat: 1g
- Unsaturated Fat: 10g
- Trans Fat: 0g
- Carbohydrates: 15g
- Fiber: 5g
- Protein: 6g
- Cholesterol: 0mg


