Oh my goodness, potstickers! Just saying the word brings back so many delicious memories. For years, I thought these little pockets of joy were strictly restaurant fare, something too complicated for a home cook like me. I mean, crispy bottoms, tender tops, and that perfectly seasoned filling? It seemed like magic! But let me tell you, once I finally dove in and tried making them myself, I was absolutely hooked. It’s actually so much easier than you’d think, and the payoff is HUGE. There’s nothing quite like that first bite of a homemade potsticker, fresh from the pan, with its juicy savory inside and that incredible crunch on the outside. My family goes wild for these, and honestly, they’re now a staple for our weeknight dinners and even weekend gatherings. Trust me, you’re going to love bringing these to life in your own kitchen!
Why You’ll Love Making These Potstickers
You know, there are so many reasons to fall head over heels for making these potstickers at home. First off, they’re just bursting with flavor – that savory beef filling mixed with fresh ginger and green onions? Divine! But beyond the taste, they’re surprisingly simple to whip up and so versatile. You can make them as a fun appetizer for a party or even a light, satisfying main dish. Plus, there’s just something so rewarding about making them yourself!
Simple Steps for Perfect Potstickers
Don’t let the idea of making potstickers intimidate you! This recipe breaks it down into super easy, straightforward steps. You’ll be amazed at how accessible and fun making these delicious dumplings can be.
Essential Ingredients for Flavorful Potstickers
Alright, let’s talk ingredients! You know how I always say that great cooking starts with great ingredients? Well, it’s especially true for these potstickers. We’re not just throwing things together; we’re building layers of flavor, and that means picking the good stuff. Here’s what you’ll need to gather:
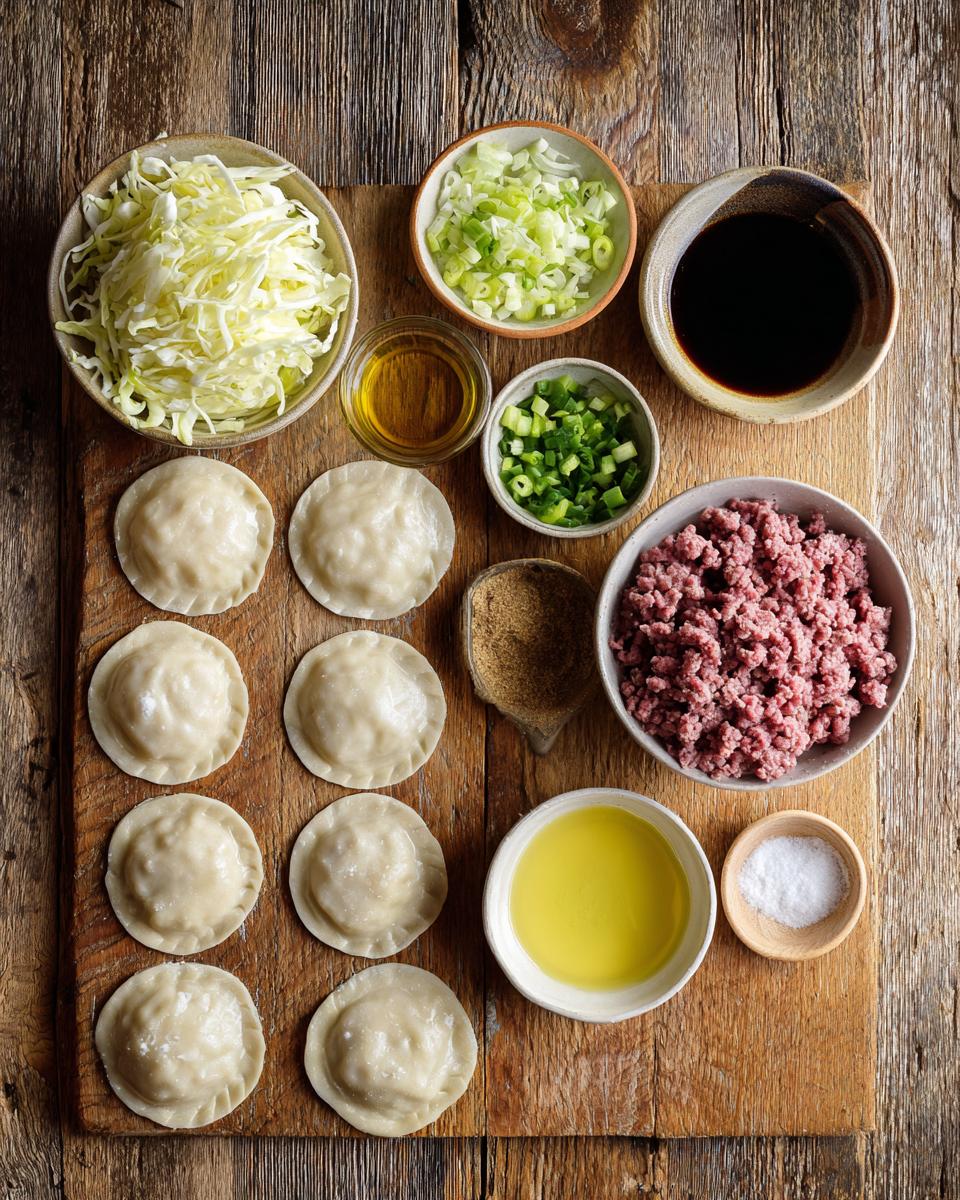
- 1 pound ground beef (I love using a leaner ground beef for this, but anything works!)
- 1/2 cup finely chopped cabbage (fresh, crisp, and finely chopped for that perfect texture)
- 1/4 cup finely chopped green onions (the green and white parts, please!)
- 1 tablespoon grated fresh ginger (seriously, fresh makes ALL the difference here!)
- 1 tablespoon soy sauce (use your favorite brand, it really shines)
- 1 teaspoon sesame oil (a little goes a long way for that nutty aroma)
- 1/2 teaspoon sugar (just a touch to balance everything out)
- 1/4 teaspoon white pepper (it’s subtle but important for authentic flavor)
- 1 package (12 ounces) round potsticker wrappers (grab the good quality ones, they’re worth it!)
- 2 tablespoons vegetable oil (or any neutral oil for cooking)
- 1/2 cup water (for steaming, easy peasy!)
Building the Best Potstickers Filling
The filling is really where the magic happens, so let’s make it count! You want that ground beef to be fresh, and don’t skimp on the fresh ginger – it brings such a vibrant, zesty punch. Finely chopping the cabbage and green onions is key; you want them to meld into the beef, not stick out like big chunks. Freshness, freshness, freshness!
How to Prepare Your Potstickers
Alright, you’ve got your amazing ingredients all lined up, now for the fun part – assembling and cooking these beauties! Don’t worry, it’s not nearly as fiddly as it looks. We’re going to break it down step-by-step so you can make perfect potstickers every single time. Get ready to get your hands a little messy, it’s all part of the joy of cooking!
- Mix the Filling: First things first, grab a big bowl. Toss in your ground beef, that finely chopped cabbage, green onions, grated ginger, soy sauce, sesame oil, sugar, and white pepper. Now, get in there with your hands! Seriously, it’s the best way to make sure everything is super well combined. You want all those flavors to mingle and become best friends. Mix until it’s uniform, but don’t overmix, or the meat can get tough.
- Fill ‘Em Up: This is where the wrappers come in. Lay one wrapper flat on your palm or a clean surface. Scoop about 1 tablespoon of your delicious filling right into the center. Don’t overfill, or they’ll be hard to seal, and we definitely don’t want any explosions!
- Seal the Deal: Now, dip your finger in a little water and lightly moisten the edges of the wrapper all the way around. This acts like glue!
- Fold and Pleat: Carefully fold the wrapper in half over the filling, creating a half-moon shape. Pinch the very center of the top edge together first. Then, starting from one side, make small pleats along the front edge, pressing them firmly against the back edge to seal. Repeat on the other side. Don’t stress too much about perfect pleats; even rustic ones taste amazing! Just make sure they’re sealed tight. Repeat this process until all your filling and wrappers are gone. It’s a bit meditative, actually!
- Get Cooking: Heat 1 tablespoon of vegetable oil in a large non-stick skillet over medium-high heat. You want it shimmering but not smoking.
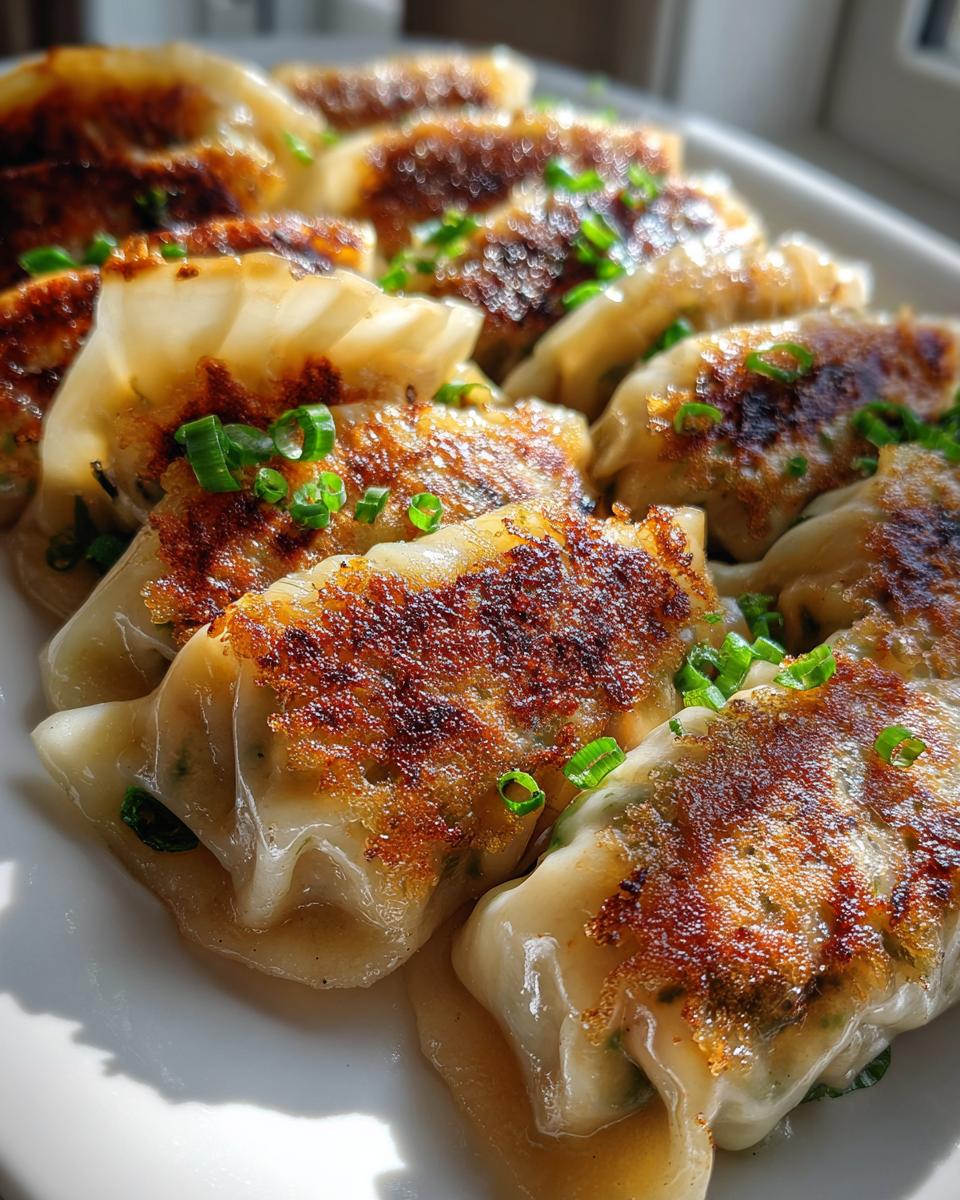
- Brown ‘Em: Place a single layer of your beautiful potstickers in the hot skillet, flat side down. Don’t overcrowd the pan; give them space to breathe and get crispy. Cook them for 2-3 minutes, or until those bottoms are a gorgeous, golden brown. That’s the “potsticker” part – crispy!
- Steam ‘Em: This is the magic trick! Carefully pour 1/4 cup of water into the skillet. It will sizzle and steam like crazy, so be ready! Immediately clap a lid on the skillet and reduce the heat to medium-low. This traps the steam and cooks the rest of the potsticker through.
- Finish Up: Let them cook for 5-7 minutes, or until all that water has evaporated and the potstickers look plump and tender. The wrappers will become translucent. Lift one out and check if it’s cooked through.
- Repeat: Remove the cooked potstickers and repeat with the remaining ones, adding more oil to the pan as needed for each batch.
And there you have it! Hot, crispy, tender, and absolutely irresistible homemade potstickers ready for dipping!
Crafting the Perfect Potstickers Shape
Okay, the filling is ready, now for the artistic part! Take a wrapper, put a tablespoon of filling right in the middle, and then dampen the edges with a little water. Fold it in half to make a half-moon. Now, for the pleats! Start pinching from one corner, creating small folds along the front edge and pressing them firmly to the back. It just takes a little practice, and even if they’re not perfect, they’ll still taste incredible!
Cooking Potstickers to Golden Perfection
This is where the “potsticker” gets its name! Heat up some oil in a good non-stick skillet over medium-high heat until it shimmers. Lay your potstickers flat-side down and let them sizzle for 2-3 minutes until they’re beautifully golden and crispy on the bottom. Then, quickly pour in 1/4 cup of water and immediately cover the skillet! Reduce the heat and let them steam for 5-7 minutes until the water’s gone and they’re tender. Crispy bottom, tender top – perfection!
Potstickers Serving Suggestions and Variations
You’ve put all that love into making these amazing potstickers, so now let’s make sure you serve them up in style! While they’re absolutely fantastic on their own, a good dipping sauce just takes them to the next level. And don’t even get me started on how fun it is to play around with different fillings! These potstickers are so versatile, they can be the star of the show or a fantastic sidekick at any meal.
Dipping Sauces for Your Potstickers
Oh, the dipping sauces! My go-to is usually a simple mix of soy sauce, a splash of rice vinegar, a tiny bit of sesame oil, and a pinch of red pepper flakes for a kick. But you could also do a sweet chili sauce, or even a creamy peanut sauce! Experiment and find your favorite.
Creative Potstickers Filling Ideas
This recipe uses ground beef, which is delicious, but don’t limit yourself! Ground lamb or chicken work beautifully too. For a vegetarian twist, try finely chopped mushrooms, firm tofu (pressed well!), and shredded carrots. You can even add some chopped water chestnuts for extra crunch. The possibilities are endless!
Tips for Success with Your Potstickers
Alright, you’re almost a potsticker pro! Just a few little nuggets of wisdom to make sure your potstickers are absolutely perfect every single time. Don’t overcrowd the pan when you’re browning them; they need space to get that glorious crispy bottom. Also, make sure your water isn’t too cold when you add it for steaming, or it’ll cool down your pan too much. And finally, don’t be afraid to experiment with the filling – it’s your kitchen, after all!
Common Questions About Potstickers (FAQ)
Got some burning questions about these amazing potstickers? Don’t worry, I’ve got you covered! Making homemade dumplings can sometimes bring up a few queries, especially if it’s your first time. Here are some of the most common things people ask me about these savory little parcels.
Can I Prepare Potstickers Ahead of Time?
Absolutely! You can assemble these delicious potstickers and freeze them uncooked on a baking sheet. Once solid, transfer them to a freezer-safe bag. Cook from frozen, adding a few extra minutes to the steaming time.
How to Store Leftover Potstickers
If you happen to have any leftover potstickers (which is rare in my house!), pop them into an airtight container and store them in the fridge for up to 3 days. To reheat, you can pan-fry them again for a crispy bottom or microwave them gently.
Estimated Nutritional Information for Potstickers
Okay, so you’re curious about the nitty-gritty nutritional details for these potstickers, right? I get it! While I can’t give you exact, lab-tested numbers (because, let’s be real, every ingredient from every brand can vary a little!), I can tell you that these potstickers are generally a pretty satisfying bite. Just remember, these are always estimates, and things like the specific type of ground beef you use, or even the brand of wrappers, can shift the numbers a bit. Think of this as a helpful guide rather than a strict dietary decree!
Share Your Potstickers Experience!
Well, there you have it! Your very own homemade potstickers. I’m so excited for you to try this recipe! Please, please, please tell me how they turn out in the comments below. Did you try a different filling? What’s your favorite dipping sauce? Snap a pic and share it on social media with #MyHomemadePotstickers so I can see your amazing creations! Happy cooking, my friends! For more great recipes, check out BBC Good Food.
PrintPotstickers with Beef and Cabbage

These potstickers are a delicious and easy-to-make appetizer or main dish. They feature a savory filling encased in a delicate wrapper, pan-fried to a crispy perfection and then steamed until tender.
- Prep Time: 30 minutes
- Cook Time: 20 minutes
- Total Time: 50 minutes
- Yield: 30-40 potstickers 1x
- Category: Appetizer
- Method: Pan-frying and Steaming
- Cuisine: Asian
- Diet: Low Calorie
Ingredients
- 1 pound ground beef
- 1/2 cup finely chopped cabbage
- 1/4 cup finely chopped green onions
- 1 tablespoon grated fresh ginger
- 1 tablespoon soy sauce
- 1 teaspoon sesame oil
- 1/2 teaspoon sugar
- 1/4 teaspoon white pepper
- 1 package (12 ounces) round potsticker wrappers
- 2 tablespoons vegetable oil
- 1/2 cup water
Instructions
- In a large bowl, combine the ground beef, cabbage, green onions, ginger, soy sauce, sesame oil, sugar, and white pepper. Mix until well combined.
- Place about 1 tablespoon of the filling in the center of each potsticker wrapper. Moisten the edges of the wrapper with water.
- Fold the wrapper in half to form a half-moon shape. Pinch the edges together to seal, creating pleats on one side for a decorative finish.
- Heat 1 tablespoon of vegetable oil in a large non-stick skillet over medium-high heat.
- Place a single layer of potstickers in the skillet, flat side down. Cook for 2-3 minutes, or until the bottoms are golden brown and crispy.
- Carefully pour 1/4 cup of water into the skillet. Immediately cover the skillet and reduce heat to medium-low.
- Cook for 5-7 minutes, or until the water has evaporated and the potstickers are cooked through and tender.
- Repeat with the remaining potstickers, adding more oil as needed.
- Serve hot with your favorite dipping sauce.
Notes
- You can substitute ground lamb or chicken for the ground beef.
- For a vegetarian option, use finely chopped mushrooms and tofu as the filling.
- Make sure not to overcrowd the skillet when cooking the potstickers to ensure even browning.
- Leftover potstickers can be stored in an airtight container in the refrigerator for up to 3 days. Reheat in a skillet or microwave.
Nutrition
- Serving Size: 4 potstickers
- Calories: 250
- Sugar: 2g
- Sodium: 350mg
- Fat: 12g
- Saturated Fat: 4g
- Unsaturated Fat: 7g
- Trans Fat: 0g
- Carbohydrates: 25g
- Fiber: 2g
- Protein: 10g
- Cholesterol: 30mg


