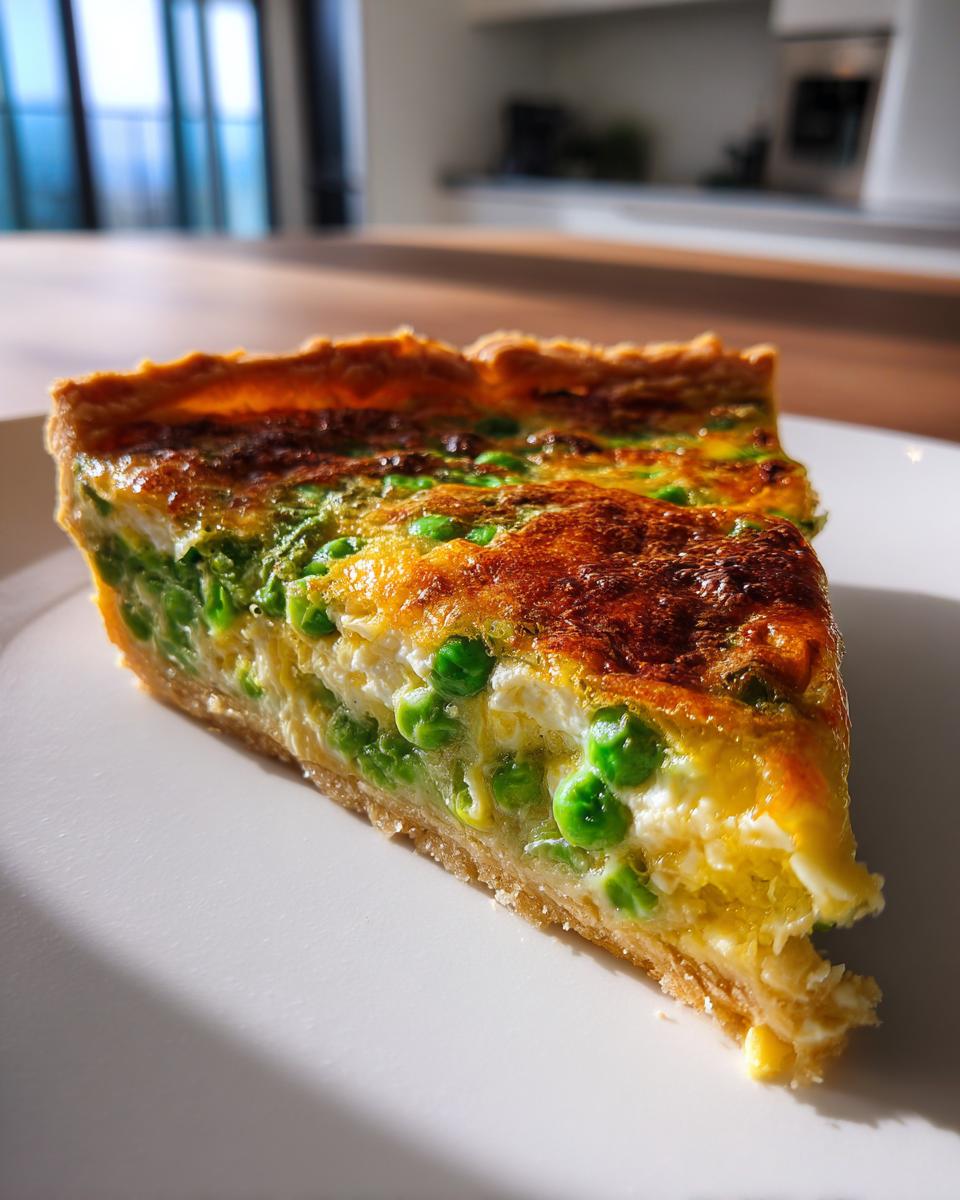
Oh my goodness, friends, can you feel it? That little whisper in the air, the longer days, the burst of green everywhere? Spring is here, and with it, all the fresh, vibrant flavors I absolutely adore! I swear, after a long winter of hearty stews and roasts, my taste buds just *sing* when those first tender peas hit the market. And let me tell you, there’s no better way to celebrate this season of renewal than with my absolute favorite Spring Pea Tart with Goat Cheese. It’s light, it’s bright, and it just screams “hello, sunshine!”
I first stumbled upon a version of this tart at a little French cafe years ago, and I was instantly hooked. It was flaky, creamy, and every bite was bursting with fresh pea goodness and that tangy goat cheese zing. I knew right then and there I HAD to recreate it at home. And after many delicious (and a few not-so-delicious!) attempts, I’ve perfected a recipe that’s not just easy but utterly show-stopping. This Spring Pea Tart with Goat Cheese is so versatile – perfect for a fancy brunch, a light lunch, or even as an appetizer at your next gathering. Trust me, it’s going to be your new spring obsession!
Why You’ll Love This Spring Pea Tart with Goat Cheese
Honestly, what’s not to love? This Spring Pea Tart with Goat Cheese is a total dream! It’s ridiculously easy to throw together, but it tastes like you spent hours slaving away. The flavors are just so fresh and bright, making it perfect for a quick weeknight dinner, a fancy brunch, or even as a show-stopping appetizer. Plus, it’s gorgeous to look at, which always makes food taste better, right?
The Allure of a Spring Pea Tart with Goat Cheese
Oh, the allure! It’s that flaky crust giving way to a creamy, dreamy filling. The sweetness of those fresh peas pops against the tangy goat cheese, all tied together with a hint of fresh herbs. It’s light but satisfying, and every single bite just screams “spring has sprung!” You’ll be making this on repeat, I promise!
Essential Ingredients for Your Spring Pea Tart with Goat Cheese
Alright, let’s get down to the good stuff – what you’ll need to whip up this amazing Spring Pea Tart! Don’t you just love a recipe with simple, fresh ingredients that really shine? Here’s my go-to list:
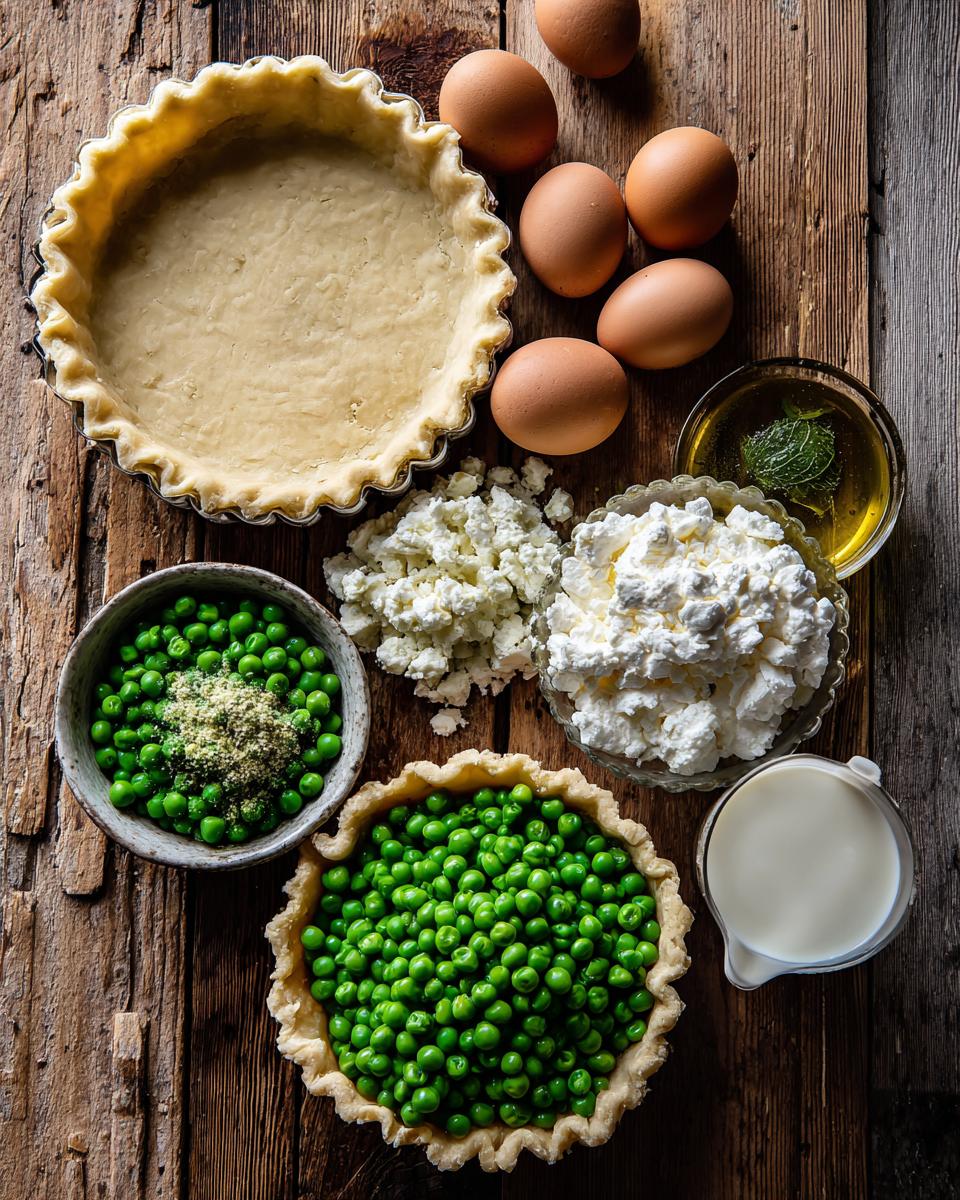
- 1 (9-inch) pre-made pie crust (or your favorite homemade recipe, if you’re feeling ambitious!)
- 1 tablespoon olive oil
- 1 shallot, finely minced (those little guys pack a flavor punch!)
- 2 cups fresh or frozen peas (thawed if frozen, please!)
- 4 ounces goat cheese, crumbled (the star of the show!)
- 2 large eggs
- 1/2 cup heavy cream
- 1/4 cup milk
- 1/4 teaspoon salt
- 1/8 teaspoon black pepper
- 1 tablespoon fresh mint, chopped (optional, but oh-so-good!)
- 1 tablespoon fresh parsley, chopped (also optional, but adds lovely color and freshness!)
Key Components for a Perfect Spring Pea Tart with Goat Cheese
Every ingredient in this Spring Pea Tart with Goat Cheese plays a vital role. The goat cheese? It brings that irresistible tang and creaminess. The fresh peas? They burst with sweet, vibrant flavor. And that combination of heavy cream and milk creates the most luscious, custardy filling. Trust me, these are the heroes of this tart!
Step-by-Step: How to Prepare Your Spring Pea Tart with Goat Cheese
Okay, let’s get cooking! This Spring Pea Tart with Goat Cheese might look fancy, but I promise you, the steps are super straightforward. Just follow along, and you’ll have a gorgeous, delicious tart in no time. We’re going to start with that lovely crust, then build up all those amazing flavors. Don’t rush it, and you’ll be golden!
- First things first, preheat your oven to a cozy 375°F (190°C). This ensures everything cooks evenly and gets nice and golden.
- Grab your pre-made pie crust – seriously, no judgment here, it makes life so much easier! Unroll it carefully and gently press it into a 9-inch tart pan, especially one with a removable bottom. Those are a lifesaver for getting the tart out cleanly. Trim any extra crust hanging over the edges.
- Now for the blind baking! Line that crust with parchment paper and fill it with pie weights or dried beans. Pop it in the oven for 10 minutes. This helps prevent a soggy bottom, which is a big no-no for tarts!
- After 10 minutes, carefully take it out, remove the parchment and weights, and bake for another 5 minutes, or until it looks lightly golden. Let it cool a bit while you get the filling ready.
- While the crust is doing its thing, heat a tablespoon of olive oil in a medium skillet over medium heat. Toss in your finely minced shallot and cook it until it’s lovely and soft, about 2-3 minutes. You want that sweetness to come out!
- Add your peas to the skillet and cook them for another 3-5 minutes. You’re looking for tender-crisp – not mushy! Then, take them off the heat.
- In a separate medium bowl, whisk together your eggs, heavy cream, milk, salt, and pepper until it’s all beautifully combined. If you’re using fresh mint and parsley, stir those in now – they add such a wonderful, fresh kick!
- Time to assemble! Sprinkle half of your crumbled goat cheese evenly over the bottom of your pre-baked crust.
- Spoon that delicious pea and shallot mixture right over the goat cheese.
- Carefully pour the egg and cream mixture over the peas and goat cheese.
- Finally, sprinkle the rest of that glorious goat cheese over the top of the tart.
- Bake for 30-35 minutes, or until the filling is set and looks beautifully golden brown.
- The hardest part: letting it cool! Give it at least 10 minutes before you even think about slicing it. This helps it set up perfectly.
Preparing the Crust for Your Spring Pea Tart with Goat Cheese
Okay, the crust is the foundation of our amazing Spring Pea Tart with Goat Cheese, so we want it to be perfect! Using a pre-made crust is totally fine, but blind baking is a must. Line it with parchment paper and fill it with pie weights – this stops it from puffing up or shrinking. Bake it until it’s lightly golden. This little step makes all the difference for a flaky, not-soggy, bottom crust. Trust me, you’ll thank me later!
Assembling Your Delicious Spring Pea Tart with Goat Cheese
Now for the fun part: bringing all those incredible flavors together for your Spring Pea Tart with Goat Cheese! Once your crust is cool, sprinkle about half of that tangy goat cheese right on the bottom. Then, layer on those sweet, tender peas and shallots. Finally, pour that rich, creamy egg mixture over everything. Top it off with the rest of the goat cheese, and boom! It’s ready for the oven. It’s so satisfying to see it all come together!
Tips for Success with Your Spring Pea Tart with Goat Cheese
Alright, friends, I want your Spring Pea Tart with Goat Cheese to be utterly perfect, so here are a few little secrets I’ve picked up along the way! Don’t skimp on fresh ingredients if you can help it – they really make a difference. And please, please, don’t overmix that filling; we want it light and custardy, not tough. Also, trust your oven, but keep an eye on it – every oven is a little different, so a few extra minutes might be just what your tart needs!
Achieving the Best Flavor in Your Spring Pea Tart with Goat Cheese
For truly mind-blowing flavor in your Spring Pea Tart with Goat Cheese, always go for fresh peas when they’re in season. They’re just sweeter! And don’t be shy with the fresh herbs – mint and parsley really brighten things up. Taste your filling before it goes into the crust and adjust the salt and pepper. A tiny pinch more can sometimes make all the difference, waking up those creamy, tangy flavors!
Frequently Asked Questions About Spring Pea Tart with Goat Cheese
I know you’re probably buzzing with excitement to make this Spring Pea Tart with Goat Cheese, and maybe a few questions are popping into your head! That’s totally normal. Here are some of the common things people ask me about this delicious vegetarian tart, along with my best advice:
Can I Make a Spring Pea Tart with Goat Cheese Ahead of Time?
Absolutely! That’s one of the best things about this savory tart. You can definitely prepare the crust and the pea mixture a day ahead. Just store them separately in the fridge. Then, when you’re ready to bake, assemble everything and pop it in the oven. For a fully baked tart, it keeps beautifully in the fridge for up to 3 days. Just cover it loosely!
What Can I Serve with My Spring Pea Tart with Goat Cheese?
Oh, the possibilities! This Spring Pea Tart with Goat Cheese is so versatile. For a light lunch or dinner, I love serving it with a simple, crisp green salad tossed with a lemon vinaigrette. A bowl of warm tomato soup would also be divine! If you’re having it for brunch, consider some fresh fruit or even a mimosa. It really pairs well with anything fresh and light!
Storing and Reheating Your Spring Pea Tart with Goat Cheese
Okay, so you’ve made this amazing Spring Pea Tart with Goat Cheese, and maybe (just maybe!) you have some leftovers. Lucky you! To keep it fresh, just cover it loosely with plastic wrap or foil once it’s completely cooled and pop it in the fridge. It’ll stay delicious for up to 3 days. When you’re ready for another slice, I like to gently reheat it in the oven at about 300°F (150°C) for 10-15 minutes until it’s warmed through. The microwave works in a pinch, but the oven keeps that crust nice and crisp!
Estimated Nutritional Information for Spring Pea Tart with Goat Cheese
Alright, for those of you who like to keep an eye on these things, here’s a rough idea of the nutritional breakdown for a serving of this Spring Pea Tart with Goat Cheese. Keep in mind, these are just estimates and can vary a bit depending on your exact ingredients and portion sizes. But it gives you a good ballpark!
- Serving Size: 1 slice
- Calories: 300
- Sugar: 5g
- Sodium: 350mg
- Fat: 20g
- Saturated Fat: 10g
- Unsaturated Fat: 8g
- Trans Fat: 0g
- Carbohydrates: 20g
- Fiber: 3g
- Protein: 10g
- Cholesterol: 100mg
Share Your Spring Pea Tart with Goat Cheese Experience
So, you’ve made it! Your kitchen probably smells absolutely incredible right now. I’d love, love, *love* to hear how your Spring Pea Tart with Goat Cheese turned out! Did you add a secret ingredient? What did you serve it with? Drop a comment below, rate the recipe, or even better, snap a pic and share it on social media! Don’t forget to tag me – I can’t wait to see your amazing creations!
PrintSpring Pea and Goat Cheese Tart

A delightful and vibrant Spring Pea Tart with Goat Cheese, perfect for a light meal or appetizer. This tart features a flaky crust filled with a creamy, savory mixture of fresh peas, goat cheese, and herbs.
- Prep Time: 20 minutes
- Cook Time: 40 minutes
- Total Time: 60 minutes
- Yield: 6-8 servings 1x
- Category: Appetizer, Main Course
- Method: Baking
- Cuisine: French
- Diet: Vegetarian
Ingredients
- 1 (9-inch) pre-made pie crust
- 1 tablespoon olive oil
- 1 shallot, finely minced
- 2 cups fresh or frozen peas (thawed if frozen)
- 4 ounces goat cheese, crumbled
- 2 large eggs
- 1/2 cup heavy cream
- 1/4 cup milk
- 1/4 teaspoon salt
- 1/8 teaspoon black pepper
- 1 tablespoon fresh mint, chopped (optional)
- 1 tablespoon fresh parsley, chopped (optional)
Instructions
- Preheat your oven to 375°F (190°C).
- If using a pre-made pie crust, unroll it and fit it into a 9-inch tart pan with a removable bottom. Trim any excess crust.
- Line the crust with parchment paper and fill with pie weights or dried beans. Blind bake for 10 minutes. Remove the parchment and weights and continue to bake for another 5 minutes, or until lightly golden. Remove from the oven and let cool slightly.
- While the crust is baking, heat olive oil in a medium skillet over medium heat. Add the minced shallot and cook until softened, about 2-3 minutes.
- Add the peas to the skillet and cook for 3-5 minutes, or until tender-crisp. Remove from heat.
- In a medium bowl, whisk together the eggs, heavy cream, milk, salt, and pepper. Stir in the chopped mint and parsley, if using.
- Sprinkle half of the goat cheese evenly over the bottom of the pre-baked pie crust.
- Spoon the pea mixture over the goat cheese.
- Pour the egg and cream mixture over the peas and goat cheese.
- Sprinkle the remaining goat cheese over the top of the tart.
- Bake for 30-35 minutes, or until the filling is set and lightly golden brown.
- Let the tart cool for at least 10 minutes before slicing and serving.
Notes
- For a richer flavor, use full-fat goat cheese.
- You can prepare the crust and filling ingredients ahead of time and assemble just before baking.
- Leftovers can be stored in the refrigerator for up to 3 days.
Nutrition
- Serving Size: 1 slice
- Calories: 300
- Sugar: 5g
- Sodium: 350mg
- Fat: 20g
- Saturated Fat: 10g
- Unsaturated Fat: 8g
- Trans Fat: 0g
- Carbohydrates: 20g
- Fiber: 3g
- Protein: 10g
- Cholesterol: 100mg


