Oh my goodness, can we talk about takeout cravings for a second? You know those nights when all you want is something utterly delicious, a little bit comforting, and packed with flavor? For me, that’s almost always Sweet and Sour Chicken! The crispy chicken, the vibrant sauce – it just hits all the right spots. But honestly, after one too many soggy deliveries or sauces that tasted… off, I decided enough was enough. I was going to crack the code and make the absolute best Sweet and Sour Chicken right in my own kitchen.
And guess what? I did it! After a *lot* of experimenting (and maybe a few kitchen disasters, but we don’t talk about those), I’ve perfected a recipe that brings all that beloved takeout goodness home. It’s surprisingly easy, incredibly satisfying, and honestly, way better than anything you’ll get delivered. So, if you’re ready to ditch the delivery menus and whip up a truly fantastic Sweet and Sour Chicken, you’ve come to the right place. I’m so excited to share my go-to, reliable, step-by-step recipe with you!
Why You’ll Love This Sweet and Sour Chicken
Okay, so why *this* Sweet and Sour Chicken recipe? Because it’s not just another recipe; it’s a game-changer for your weeknight dinners and weekend cravings! Trust me, I’ve made enough versions to know. You’re going to adore this one because:
- Seriously Crispy Chicken: We’re talking golden, crunchy perfection that stays crispy, even when tossed in sauce. No sad, soggy bits here!
- Perfectly Balanced Sauce: It’s got that ideal sweet and tangy zing, bright and flavorful without being syrupy or overpowering.
- Faster Than Takeout: Once you get the hang of it, you can whip this up quicker than it takes for delivery to arrive, and you control all the ingredients.
- Customizable & Fresh: Load it up with your favorite veggies, adjust the spice level – make it *yours*! Plus, you know exactly what’s going into it.
The Irresistible Appeal of Sweet and Sour Chicken
There’s just something magical about Sweet and Sour Chicken, isn’t there? It’s pure comfort food, a dish that brings smiles to faces, and a total crowd-pleaser. Making it at home means you get all that beloved, vibrant flavor and satisfying texture, but with the added warmth and goodness of a homemade meal. It’s a classic for a reason!
Essential Equipment for Perfect Sweet and Sour Chicken
Alright, before we dive into the deliciousness, let’s talk tools! You don’t need a super fancy kitchen, but having the right gear makes this Sweet and Sour Chicken a breeze. First up, a good, heavy-bottomed skillet or Dutch oven for frying the chicken – it holds heat evenly, which is key for those crispy results. You’ll also want a slotted spoon for safely getting the chicken out of the oil. A large wok or another skillet is perfect for sautéing those gorgeous veggies and bringing the sauce together. And don’t forget your trusty whisk for a perfectly smooth sauce!
Ingredients for Delicious Sweet and Sour Chicken
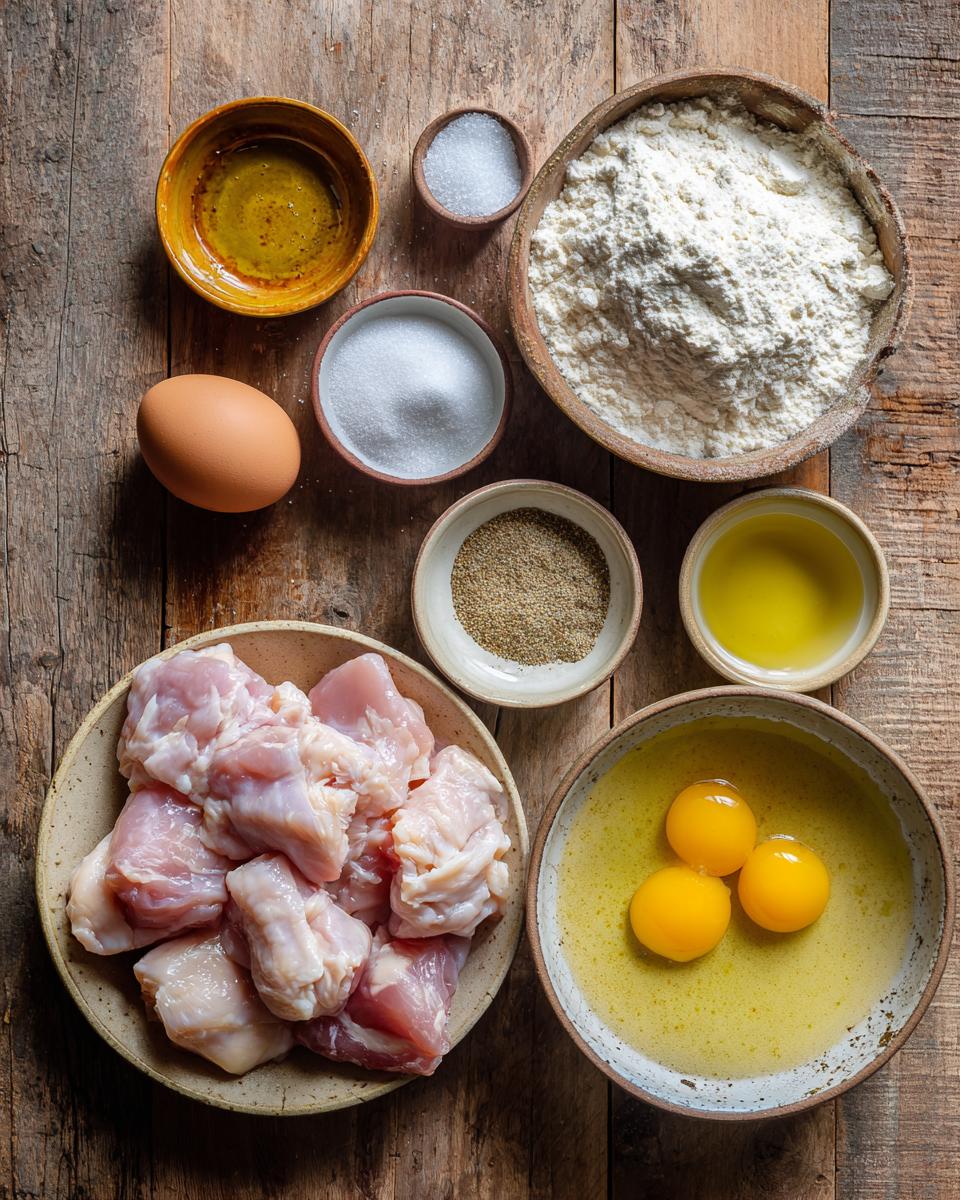
Okay, let’s get down to the good stuff – what you’ll need to make this magic happen! I’ve broken it down so it’s super clear, and trust me, each of these ingredients plays a vital role in getting that perfect Sweet and Sour Chicken flavor and texture. Don’t skimp on fresh ingredients, it really does make a difference! Here’s your shopping list:
- 1 pound boneless, skinless chicken thighs or breasts, cut into 1-inch pieces
- 1 teaspoon salt
- 1/2 teaspoon black pepper
- 1/2 cup cornstarch (for coating the chicken)
- 1 large egg, beaten
- Vegetable oil, for frying (enough for about 2 inches in your pan)
- 1/2 cup white vinegar
- 1/2 cup granulated sugar
- 1/4 cup ketchup
- 2 tablespoons soy sauce
- 1 tablespoon cornstarch (for the sauce)
- 1/2 cup water
- 1 small red bell pepper, cut into 1-inch pieces
- 1 small green bell pepper, cut into 1-inch pieces
- 1/2 small onion, cut into 1-inch pieces
- 1 (8 ounce) can pineapple chunks, drained
- Cooked rice, for serving (because you gotta have rice!)
Preparing Your Chicken for Sweet and Sour Chicken
For the chicken, I usually grab about a pound of boneless, skinless chicken thighs. They stay super juicy and flavorful, even after frying! But if you prefer breast meat, that works just as well. Just make sure to cut it into nice, even 1-inch pieces. This helps everything cook at the same rate and gets you those perfect bite-sized nuggets.
Crafting the Iconic Sweet and Sour Chicken Sauce
Now for the star of the show – that incredible sauce! You’ll need 1/2 cup of white vinegar for that essential tang, 1/2 cup of granulated sugar for the sweetness, and 1/4 cup of ketchup for color and a bit more depth. Add in 2 tablespoons of soy sauce, 1 tablespoon of cornstarch (this is key for thickening!), and 1/2 cup of water to bring it all together. Whisk it well, and you’re golden!
Fresh Vegetables and Pineapple for Sweet and Sour Chicken
To round out the dish, we’re going with some classic veggies: one small red bell pepper and one small green bell pepper, both cut into 1-inch pieces. I also like to throw in about half a small onion, also cut into 1-inch pieces. And don’t forget the pineapple! A small 8-ounce can of drained pineapple chunks adds that signature tropical sweetness and a lovely texture.
How to Make Sweet and Sour Chicken: Step-by-Step Guide
Alright, let’s get cooking! This is where the magic happens, and I promise, it’s easier than you think. Just follow these steps, and you’ll have the most amazing homemade Sweet and Sour Chicken ready to devour before you know it. Read through once, gather your ingredients, and then let’s dive in!
Preparing and Frying Your Sweet and Sour Chicken
First things first, let’s get that chicken ready for its crispy transformation! Take your 1-inch chicken pieces and season them generously with salt and pepper – don’t be shy here, flavor starts from within! Next, toss the seasoned chicken with 1/2 cup of cornstarch until every single piece is beautifully coated. This is your secret weapon for crispiness. Now, beat one large egg in a separate bowl. Dip each cornstarch-coated chicken piece into the egg, letting any excess drip off. Heat about 2 inches of vegetable oil in your large skillet or Dutch oven over medium-high heat until it reaches a glorious 350°F (175°C). Fry the chicken in batches – don’t overcrowd the pan, or it won’t get crispy! Cook for 4-6 minutes per batch, or until golden brown and cooked through. Use a slotted spoon to remove the chicken and place it on a paper towel-lined plate to drain. Look at that golden goodness!
Crafting the Tangy Sweet and Sour Chicken Sauce
While your chicken is draining, let’s get that incredible sauce going! In a small bowl, whisk together the white vinegar, granulated sugar, ketchup, soy sauce, that extra tablespoon of cornstarch (this is for thickening the sauce, remember?), and 1/2 cup of water. Whisk it really well until it’s super smooth and there are no lumps of cornstarch. This pre-mixing is key! Now, in a separate large skillet or wok, heat 1 tablespoon of fresh oil over medium heat. Add your red bell pepper, green bell pepper, and onion pieces. Sauté them for about 3-5 minutes, just until they’re slightly tender-crisp. You want them to still have a little bite, not be mushy!
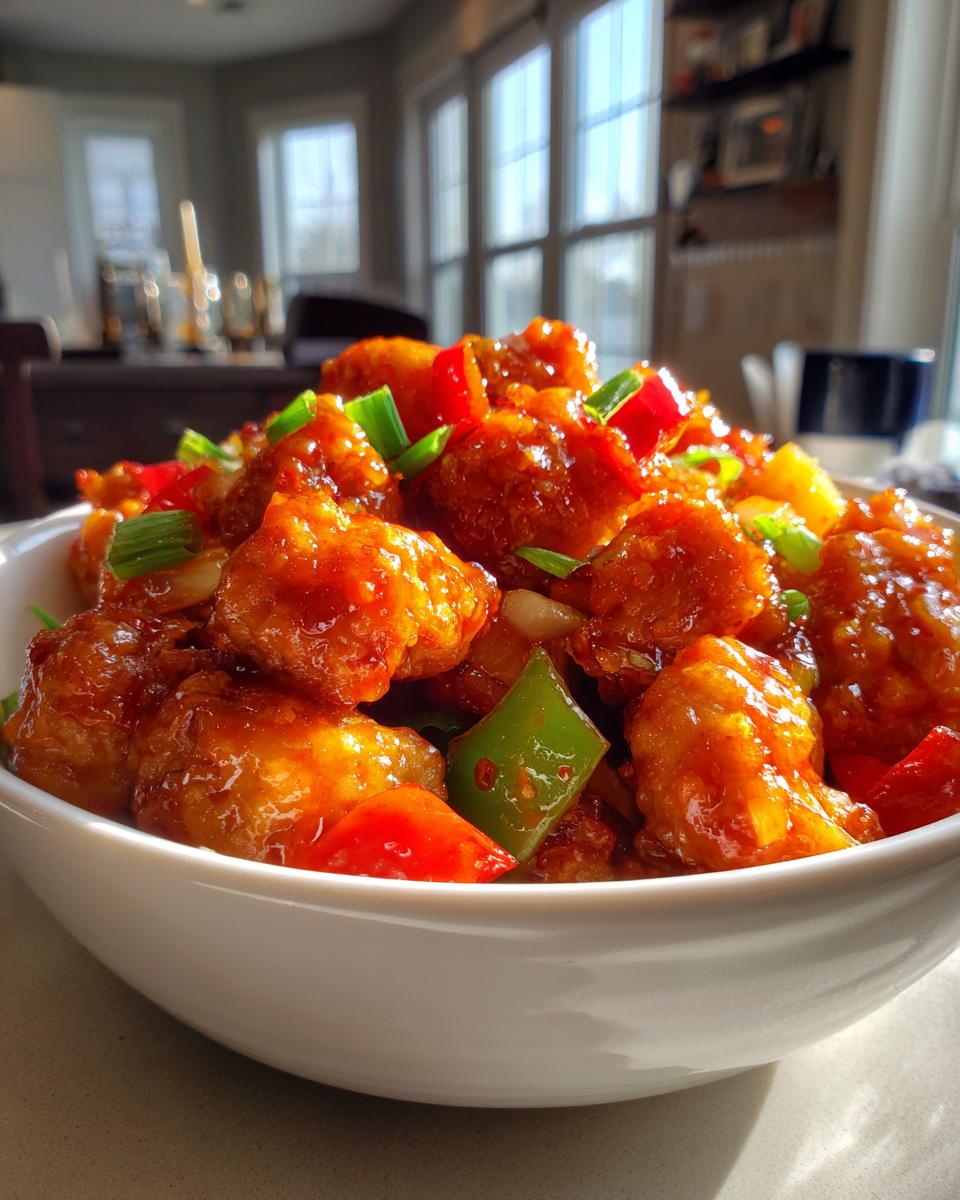
Combining and Serving Your Sweet and Sour Chicken
Now for the grand finale! Add your drained pineapple chunks to the vegetables in the skillet. Give it a quick stir. Then, pour that perfectly whisked sweet and sour sauce mixture over the veggies and pineapple. Bring it to a gentle simmer, and here’s the important part: stir constantly! The cornstarch will start to work its magic, and you’ll see the sauce thicken up beautifully right before your eyes. Once it’s nice and glossy and thick, add your crispy fried chicken pieces to the pan. Toss everything gently to make sure every single piece of chicken and every veggie is coated in that vibrant, tangy, sweet sauce. Serve it up immediately over a bed of fluffy, hot cooked rice. Get ready for some serious deliciousness!
Tips for the Best Sweet and Sour Chicken
You’ve got the steps down, but a few little tricks can take your Sweet and Sour Chicken from great to absolutely legendary! These are the things I’ve learned over countless batches that really make a difference. Pay attention to these, and you’ll be a sweet and sour superstar!
Achieving Extra Crispy Sweet and Sour Chicken
Want that chicken *extra* crunchy? After the first fry, let it rest for a few minutes. Then, crank up the heat slightly and fry it again for just 1-2 minutes. Double-frying is a game-changer!
Customizing Your Sweet and Sour Chicken Flavors
Feel free to play with the sauce! You can totally adjust the sugar and vinegar to get your perfect sweet-tangy balance. And for veggies, go wild! Carrots, snap peas, or water chestnuts are amazing additions.
Sweet and Sour Chicken: Frequently Asked Questions
Okay, so you’ve got questions, and I’ve got answers! It’s totally normal to have a few things pop up when you’re making a new dish, especially one as beloved as Sweet and Sour Chicken. Here are some common questions I get, and my best advice to help you out!
Can I Bake My Sweet and Sour Chicken Instead of Frying?
You absolutely can! For a lighter version, toss the coated chicken with a tablespoon of oil and bake at 400°F (200°C) for 20-25 minutes, flipping halfway, until golden and cooked through. It won’t be *quite* as crispy as fried, but still delicious!
How Can I Make My Sweet and Sour Chicken Sauce Thicker?
If your Sweet and Sour Chicken sauce isn’t as thick as you’d like, don’t panic! Just mix a teaspoon of cornstarch with a tablespoon of cold water to make a slurry. Whisk it into the simmering sauce a little at a time until it reaches your desired consistency. Easy peasy!
What Can I Serve with Sweet and Sour Chicken?
Oh, the possibilities are endless! My absolute favorite is simple white rice, but brown rice or even cauliflower rice works great. Steamed broccoli, a side salad, or some quick stir-fried greens would also be fantastic with your homemade Sweet and Sour Chicken!
Storing and Reheating Sweet and Sour Chicken
Got leftovers? Lucky you! This Sweet and Sour Chicken actually tastes great the next day. Just pop any uneaten portions into an airtight container and stash it in the fridge for up to 3 days. To reheat, I usually opt for a quick zap in the microwave or, even better, a few minutes in a skillet over medium heat to help the chicken crisp up a bit again. Enjoy!
Estimated Nutritional Information for Sweet and Sour Chicken
I know some of you out there like to keep an eye on your macros, and I totally get it! So, I’ve put together some estimated nutritional information for this Sweet and Sour Chicken recipe. Please remember, these are just estimates and can vary based on exact ingredient brands, portion sizes, and preparation methods. Think of it as a general guide to help you out!
- Calories: Approximately 550 per serving
- Sugar: Around 35g
- Sodium: About 800mg
- Fat: Roughly 25g (with about 5g Saturated Fat)
- Carbohydrates: Around 50g
- Fiber: About 3g
- Protein: Roughly 30g
Your Sweet and Sour Chicken Journey
And there you have it – your very own, absolutely delicious Sweet and Sour Chicken! I’m so excited for you to try this recipe. Did you love it? Did you make any fun tweaks? Please, please, please tell me all about your cooking journey in the comments below! Don’t forget to share your creations on social media too – tag me, I’d love to see them!
PrintSweet and Sour Chicken at Home

Sweet and Sour Chicken is a classic Chinese-American dish featuring crispy fried chicken pieces tossed in a vibrant, tangy, and sweet sauce. It’s a popular takeout item that can be easily recreated at home for a delicious and satisfying meal.
- Prep Time: 20 minutes
- Cook Time: 25 minutes
- Total Time: 45 minutes
- Yield: 4 servings 1x
- Category: Main Course
- Method: Frying, Sautéing
- Cuisine: Chinese-American
- Diet: None
Ingredients
- 1 pound boneless, skinless chicken thighs or breasts, cut into 1-inch pieces
- 1 teaspoon salt
- 1/2 teaspoon black pepper
- 1/2 cup cornstarch
- 1 large egg, beaten
- Vegetable oil, for frying
- 1/2 cup white vinegar
- 1/2 cup granulated sugar
- 1/4 cup ketchup
- 2 tablespoons soy sauce
- 1 tablespoon cornstarch (for sauce)
- 1/2 cup water
- 1 small red bell pepper, cut into 1-inch pieces
- 1 small green bell pepper, cut into 1-inch pieces
- 1/2 small onion, cut into 1-inch pieces
- 1 (8 ounce) can pineapple chunks, drained
- Cooked rice, for serving
Instructions
- Season the chicken pieces with salt and pepper. In a medium bowl, toss the chicken with 1/2 cup cornstarch until evenly coated.
- Dip each coated chicken piece into the beaten egg.
- Heat about 2 inches of vegetable oil in a large skillet or Dutch oven over medium-high heat to 350°F (175°C).
- Fry the chicken in batches for 4-6 minutes, or until golden brown and cooked through. Remove with a slotted spoon and place on a paper towel-lined plate to drain.
- In a small bowl, whisk together the white vinegar, sugar, ketchup, soy sauce, 1 tablespoon cornstarch, and water until smooth.
- In a separate large skillet or wok, heat 1 tablespoon of oil over medium heat. Add the red bell pepper, green bell pepper, and onion. Cook for 3-5 minutes, or until slightly tender-crisp.
- Add the drained pineapple chunks to the vegetables.
- Pour the sweet and sour sauce over the vegetables and pineapple. Bring to a simmer, stirring constantly, until the sauce thickens.
- Add the fried chicken to the sauce and toss to coat evenly.
- Serve immediately over cooked rice.
Notes
- For extra crispiness, you can double-fry the chicken. After the first fry, let it rest for a few minutes, then fry again for 1-2 minutes.
- Adjust the amount of sugar and vinegar in the sauce to suit your taste.
- You can add other vegetables like carrots, snap peas, or water chestnuts.
- Leftovers can be stored in an airtight container in the refrigerator for up to 3 days.
Nutrition
- Serving Size: 1 serving
- Calories: 550
- Sugar: 35g
- Sodium: 800mg
- Fat: 25g
- Saturated Fat: 5g
- Unsaturated Fat: 15g
- Trans Fat: 0g
- Carbohydrates: 50g
- Fiber: 3g
- Protein: 30g
- Cholesterol: 100mg


