Oh my goodness, friends, do I have a treat for you today! There’s just something about a classic chocolate cream pie that screams comfort, doesn’t it? For me, it takes me right back to my grandma’s kitchen, that sweet, velvety filling, the flaky crust, and that cloud of whipped cream just begging to be devoured. It’s not just a dessert; it’s a hug in a pie plate! This isn’t just any recipe; it’s the one I pull out when I want to impress without breaking a sweat, or when I just need a little extra joy in my life. Trust me, once you try this rich, creamy, utterly decadent chocolate cream pie, you’ll understand exactly why it’s a must-try for everyone!
Why You’ll Love This Chocolate Cream Pie
Okay, so why should *this* chocolate cream pie be your next baking adventure? Let me count the ways! It’s seriously foolproof, incredibly delicious, and has that wow-factor without a ton of fuss. Here’s the lowdown:
- Super Easy: We’re talking minimal effort for maximum payoff.
- Decadent Flavor: Rich, deep chocolate that satisfies every single craving.
- Versatile Delight: Perfect for a fancy dinner or a cozy night in.
- Crowd-Pleaser: Everyone, and I mean *everyone*, adores a good chocolate cream pie!
The Irresistible Charm of Chocolate Cream Pie
Just imagine that first bite: the delicate crunch of the crust, giving way to the silken, cool chocolate filling, then melting into the light, airy whipped cream. It’s a symphony! This isn’t just dessert; it’s a moment. A sweet, blissful escape that brings smiles and happy sighs. It’s pure, unadulterated joy on a plate, and that, my friends, is its true charm.
Essential Ingredients for Your Chocolate Cream Pie
Alright, let’s get down to business! You can’t make magic without the right tools, and for this chocolate cream pie, our tools are our ingredients. Don’t worry, nothing too fancy here, just good, honest stuff that comes together for something truly spectacular. I’ve laid it all out for you, nice and clear, so you can grab everything at the store without missing a beat:
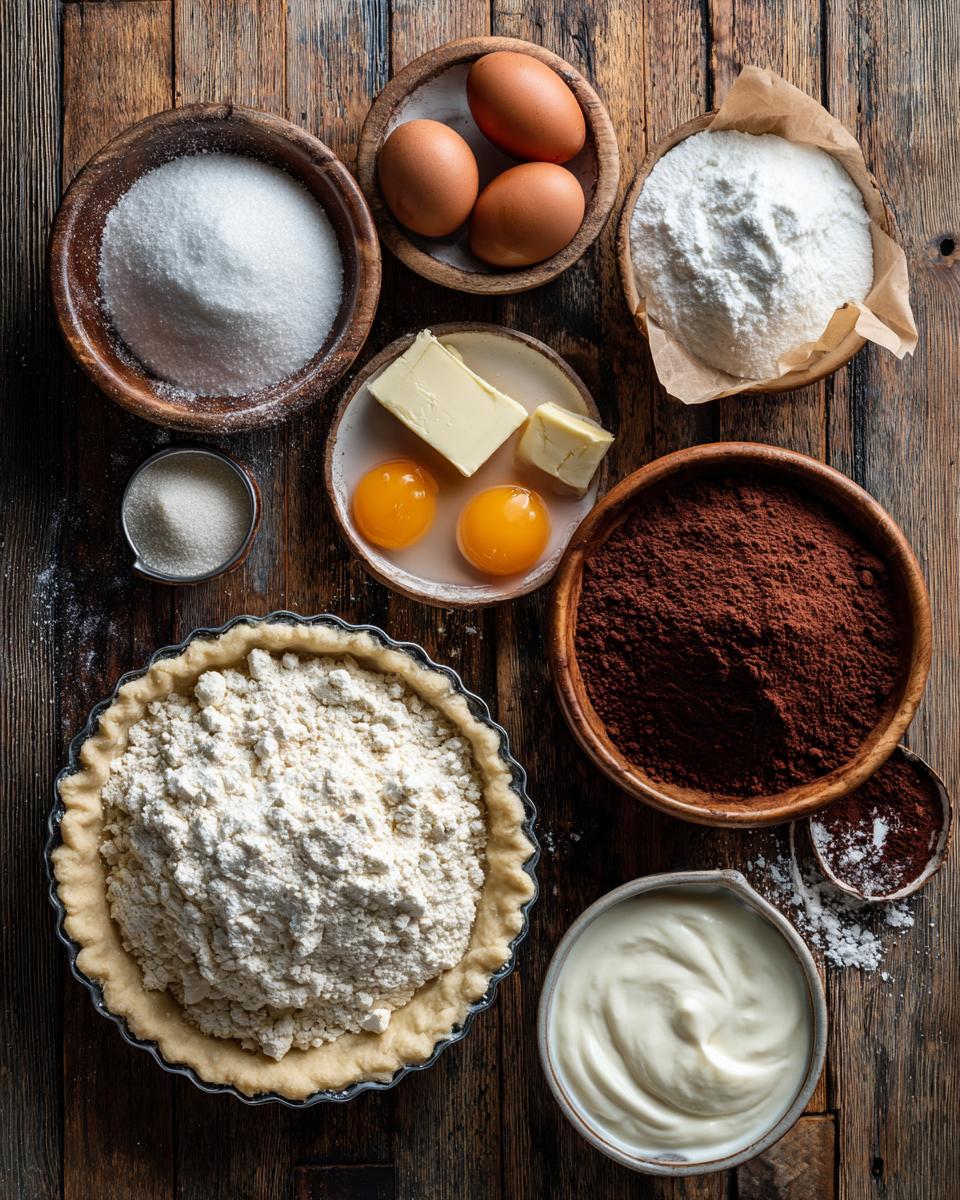
- 1 pre-made pie crust (9-inch – saves so much time, trust me!)
- 1/2 cup granulated sugar
- 1/4 cup unsweetened cocoa powder (the good stuff makes a difference!)
- 1/4 cup cornstarch
- 1/4 teaspoon salt
- 2 cups whole milk (for that creamy richness)
- 2 large egg yolks (separated from the whites)
- 2 tablespoons unsalted butter
- 1 teaspoon alcohol-free vanilla extract
- 1 1/2 cups heavy cream (for our dreamy topping)
- 2 tablespoons powdered sugar
Key Components for a Perfect Chocolate Cream Pie
You know, every star dish has its leading roles! For our chocolate cream pie, the unsweetened cocoa powder is absolutely crucial for that deep, rich chocolatey flavor we’re after – don’t skimp on quality here! And the cornstarch? That’s our secret weapon for getting that perfectly thick, luscious filling without any fuss. It’s what gives it that irresistible, spoon-coating texture. These two, plus good whole milk, are the backbone of that incredible chocolate goodness!
Step-by-Step Guide to Making Chocolate Cream Pie
Alright, gather ’round, because this is where the magic really happens! Don’t be intimidated; I’m going to walk you through making this chocolate cream pie, step by delicious step. We’re going for smooth sailing and a pie that’ll make everyone swoon. Just follow along, and you’ll have a masterpiece in no time. Precision is key, but don’t forget to have fun! This recipe is surprisingly forgiving, so let’s get baking!
Preparing the Flaky Crust for Your Chocolate Cream Pie
First things first, we need a cozy home for our chocolatey goodness! Preheat your oven to a nice warm 375°F (190°C). Pop that pre-made pie crust into the oven and bake it according to the package directions. You want it beautifully golden brown – that means flaky perfection! Once it’s done, pull it out and let it cool completely on a wire rack. Seriously, completely cool. No one likes a soggy bottom!
Crafting the Rich Chocolate Filling for Your Chocolate Cream Pie
Now for the star of the show! In a medium saucepan, whisk together your granulated sugar, cocoa powder, cornstarch, and salt. Get all those dry bits nice and combined. Then, gradually whisk in the whole milk until everything is smooth – no lumps allowed! Cook this mixture over medium heat, stirring *constantly*. This is important! Keep stirring until it thickens up and finally comes to a boil. Let it boil for just one minute, still stirring, then take it off the heat.
Next, grab a small bowl and whisk your two egg yolks. Now, here’s the trick to tempering: slowly drizzle about half a cup of your hot chocolate mixture into the egg yolks, whisking like crazy the whole time. This warms them up gently so they don’t scramble when they hit the hot pan. Pour that tempered egg yolk mixture back into the saucepan with the rest of the chocolate, whisking constantly again! Return it to medium-low heat and cook for another 1-2 minutes, stirring non-stop, until it’s super thick. Don’t let it boil this time! Remove it from the heat and stir in the butter and alcohol-free vanilla extract until everything is melted and combined. Pour this luscious filling into your cooled pie crust. Press plastic wrap directly onto the surface of the filling (this stops a skin from forming – nobody wants that!) and pop it in the fridge for at least 4 hours, or until it’s perfectly set. Patience, my friend, patience!
Whipping Up the Perfect Topping for Your Chocolate Cream Pie
Almost there! When your pie is perfectly chilled and set, it’s time for the crowning glory. In a large bowl, pour in your heavy cream and powdered sugar. Get out your electric mixer and beat it on high speed until you have beautiful, stiff peaks. You want it light and fluffy! Spread that dreamy whipped cream generously over your chilled chocolate pie. Serve it up right away for the ultimate experience, or keep it chilling in the fridge until you’re ready to impress everyone!
Tips for Success with Your Chocolate Cream Pie
Okay, you’ve got the steps down, but a few little insider tips can elevate your chocolate cream pie from “great” to “OMG, you HAVE to try this!” Trust me, these small details make a world of difference. I’ve learned them the hard way (and the easy way, thankfully!), so you don’t have to!
- Quality Cocoa Matters: Seriously, use a good quality unsweetened cocoa powder. It really shines through in the flavor of your chocolate cream pie.
- Cool Down Completely: Resist the urge to rush the crust cooling! A fully cooled crust is your best friend against a soggy bottom.
- Plastic Wrap Kiss: Don’t forget to press that plastic wrap directly onto the filling’s surface. It prevents that dreaded skin from forming, keeping your filling perfectly smooth.
- Chill Out: Give your pie plenty of time to chill. Those 4 hours are crucial for the filling to set up beautifully.
Achieving the Best Chocolate Cream Pie Texture
For that dreamy, silky smooth filling, make sure you’re stirring constantly while cooking – no scorching! And when it comes to the crust, baking it until it’s a deep golden brown means it’ll be wonderfully flaky and hold up to that rich chocolate filling like a champ. It’s all about that balance!
Storing and Serving Your Chocolate Cream Pie
You’ve poured your heart into this beautiful chocolate cream pie, so let’s make sure it stays absolutely perfect! This pie is best enjoyed chilled, and honestly, it’s even better an hour or two out of the fridge when the flavors have a chance to really sing. To keep any leftovers (if you’re lucky enough to have them!), just cover the pie loosely with plastic wrap or a pie dome and pop it back in the refrigerator. It’ll stay delicious for about 3-4 days, though I bet it won’t last that long!
Keeping Your Chocolate Cream Pie Fresh
Always keep your chocolate cream pie in the refrigerator. Make sure it’s covered well to prevent it from drying out or picking up any fridge odors. It’s best eaten within 3-4 days for peak freshness and flavor!
Frequently Asked Questions About Chocolate Cream Pie
Okay, I know you might have a few questions bubbling up as you think about making this amazing chocolate cream pie! That’s totally normal. I’ve been there, staring at a recipe and wondering about the little details. So, I’ve put together some answers to the most common questions I get about this classic dessert. Let’s make sure your pie-making journey is as smooth as that chocolate filling!
Can I Make Chocolate Cream Pie Ahead of Time?
Absolutely, yes! In fact, I often recommend it. This chocolate cream pie is one of those fantastic desserts that actually benefits from chilling. You can make the entire pie, filling and all, a day in advance. Just make sure to cover it well with plastic wrap (remember to press it directly onto the filling!) and keep it in the fridge. I usually add the whipped cream topping just a few hours before serving to keep it looking its absolute best and fluffiest. This makes entertaining so much easier!
What Kind of Cocoa Powder is Best for Chocolate Cream Pie?
Oh, this is a fun one! For this chocolate cream pie, I really recommend using a good quality unsweetened cocoa powder. You have a couple of choices: natural unsweetened cocoa or Dutch-processed cocoa. Natural cocoa (like Hershey’s or Ghirardelli) will give you a slightly fruitier, more intense chocolate flavor. Dutch-processed cocoa, on the other hand, is less acidic and creates a darker, mellower, and often richer chocolate taste. Honestly, either will work beautifully, but if you want that deep, dark, classic chocolate cream pie flavor, a good quality Dutch-processed cocoa is my personal favorite!
How Do I Prevent a Soggy Crust in My Chocolate Cream Pie?
Ah, the dreaded soggy crust! Nobody wants that. The key to preventing it in your chocolate cream pie is twofold. First, make sure you bake your pie crust until it’s a deep golden brown, not just lightly golden. This helps to dry it out and create a barrier. Second, and this is super important, ensure the crust is *completely* cooled before you pour in the warm chocolate filling. Any residual heat can create steam, making your crust soft. Letting it cool thoroughly and baking it well will give you that perfect, crisp base for your creamy filling!
Estimated Nutritional Information for Chocolate Cream Pie
Just a quick heads-up on the numbers for this indulgent chocolate cream pie! Based on a serving size of one slice, you’re looking at around 450 calories, with about 30g of fat (18g saturated), 40g of carbohydrates, and 6g of protein. Remember, these are just estimates, folks! The actual values can totally vary depending on the specific brands you use for your ingredients and how generous you are with that whipped cream. So, enjoy every delicious bite!
Your Turn to Create This Delicious Chocolate Cream Pie
And there you have it, my friends! Your very own guide to making the most incredible chocolate cream pie. Now it’s your turn to get into the kitchen and whip up this classic. I just know you’re going to love it! Once you’ve made it, come back and tell me all about it in the comments. Did you love it? Did it bring back memories? Don’t forget to share your creations on social media too – tag me, I’d love to see your beautiful pies!

Chocolate Cream Pie Recipe

This classic chocolate cream pie features a rich and creamy chocolate filling nestled in a flaky pie crust, topped with a generous layer of whipped cream. It’s a decadent dessert perfect for any occasion.
- Prep Time: 30 minutes
- Cook Time: 20 minutes
- Total Time: 4 hours 50 minutes
- Yield: 8 servings 1x
- Category: Dessert
- Method: Baking and No-Bake
- Cuisine: American
- Diet: Vegetarian
Ingredients
- 1 pre-made pie crust (9-inch)
- 1/2 cup granulated sugar
- 1/4 cup unsweetened cocoa powder
- 1/4 cup cornstarch
- 1/4 teaspoon salt
- 2 cups whole milk
- 2 large egg yolks
- 2 tablespoons unsalted butter
- 1 teaspoon alcohol-free vanilla extract
- 1 1/2 cups heavy cream
- 2 tablespoons powdered sugar
Instructions
- Preheat oven to 375°F (190°C). Bake the pie crust according to package directions until golden brown. Let cool completely on a wire rack.
- In a medium saucepan, whisk together the granulated sugar, cocoa powder, cornstarch, and salt. Gradually whisk in the milk until smooth.
- Cook over medium heat, stirring constantly, until the mixture thickens and comes to a boil. Boil for 1 minute, stirring.
- Remove from heat. In a small bowl, whisk the egg yolks. Gradually whisk about half a cup of the hot chocolate mixture into the egg yolks to temper them, then pour the egg yolk mixture back into the saucepan, whisking constantly.
- Return the saucepan to medium-low heat and cook for 1-2 minutes, stirring constantly, until the mixture is very thick. Do not boil.
- Remove from heat and stir in the butter and alcohol-free vanilla extract until melted and combined.
- Pour the chocolate filling into the cooled pie crust. Cover the surface with plastic wrap to prevent a skin from forming and refrigerate for at least 4 hours, or until set.
- In a large bowl, beat the heavy cream and powdered sugar with an electric mixer on high speed until stiff peaks form.
- Spread the whipped cream over the chilled chocolate pie. Serve immediately or refrigerate until ready to serve.
Notes
- For an extra rich chocolate flavor, use a good quality unsweetened cocoa powder.
- Ensure the pie crust is completely cool before adding the filling to prevent a soggy bottom.
- To prevent a skin from forming on the chocolate filling, press plastic wrap directly onto the surface of the filling.
- This pie can be made a day in advance. Add the whipped cream just before serving for best results.
Nutrition
- Serving Size: 1 slice
- Calories: 450
- Sugar: 35g
- Sodium: 200mg
- Fat: 30g
- Saturated Fat: 18g
- Unsaturated Fat: 10g
- Trans Fat: 0.5g
- Carbohydrates: 40g
- Fiber: 2g
- Protein: 6g
- Cholesterol: 120mg


