Oh my goodness, you guys! If you’ve never had a Nanaimo Bar, you are in for the absolute BEST treat. Seriously, these Canadian no-bake wonders are a total game-changer, and I’m practically bouncing with excitement to share my super-easy recipe with you. Forget your fancy cakes; these Nanaimo Bars are going to steal your heart with their three glorious layers of pure deliciousness!
I first stumbled upon Nanaimo Bars during a trip up north, and it was love at first bite. That crumbly chocolate-coconut base? The silky, sweet custard filling? And then, that rich, glossy chocolate topping? It’s like a symphony of textures and flavors in every single square. What I love most is how incredibly simple they are to make. No oven required! Just a little melting, mixing, and chilling, and you’ve got a dessert that looks totally impressive but is secretly a breeze. They’re perfect for holidays, potlucks, or just a Tuesday when you need a little (okay, a lot!) of extra joy. Trust me, once you make these, they’ll be on your regular rotation!
Why You’ll Love These Nanaimo Bars
Get ready to fall head over heels for these Nanaimo Bars! They’re honestly one of the easiest, most satisfying treats you can whip up. Here’s why I know you’ll adore them:
- No-Bake Bliss: Seriously, no oven needed! Just a little melting and chilling, and you’re golden.
- Flavor Explosion: That chocolate, coconut, and creamy custard combo? *Chef’s kiss!* It’s utterly divine.
- Party Perfect: They’re always a hit at gatherings, holidays, or just as a special everyday treat.
- Simple & Speedy: With minimal effort, you get maximum deliciousness.
The Irresistible Charm of Nanaimo Bars
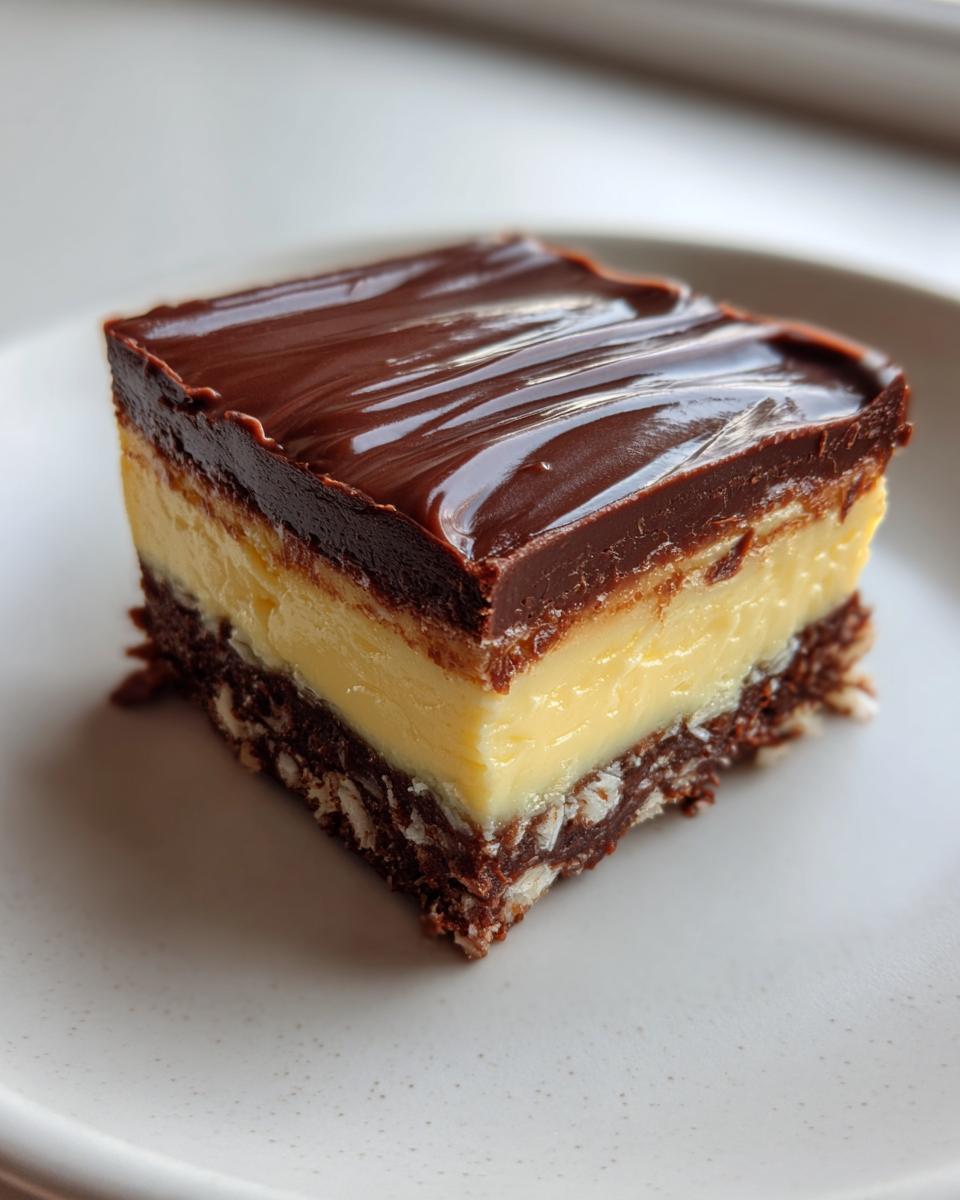
There’s just something magical about Nanaimo Bars. It’s that perfect harmony of textures – the slightly chewy, rich chocolate base, the smooth, sweet custard filling, and the satisfying snap of the chocolate ganache on top. Each bite is a little journey, a sweet escape that makes them so incredibly beloved. They just hit all the right notes!
Essential Equipment for Perfect Nanaimo Bars
Before we dive into the deliciousness, let’s make sure you’ve got all your tools ready! You won’t need anything super fancy, just a few kitchen basics to get these Nanaimo Bars just right. Having everything on hand makes the whole process so much smoother, trust me!
- 8×8 inch baking pan
- Parchment paper (with overhang!)
- Medium saucepan
- Whisk
- Medium mixing bowl
- Electric mixer (handheld or stand mixer works)
- Rubber spatula or offset spatula
- Microwave-safe bowl
Ingredients for Delicious Nanaimo Bars
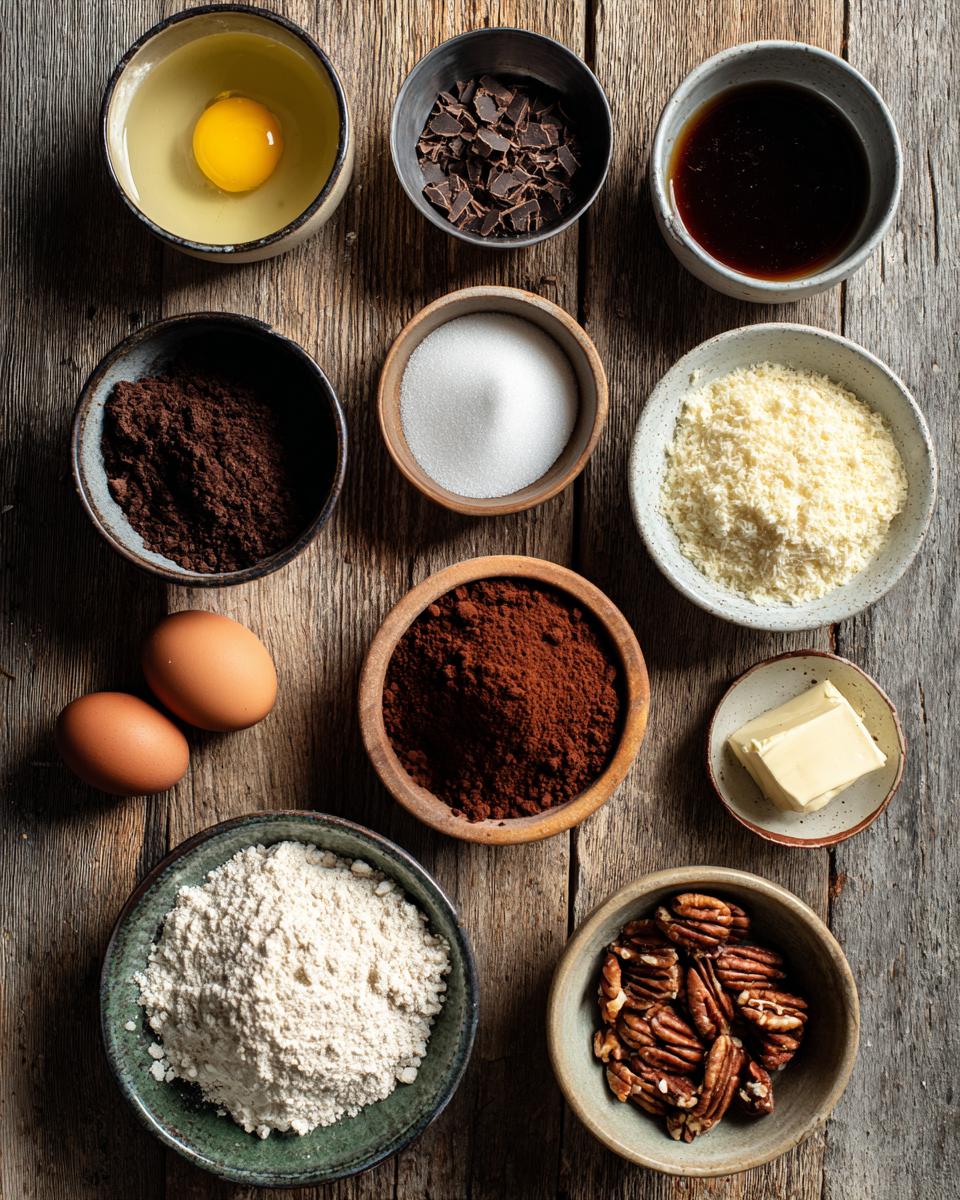
Alright, my friends, let’s talk ingredients! This is where the magic really starts to happen for our Nanaimo Bars. I’ve broken it down by layer so it’s super easy to follow. Don’t skimp on quality here; good ingredients really shine in a simple recipe like this. You’ll want to gather everything before you start mixing, it just makes life so much easier in the kitchen!
Base Ingredients for Nanaimo Bars
First up, our delightful, crumbly base! This is the foundation of our Nanaimo Bars, so make sure these are ready to go:
- 1/2 cup unsalted butter, melted
- 1/4 cup granulated sugar
- 5 tablespoons unsweetened cocoa powder
- 1 large egg, beaten
- 1 3/4 cups graham cracker crumbs
- 1 cup shredded unsweetened coconut
- 1/2 cup chopped pecans (or your favorite nut!)
Creamy Filling Ingredients for Nanaimo Bars
Now for the star of the show, in my opinion – that luscious, creamy filling! You’ll want your butter softened for this, it makes all the difference for a smooth mixture.
- 1/2 cup unsalted butter, softened
- 2 cups powdered sugar (also known as confectioners’ sugar)
- 2 tablespoons vanilla custard powder (this is key for that classic flavor!)
- 3-4 tablespoons milk (start with 3 and add more if needed for consistency)
Chocolate Topping Ingredients for Nanaimo Bars
And finally, the glorious chocolate topping that pulls it all together! For this, we’re going for a rich, smooth ganache. Good quality chocolate really makes this layer sing.
- 4 ounces semi-sweet chocolate, chopped (I like to use good baking chocolate for this)
- 2 tablespoons unsalted butter
How to Prepare Nanaimo Bars: Step-by-Step Guide
Okay, deep breaths everyone! Making Nanaimo Bars isn’t rocket science, but following these steps will get you that perfect, layered treat every single time. I’ll walk you through it, layer after delicious layer. The key here is patience, especially with the chilling times – don’t rush it, or your bars might get a little messy. Let’s get baking (without the baking, if you know what I mean!).
Crafting the Perfect Nanaimo Bars Base
First things first, line your 8×8 inch baking pan with parchment paper. Make sure you leave a nice overhang on two sides; this is your secret weapon for getting the finished bars out easily! Now, grab a medium saucepan and melt the butter, sugar, and cocoa powder over low heat. Keep whisking, okay? Once it’s all melted and happy, whisk in that beaten egg. Keep stirring for just a minute or two until it thickens up a bit – this is important for the base’s structure! Take it off the heat, then stir in your graham cracker crumbs, coconut, and pecans until everything is beautifully combined. Press this mixture firmly and evenly into your prepared pan. Now, pop it in the fridge for at least 30 minutes. Don’t skip this chilling step; it makes all the difference.
Mixing the Creamy Nanaimo Bars Filling
While your base is chilling, let’s tackle that dreamy filling! In a medium bowl, get your softened butter and beat it until it’s super creamy. I love using my electric mixer for this; it makes it so light and fluffy. Gradually, beat in the powdered sugar and that amazing vanilla custard powder until it’s all smooth and lump-free. Now, slowly add the milk, one tablespoon at a time, until your filling is perfectly spreadable. You want it thick enough to hold its shape but easy to spread. Once the base is chilled, spread this creamy goodness evenly over it. Back to the fridge it goes for another 30 minutes to firm up!
Finishing Your Nanaimo Bars with Chocolate
Almost there! The grand finale is our chocolate topping. Grab a microwave-safe bowl and combine your chopped semi-sweet chocolate and the two tablespoons of butter. Microwave it in short 30-second bursts, stirring really well after each burst, until it’s completely smooth and glossy. Don’t overheat it, or it can seize up! Once your filling has chilled nicely, pour that melted chocolate over it. Spread it out quickly and evenly – it starts to set fast! Now, the hardest part: back into the fridge for at least an hour, or until that chocolate topping is perfectly firm. When it’s ready, use those parchment paper overhangs to lift the whole slab out. Then, with a warm, sharp knife, cut your Nanaimo Bars into squares. Enjoy!
Tips for Success with Nanaimo Bars
Making these Nanaimo Bars is super fun, and with a few little tricks, you’ll have them turning out perfectly every single time! Trust me, these small details make a big difference.
- Room Temperature Matters: For the creamiest filling, make sure your butter is truly softened to room temperature. It helps everything blend beautifully without lumps.
- Quality Chocolate, Happy You: Invest in good quality semi-sweet chocolate for the topping. It melts smoother, looks shinier, and tastes so much better!
- The Hot Knife Trick: Want super neat cuts? Dip a sharp knife in hot water and wipe it dry between each slice. This keeps the chocolate topping from cracking and gives you those picture-perfect squares.
- Chill, Chill, Chill: Don’t rush the refrigeration steps! Each layer needs to be firm before you add the next. It prevents everything from squishing together and helps the bars set properly.
- Storing Your Goodies: Nanaimo Bars are happiest in an airtight container in the fridge for up to 5 days. If you’re feeling ambitious, they also freeze beautifully for up to 2 months. Just thaw them in the fridge before serving!
Frequently Asked Questions About Nanaimo Bars
Okay, so you’ve got the recipe, you’ve got the enthusiasm, but maybe a few questions are still swirling around in your head about these amazing Nanaimo Bars. Don’t worry, I’ve got you! Here are some of the most common questions I get, and my best answers to help you out.
Can I Make Nanaimo Bars Ahead of Time?
Absolutely, yes! Nanaimo Bars are fantastic for making ahead. In fact, I often think they taste even better the next day once all those flavors really get a chance to meld together. Just store them in an airtight container in the refrigerator for up to 5 days, and they’ll be perfect for when you need them.
What are Common Substitutions for Nanaimo Bars?
You can totally play around with these Nanaimo Bars! If pecans aren’t your thing, feel free to swap them for chopped walnuts or even skip them entirely. For the chocolate topping, if semi-sweet isn’t your jam, milk chocolate or even dark chocolate works beautifully, just make sure it’s good quality. You can even try different extracts in the filling instead of just vanilla, like a little almond or mint for a fun twist!
How Do I Get Clean Cuts on My Nanaimo Bars?
This is a super common question, and there’s a trick! For those perfectly neat Nanaimo Bar squares, grab a sharp knife and run it under hot water, then wipe it completely dry. Make your cut, then repeat the hot water and wipe-dry step for each new cut. This prevents the chocolate topping from cracking and gives you those beautiful, clean lines every single time!
Estimated Nutritional Information for Nanaimo Bars
I know some of you like to keep an eye on the numbers, so here’s an estimated nutritional breakdown for one Nanaimo Bar. Please remember, these are just estimates and can vary depending on the exact ingredients and brands you use. Think of it as a helpful guide, not a strict rule! After all, these are treats, and sometimes, you just gotta indulge a little, right?
- Serving Size: 1 bar
- Calories: 350
- Sugar: 35g
- Sodium: 120mg
- Fat: 25g
- Saturated Fat: 15g
- Unsaturated Fat: 8g
- Trans Fat: 0.5g
- Carbohydrates: 35g
- Fiber: 2g
- Protein: 3g
- Cholesterol: 45mg
Your Nanaimo Bars Journey
And there you have it, my friends! Your very own batch of glorious Nanaimo Bars. I’m so excited for you to try these! Once you’ve whipped up your own, I’d absolutely LOVE to hear about it. Did you make any fun substitutions? What’s your favorite part? Leave a comment below, rate the recipe, or even better, snap a pic and share it on social media! Don’t forget to tag me so I can see your delicious creations!
PrintClassic No-Bake Nanaimo Bars
Nanaimo bars are a classic no-bake Canadian dessert with a crumbly chocolate coconut base, creamy custard filling, and a rich chocolate ganache topping. They are simple to make and a popular treat for any occasion.
- Prep Time: 30 minutes
- Cook Time: 5 minutes
- Total Time: 2 hours
- Yield: 16 servings 1x
- Category: Dessert
- Method: No-Bake
- Cuisine: Canadian
- Diet: Vegetarian
Ingredients
- 1/2 cup unsalted butter, melted
- 1/4 cup granulated sugar
- 5 tablespoons unsweetened cocoa powder
- 1 large egg, beaten
- 1 3/4 cups graham cracker crumbs
- 1 cup shredded unsweetened coconut
- 1/2 cup chopped pecans
- 1/2 cup unsalted butter, softened
- 2 cups powdered sugar
- 2 tablespoons vanilla custard powder
- 3–4 tablespoons milk
- 4 ounces semi-sweet chocolate, chopped
- 2 tablespoons unsalted butter
Instructions
- Line an 8×8 inch baking pan with parchment paper, leaving an overhang on two sides.
- For the base: In a medium saucepan over low heat, melt 1/2 cup butter, sugar, and cocoa powder. Whisk in the beaten egg and cook for 1-2 minutes, stirring constantly, until the mixture thickens slightly.
- Remove from heat and stir in the graham cracker crumbs, coconut, and pecans until well combined.
- Press the mixture evenly into the prepared pan. Refrigerate for at least 30 minutes to set.
- For the filling: In a medium bowl, beat 1/2 cup softened butter until creamy. Gradually beat in the powdered sugar and custard powder until smooth. Add milk, 1 tablespoon at a time, until the filling reaches a spreadable consistency.
- Spread the filling evenly over the chilled base. Refrigerate for another 30 minutes.
- For the topping: In a microwave-safe bowl, melt the chopped chocolate and 2 tablespoons butter in 30-second intervals, stirring until smooth.
- Pour the melted chocolate over the chilled filling and spread evenly.
- Refrigerate for at least 1 hour, or until the chocolate topping is firm.
- Once set, lift the bars from the pan using the parchment paper overhang. Cut into squares and serve.
Notes
- Ensure all ingredients are at room temperature for best results, especially the butter for the filling.
- Use good quality chocolate for the topping for a smooth and shiny finish.
- For easier cutting, dip a sharp knife in hot water and wipe it clean between each cut.
- Nanaimo bars can be stored in an airtight container in the refrigerator for up to 5 days or frozen for up to 2 months.
Nutrition
- Serving Size: 1 bar
- Calories: 350
- Sugar: 35g
- Sodium: 120mg
- Fat: 25g
- Saturated Fat: 15g
- Unsaturated Fat: 8g
- Trans Fat: 0.5g
- Carbohydrates: 35g
- Fiber: 2g
- Protein: 3g
- Cholesterol: 45mg


