You know those moments when dessert just needs to be fun? That’s exactly what inspired these Strawberry Crunch Cheesecake Tacos – my latest kitchen experiment turned family favorite. I was tinkering with ways to jazz up classic cheesecake when my niece challenged me to make something “you can eat with your hands.” Boom – dessert tacos were born!
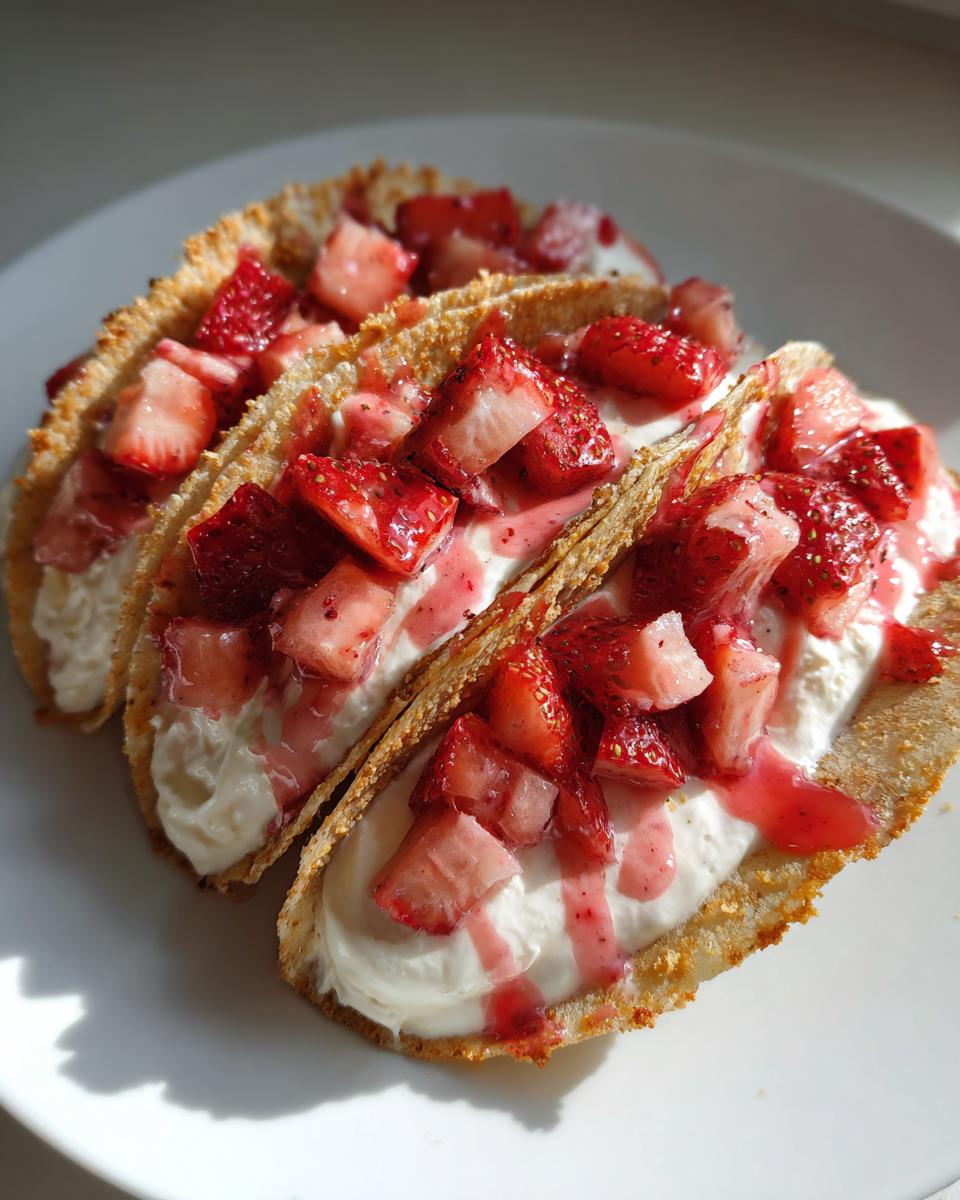
Imagine this: crispy baked tortilla shells hugging a cloud of creamy cheesecake filling, all topped with juicy strawberries and that irresistible golden crumble. It’s the perfect mashup of textures – the crunch gives way to smooth perfection in every bite. After years of creating desserts for birthdays and potlucks, I can tell you these disappear faster than you can say “seconds please!”
What I love most is how these tacos turn any ordinary day into a celebration. They’re playful enough for kids yet sophisticated enough for dinner parties. The strawberry crunch topping? Pure magic – it adds that nostalgic ice cream truck flavor we all adore. Trust me, once you try this sweet twist on tacos, you’ll never look at dessert the same way again.
Why You’ll Love These Strawberry Crunch Cheesecake Tacos
Let me tell you why these tacos became my go-to dessert – they’re pure joy in every bite! Here’s what makes them special:
- Ready in a flash: From mixing bowl to table in 20 minutes flat – perfect for last-minute sweet cravings
- Texture heaven: That magical combo of crispy shell, velvety filling, and crunchy topping will make your taste buds dance
- Endless fun: Swap strawberries for blueberries, add chocolate chips, or drizzle caramel – make them your own!
- Party hit: I’ve never brought these to a gathering without someone begging for the recipe
Seriously, these tacos are like edible happiness – sweet, playful, and impossible to resist!
Ingredients for Strawberry Crunch Cheesecake Tacos
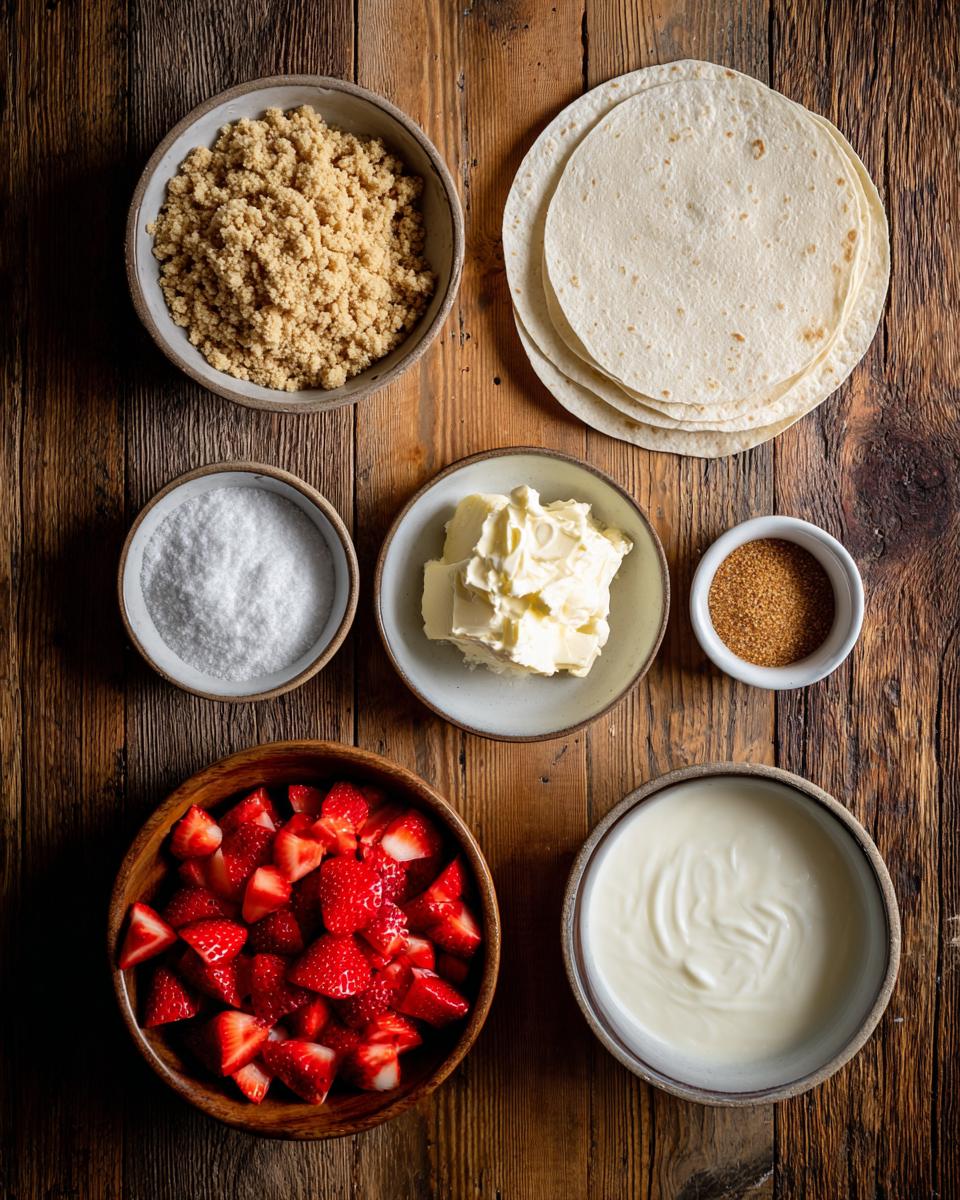
Let’s gather everything you’ll need to make these sweet treats. I’ve grouped the ingredients logically so you can prep like a pro:
- For the crust:
- 1 cup graham cracker crumbs (trust me, the sweetness is perfect)
- 1/4 cup melted butter (salted or unsalted works, but I prefer salted for that extra oomph)
- For the cheesecake filling:
- 8 oz cream cheese, softened (let it sit out for 30 minutes – it’ll make your life so much easier)
- 1/4 cup sugar (granulated works best here)
- 1 tsp vanilla extract (pure, please – it makes all the difference)
- 1/2 cup heavy cream (chill it first for the best whip)
- For the toppings:
- 1 cup fresh strawberries, diced (go for the juiciest ones you can find!)
- 1/4 cup strawberry syrup (store-bought or homemade – both work beautifully)
- For the shells:
- 4 small flour tortillas (6-inch size is perfect – not too big, not too small)
That’s it! Simple, fresh, and totally doable. Now let’s talk swaps in case you need to mix things up.
Ingredient Substitutions
Don’t stress if you’re missing something – I’ve got you covered with some easy swaps:
- Gluten-free? Use gluten-free graham crackers for the crust. They work just as well!
- Dairy-free? Swap the cream cheese for a vegan alternative and use coconut cream instead of heavy cream. It’s just as dreamy.
- Not a strawberry fan? Try raspberries or even mango for a tropical twist. The syrup can be swapped with any fruit syrup you love.
See? Totally flexible. Now let’s get baking!
How to Make Strawberry Crunch Cheesecake Tacos
Ready to make the most fun dessert ever? Let’s dive in step by step – it’s easier than you think!
- Preheat your oven to 350°F. While it heats up, grab your tortillas and get ready to shape them.
- Mix the crust: In a bowl, combine graham cracker crumbs and melted butter until they look like wet sand. Press this mixture firmly into the bottom of your taco shells – this gives them that extra crunch!
- Bake the shells: Pop them in the oven for 5 minutes, then let them cool completely. Trust me, this step makes all the difference for that perfect texture.
- Make the filling: Beat the softened cream cheese, sugar, and vanilla until smooth and creamy. In another bowl, whip the heavy cream until stiff peaks form. Gently fold the whipped cream into the cream cheese mixture – this keeps it light and fluffy.
- Fill the shells: Once the shells are cool, spoon the cheesecake mixture into each one. Don’t overfill – leave a little room for toppings!
- Add the toppings: Sprinkle diced strawberries over the filling, then drizzle with strawberry syrup. For extra crunch, add a sprinkle of extra graham cracker crumbs.
- Serve or chill: These tacos are best served immediately, but you can chill them for up to an hour before serving if needed. Just don’t wait too long – the shells stay crispiest when fresh!
Shaping the Taco Shells
Here’s my foolproof method for shaping the perfect taco shells:
First, drape each tortilla over two bars of your oven rack so they form a taco shape. If you’re worried about them slipping, you can mold them over a foil-covered wooden spoon handle or even a clean, rolled-up kitchen towel. Bake them for 5 minutes at 350°F, and they’ll hold their shape beautifully. Just let them cool completely before filling – this keeps them crisp and sturdy!
Perfecting the Cheesecake Filling
The secret to that dreamy filling? Two things: room-temperature cream cheese and perfectly whipped cream.
Take your cream cheese out of the fridge at least 30 minutes before you start. When it’s soft, it blends smoothly with no lumps. For the whipped cream, make sure your heavy cream is cold (I even chill the bowl and whisk for extra stability). Whip it until stiff peaks form – that means when you lift the whisk, the cream stands up straight without drooping. Fold it gently into the cream cheese mixture to keep it light and airy. This combo is what makes the filling so irresistible!
Tips for the Best Strawberry Crunch Cheesecake Tacos
After making these tacos more times than I can count (hey, quality control is important!), I’ve picked up some game-changing tricks that’ll make yours absolutely perfect:
- Chill the filling first: If you’ve got a few extra minutes, pop your cheesecake mixture in the fridge for 15-20 minutes before filling the shells. It firms up beautifully and won’t ooze out when you take that first glorious bite.
- Serve ’em fresh: These babies are best enjoyed right after assembly – that’s when the shells are at their crispiest. I learned this the hard way when I left a test batch sitting too long… sad, soggy tacos are no fun!
- Dry those berries: After dicing your strawberries, give them a gentle pat with paper towels. That little extra step prevents juice from making your shells soggy. My niece calls this the “no-wet-taco rule” – wise words!
- Double the crunch: For serious texture lovers (like me!), sprinkle extra graham cracker crumbs on top after adding the strawberries. That extra golden crunch takes these from great to “oh-my-gosh-give-me-the-recipe-now” status.
Follow these simple tips, and you’ll have dessert tacos that look AND taste like they came from a professional bakery. Just try not to eat them all yourself – I can’t promise I always succeed at that part!
Serving and Storage
Now here’s the tricky part – trying not to eat all these tacos in one sitting! But if you do need to store them (or hide them from sneaky family members), here’s how to keep them tasting fresh:
Best way to serve: These tacos are absolute perfection when served immediately after assembly. The shells stay crispy, the filling stays fluffy, and the strawberries stay juicy – it’s the trifecta of dessert happiness. I like to arrange them on a platter with extra strawberry syrup drizzled in fun zigzags. So pretty!
Storing leftovers (if you have any!): Keep unfilled shells and the cheesecake mixture separate in airtight containers. The shells stay fresh at room temp for 2 days, while the filling keeps in the fridge for 3-4 days. When ready to serve, just crisp up the shells (see below) and assemble fresh.
Reviving day-old shells: If your shells lose their crunch, no worries! Pop them in a 300°F oven for 5 minutes – they’ll crisp right back up. I do this all the time when prepping for parties. Just watch them closely – they go from perfect to overdone in a flash!
One last pro tip: If you’re taking these to a potluck, pack everything separately and assemble on-site. That way everyone gets that magical first-bite crunch that makes these tacos so special. Trust me, you’ll be the dessert hero of any gathering!
Strawberry Crunch Cheesecake Tacos Nutritional Info
Okay, let’s talk numbers – but don’t let this scare you away from enjoying every delicious bite! Here’s the breakdown per taco (because let’s be real, no one’s stopping at just one):
- Calories: About 320 per taco – totally worth it for that creamy-crunchy joy
- Fat: 22g (mostly from the cream cheese and butter – the good stuff!)
- Carbs: 28g (hello, graham cracker goodness)
- Sugar: 18g (mostly from the strawberries and syrup – nature’s candy!)
Important note: These are estimates based on my exact ingredients. Your numbers might vary slightly depending on your brands or substitutions. Using low-fat cream cheese or sugar alternatives? The counts will change – but the flavor will still be amazing!
I like to think of these as “happy calories” – every bite delivers pure dessert bliss. And hey, there’s fruit in there – that counts for something, right? *wink*
FAQ About Strawberry Crunch Cheesecake Tacos
Got questions? I’ve got answers! Here are the most common things people ask me about these dreamy dessert tacos:
Can I make these ahead?
Absolutely! The shells and filling can be prepped separately a day in advance. Just store the shells in an airtight container at room temp, and keep the filling in the fridge. Assemble right before serving to keep everything crisp and fresh. Perfect for parties when you want to minimize last-minute stress!
Can I use frozen strawberries?
You bet! Frozen strawberries work great, but here’s the trick: thaw them completely and drain off any extra liquid. I usually pat them dry with a paper towel too. This prevents your tacos from getting soggy. Pro tip: if you’re in a pinch, you can even use frozen berries straight from the bag – just dice them while they’re still slightly frozen!
How do I prevent soggy shells?
The key is letting the baked shells cool completely before filling them. I know it’s tempting to rush, but trust me – patience pays off! Also, pat your strawberries dry (fresh or thawed) to remove excess moisture. And if you’re not serving immediately, store the shells and filling separately. These little steps make all the difference in keeping that perfect crunch!
Remember, there’s no such thing as a silly question when it comes to dessert – especially one as fun as this! If you’ve got more questions, just ask. I’m always happy to help you create taco magic!
Share Your Creation!
Okay, confession time – I literally squeal with joy every time someone sends me photos of their Strawberry Crunch Cheesecake Tacos! There’s something magical about seeing how you all put your own spin on this recipe. Did you add chocolate drizzle? Swap in blueberries? Maybe even try a savory-sweet version with balsamic glaze? (Yes please!)
Here’s how we can keep the dessert taco party going:
- Tag me on Instagram @YourDessertBestie – I repost my favorite creations every Friday (and let’s be honest, I end up craving tacos all over again!)
- Leave a star rating below – Your feedback helps other sweet-toothed friends know what to expect
- Comment with your twists – I read every single one and often steal your brilliant ideas for my next batch!
Seriously, nothing makes my day more than seeing your kitchen adventures. Whether it’s your first time making these or you’ve perfected your own signature version, we want to celebrate your dessert taco masterpiece! Now go forth and taco ’bout how amazing these are with all your friends – the more the merrier!
PrintStrawberry Crunch Cheesecake Tacos

A fun and delicious dessert combining the creamy texture of cheesecake with the crispiness of taco shells, topped with strawberry crunch.
- Prep Time: 15 minutes
- Cook Time: 5 minutes
- Total Time: 20 minutes
- Yield: 4 tacos 1x
- Category: Dessert
- Method: Baking
- Cuisine: Fusion
- Diet: Vegetarian
Ingredients
- 1 cup graham cracker crumbs
- 1/4 cup melted butter
- 8 oz cream cheese, softened
- 1/4 cup sugar
- 1 tsp vanilla extract
- 1/2 cup heavy cream
- 1 cup fresh strawberries, diced
- 4 small flour tortillas
- 1/4 cup strawberry syrup
Instructions
- Preheat oven to 350°F.
- Mix graham cracker crumbs and melted butter. Press into taco shells.
- Bake for 5 minutes, then let cool.
- Beat cream cheese, sugar, and vanilla until smooth.
- Whip heavy cream until stiff peaks form, then fold into cream cheese mixture.
- Fill taco shells with the cheesecake mixture.
- Top with diced strawberries and drizzle with strawberry syrup.
- Serve immediately or chill before serving.
Notes
- Use mini tortillas for bite-sized tacos.
- Swap strawberries for other berries if preferred.
- Add chocolate drizzle for extra flavor.
Nutrition
- Serving Size: 1 taco
- Calories: 320
- Sugar: 18g
- Sodium: 220mg
- Fat: 22g
- Saturated Fat: 12g
- Unsaturated Fat: 8g
- Trans Fat: 0g
- Carbohydrates: 28g
- Fiber: 1g
- Protein: 4g
- Cholesterol: 65mg


